Intro to Scratch
| Lesson | Description | Link |
|---|---|---|
| What is Scratch? | Explains what Scratch is and who Scratch is designed for! | View |
| Creating a Scratch Project | Explains how to access Scratch and how to begin a project | View |
| Using the Scratch Editor | Describes the components of the scratch editor and how to use them. | View |
| Using Motion Blocks | Teaches the X and Y axis and how to use Scratch's motion blocks | View |
| Using Event Blocks | Teaches about how to use event blocks and tie code into key presses. | View |
| Variables, Operators, and If Statements | Defines variables and teaches about if statements and operators. | View |
| Adding Sound | Teaches how to add sounds to your code. | View |
| Adding Backdrops | Teaches how to add backdrops to your stage and switch between them | View |
| Changing Costumes & Forever Blocks | Teaches how to change your sprite's costumes and how to use forever blocks. | View |
| Adding and Removing Sprites | Teaches how to add or remove sprites (objects and characters), as well as how to stop other scripts. | View |
| Custom Variables & Keeping Score | Teaches how to add, display, and modify your own custom variables. | View |
| User Input & Join Statements | Teaches how to customize your game with user input! | View |
| Saving and Sharing Your Project | Teaches how to save your project, share your project, and create an account. | View |
What is Scratch?
Scratch is a free coding language designed for ages 8-16. It teaches the basics of programming logic that will aid you in any coding you want to do, in a format that is visual and easy to understand! With this tool, you can create video games, interactive animations, and more.
Creating a Scratch Project
To access Scratch, all you have to do is go to the Scratch website from any computer: https://scratch.mit.edu/
Once on the main scratch website, click "Create" in the upper left to start a new project.
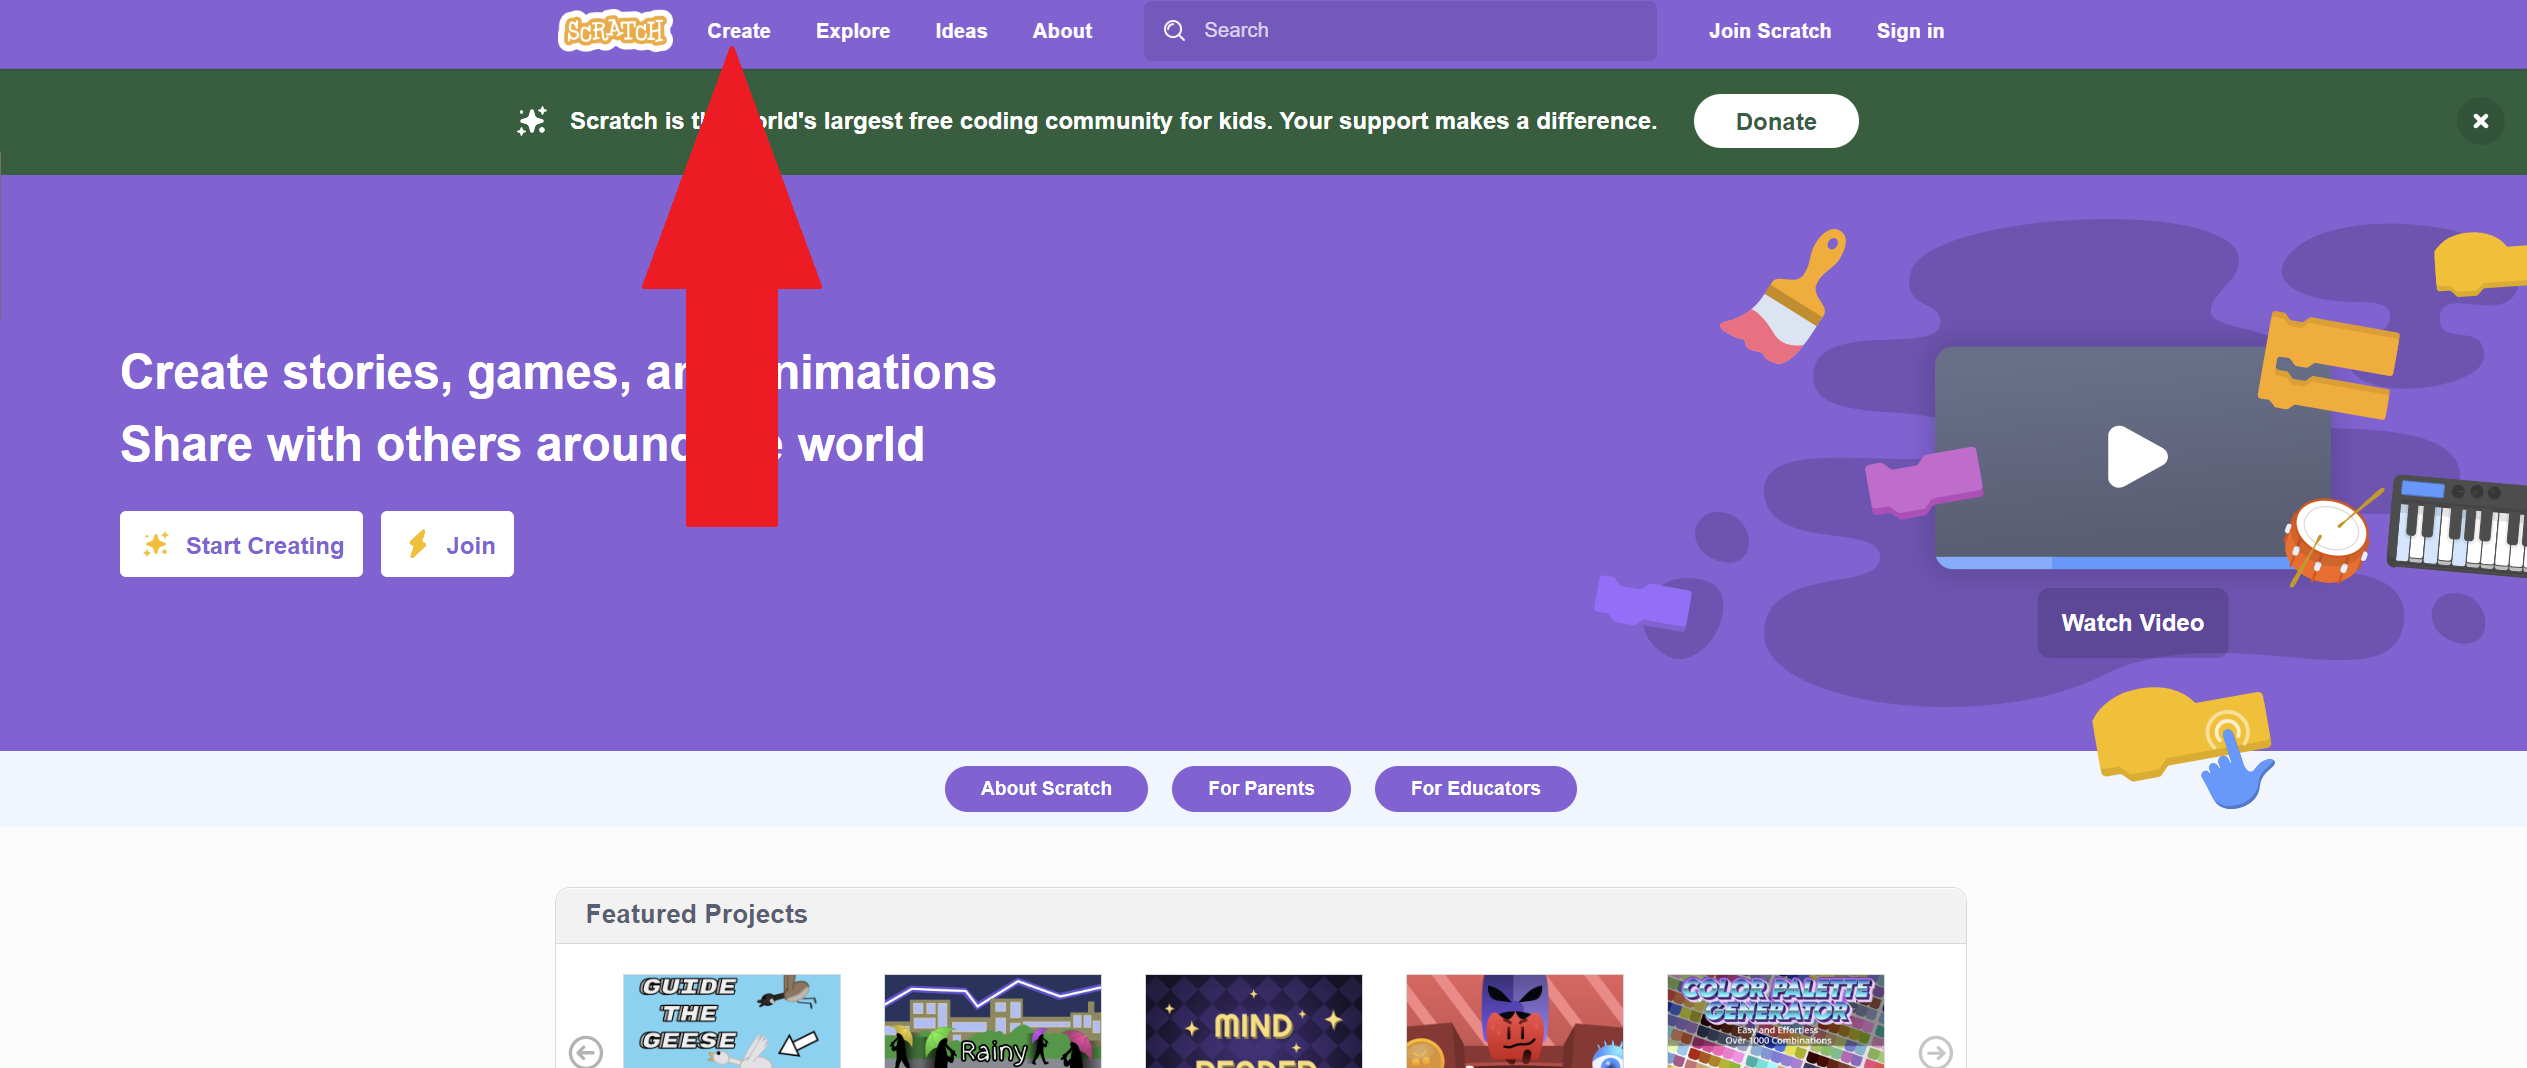
After you click create, you will be taken to the Scratch Editor. This is where you'll create and edit your projects. Next, we'll teach you how to use it!
Using the Scratch Editor
The Scratch Editor is made up of four components: the block palette, the code area, the stage, and the sprite pane.
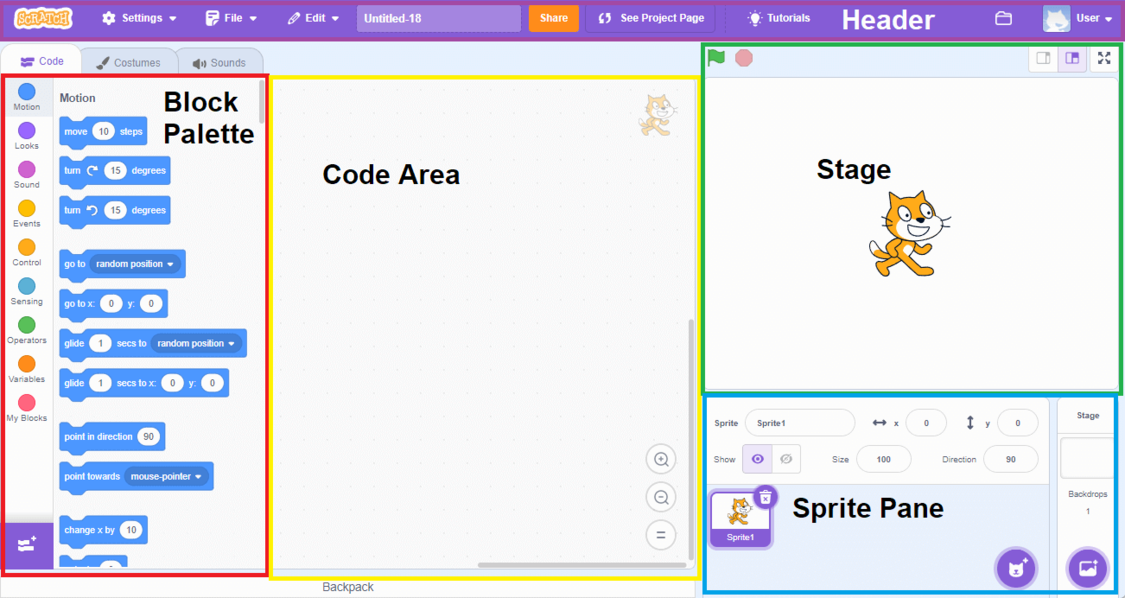
Source: https://en.scratch-wiki.info/wiki/User_Interface
The stage, in the upper right, is where you will see the results of your code. In a new project, it automatically has one sprite, an orange cat named Scratch cat. A sprite can be any object or character that you can program to do things!
Beneath the stage is the sprite pane, where you can add new sprites. Since we already have a sprite to begin with, we don't have to worry about that section right away!
The left is the block palette, which has a list of all the blocks available to use for coding. Each block is a piece of code. You can click any block in the block palette to see what effect it will have on the sprite, if any. In the block palette, try clicking the "move 10 steps" block. You'll see your sprite move a little to the right on the stage each time you click it.

Each block is sorted into categories by color. You can jump to the category by clicking the color on the left, or you can just scroll through the block palette to find exactly what you're looking for. We'll be going through a lot of the commonly used blocks later in this lesson.
Finally, we have the code editor, where we actually put our blocks together! Blocks are designed so that they can fit together, kind of like fitting together two legos. When two or more blocks are fit together, all of the blocks' actions will occur when any one of them are clicked!
Let's try putting some code together. First, click and drag the "Move 10 Steps" to the code editor, dropping it wherever you want. Then, click the dark purple "Looks" category on the left or scroll down in the block palette until you see "Say Hello for 2 Seconds". Drag this block to the code editor as well, placing it right under the "Move 10 Steps" block. Only let go when you see a dark grey rectangle under "Move 10 Steps". This is telling you if you let go, the two blocks will link together.
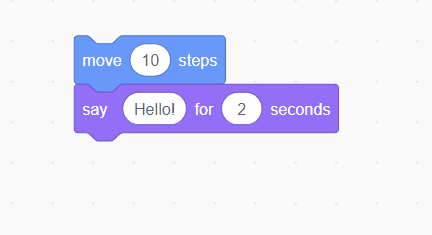
Now click either of the two blocks in your code editor. In the stage, your sprite will both move 10 steps and there will be a speech bubble that says "Hello!", even though you only clicked one! Note that this is only a speech bubble, and you won't hear any sound. You can put together as many blocks as you like in the code editor, so that many things can happen with just one click.
Next, we'll learn all about using the different motion blocks.
Using Motion Blocks
The motion blocks are all colored blue, and they are used to make your sprite move around the stage to different locations. To understand many of these blocks, we first have to understand the x and y axis.
Whenever we are working in a 2-dimensional space, such as on a computer screen, there are two things we need to track to figure out where something is. The first is where it is on the screen horizontally (left and right) and where it is on the screen vertically (up and down). We use numbers to represent this, calling the horizontal number "X" and the vertical number "Y". If the object is in the middle, X and Y will both be 0. If you move it to the left, X will become more negative. If you move it to the right, X will become more positive. If you move it down, Y will become more negative. If you move it up, Y will become more positive.
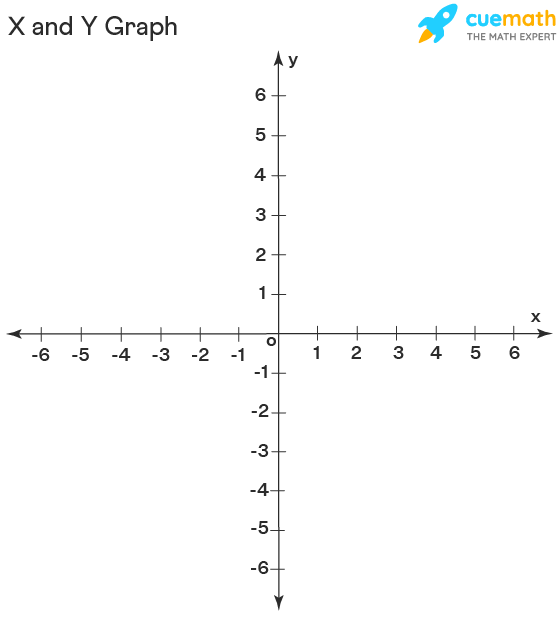
Source: https://www.cuemath.com/geometry/x-and-y-axis/
Scratch shows the X and Y position of your sprite in the sprite pane. Your sprite will start exactly in the middle of the stage, so X and Y are both set to 0 when you first open the page. Because we clicked "Move 10 Steps" a few times, your X will be bigger than 0, because your sprite has been moved to the right!
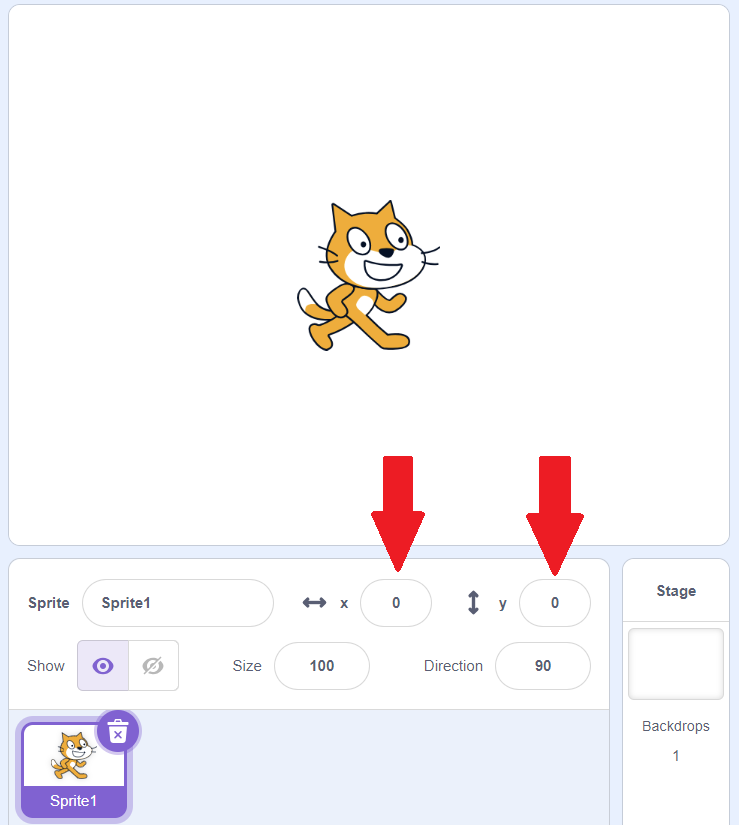
Click on your sprite and drag him so that he is on the left half of the stage. When you let go, the X and Y numbers in the sprite pane will change. The x will become a negative number. If you did not accidentally move the sprite up or down at all while moving him, the y number will remain 0.
We can also change the sprite's position by typing directly in the boxes. In the Y box, type 100, and then click off of the box. Your sprite will move up!
Now that we understand what x and y mean in scratch, we can use a lot of the motion blocks that refer to X and Y! We'll only be going over a few of them in this basic course, but feel free to experiment with the rest.
Earlier, we tried the "move 10 steps" block. Drag both that block, and the block that says "change x by 10" to the code area. Try clicking them both, and you'll see that they do the same thing. The "move 10 steps" is just easier to understand language if you don't understand "x".

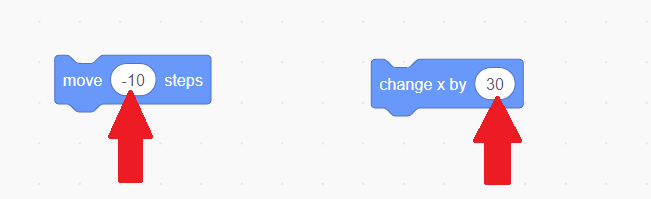
We can edit the part of the code block that is white to change how much the sprite moves to the right or to make the sprite move to the left! Click the white area where it says "10" in our "move 10 steps" block, and then type in "-10". By using a negative number, the sprite will move left. Do the same in the "change x by" box, but change it to 30. This will create a bigger change to the right. You can change these numbers to be whatever you want!
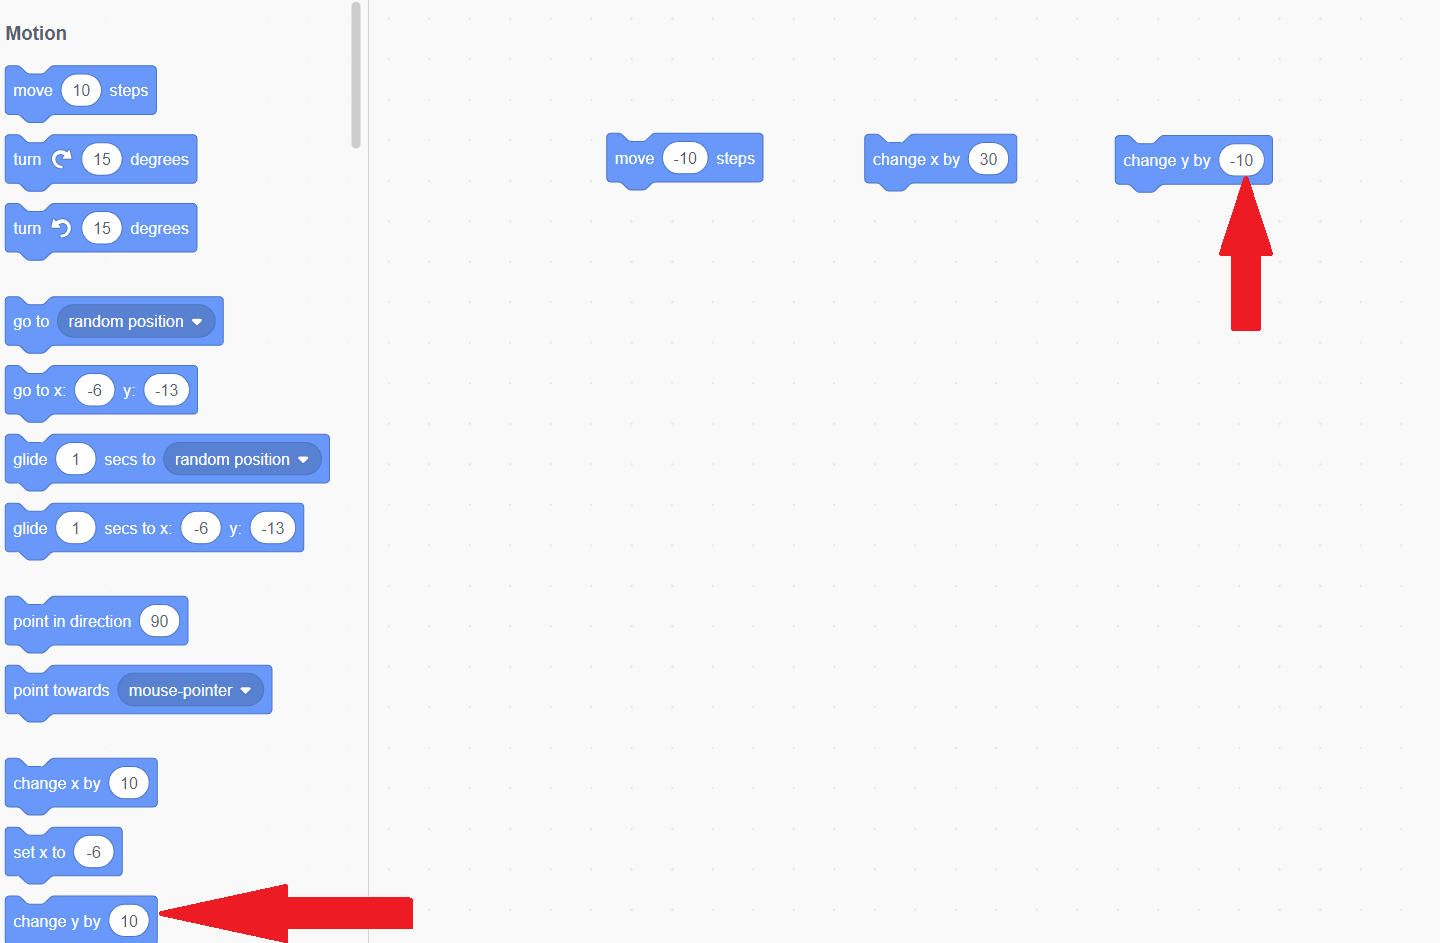
The move steps block will only let us change the x position, or change where the sprite is to the left or the right. To change where the sprite is up or down, we have to use the "change y by 10" block. Just like with the x blocks, this number can be edited. If you want to move down, use a negative number.
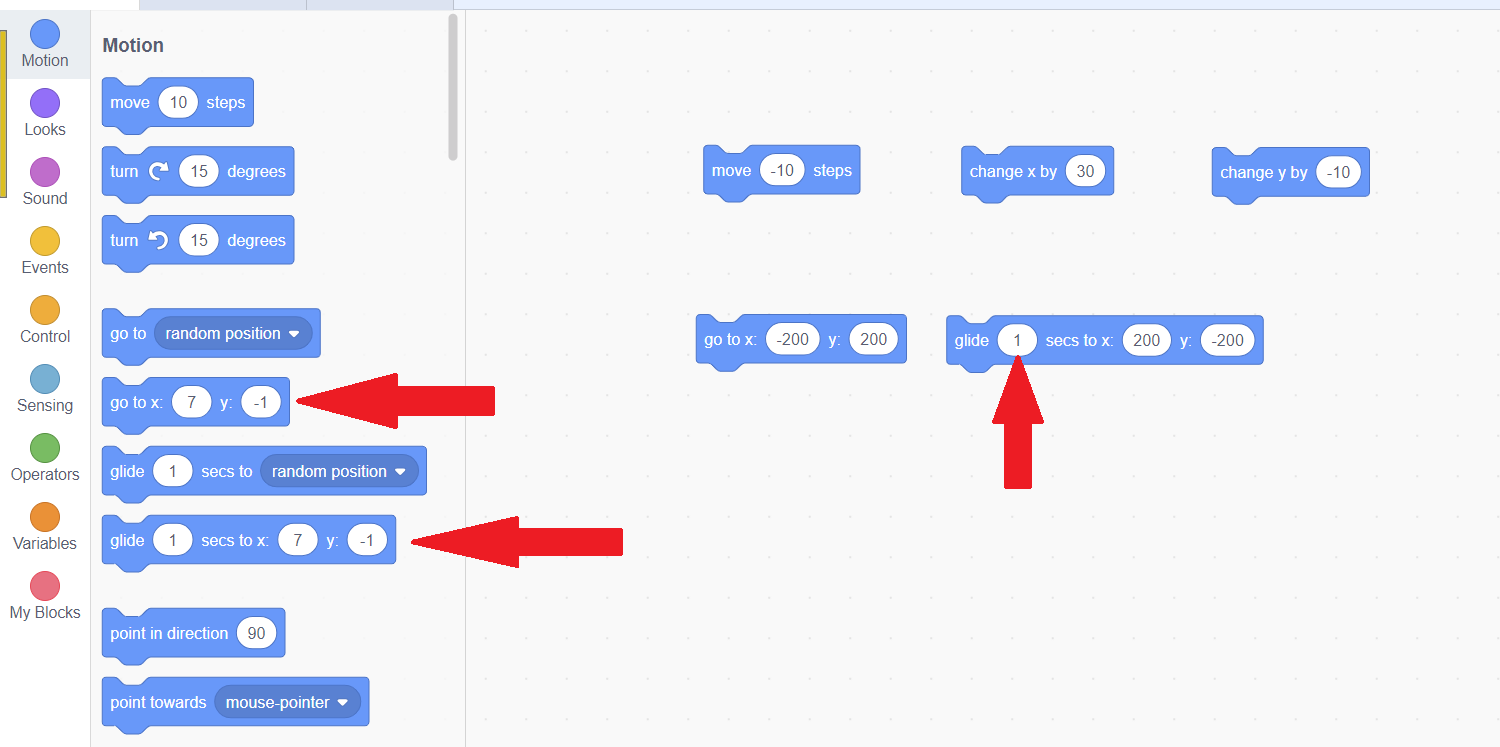
Instead of just changing the x and y position, you can also move the sprite to a specific position. There are two options for doing this, "go to" and "glide". Try both, and change the x and y values. Give the "go to" and "glide" boxes different x and y values from each other so you can alternate clicking between them to see how it works. If you leave them the same, you won't see your sprite move! With "go to", the sprite will appear in that location right away. With "glide", the sprite will visibly move to that location. If you set glide to a small value, such as "1 second", the sprite will move fast. If you set glide to a large value, such as "5 seconds", the sprite will move slowly. Try changing the glide value to affect the speed!
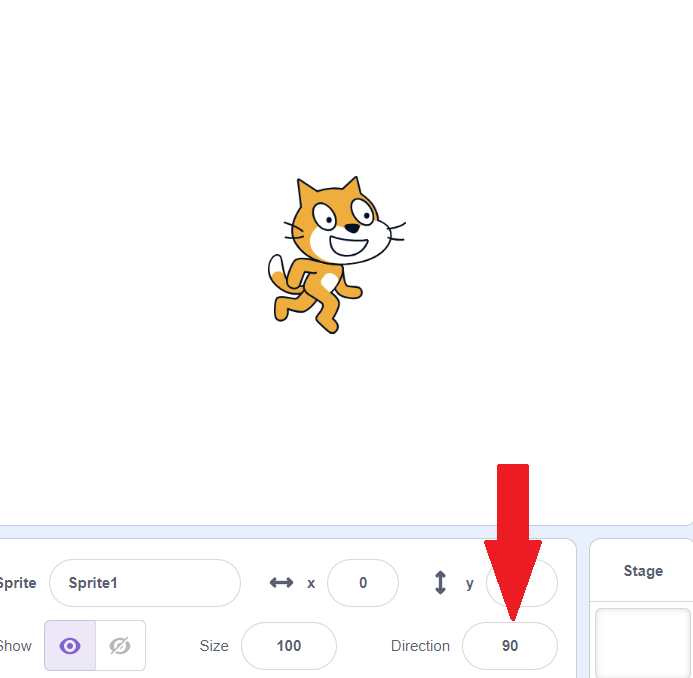
In the motion blocks, we are also able to turn the sprite! To understand turning, we must first understand direction. This determines the way the sprite is facing. You can see the direction underneath the y position in the sprite pane. It defaults to 90. This is based on degrees. A circle has 360 degrees. 0 Degrees is the top of the circle, or facing up. 90 degreees is facing right (1/4 of 360). 180 degrees (1/2 of 360) is facing down. Scratch then uses negative numbers for facing the other way, so facing left is -90 degrees. Because the direction field rotates the sprite, he'll be upside-down when facing left! We'll fix that later.
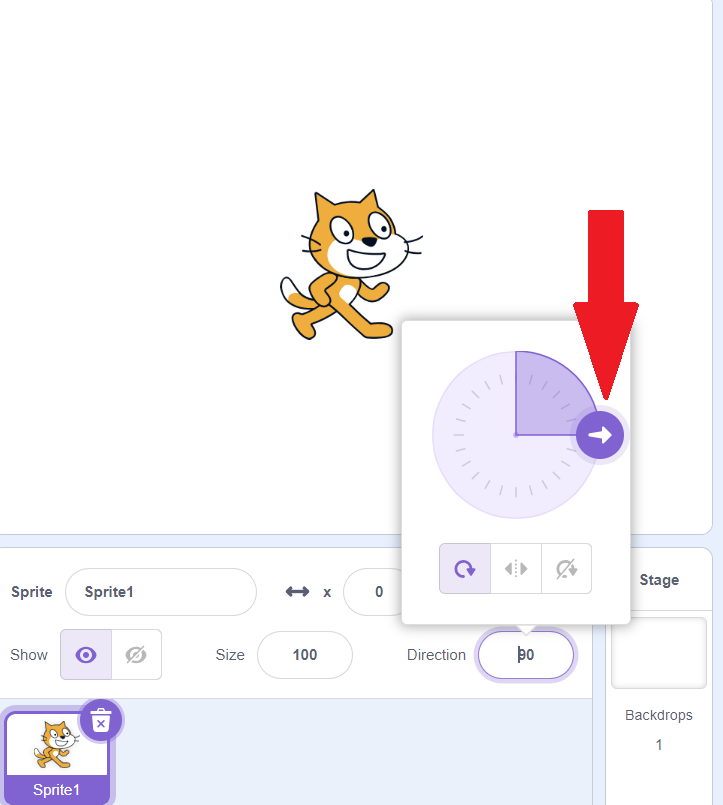
Try clicking the number next to direction to edit it. A circle will pop up. You can type in a number manually, or click and drag the big purple arrow on the circle to change the direction.
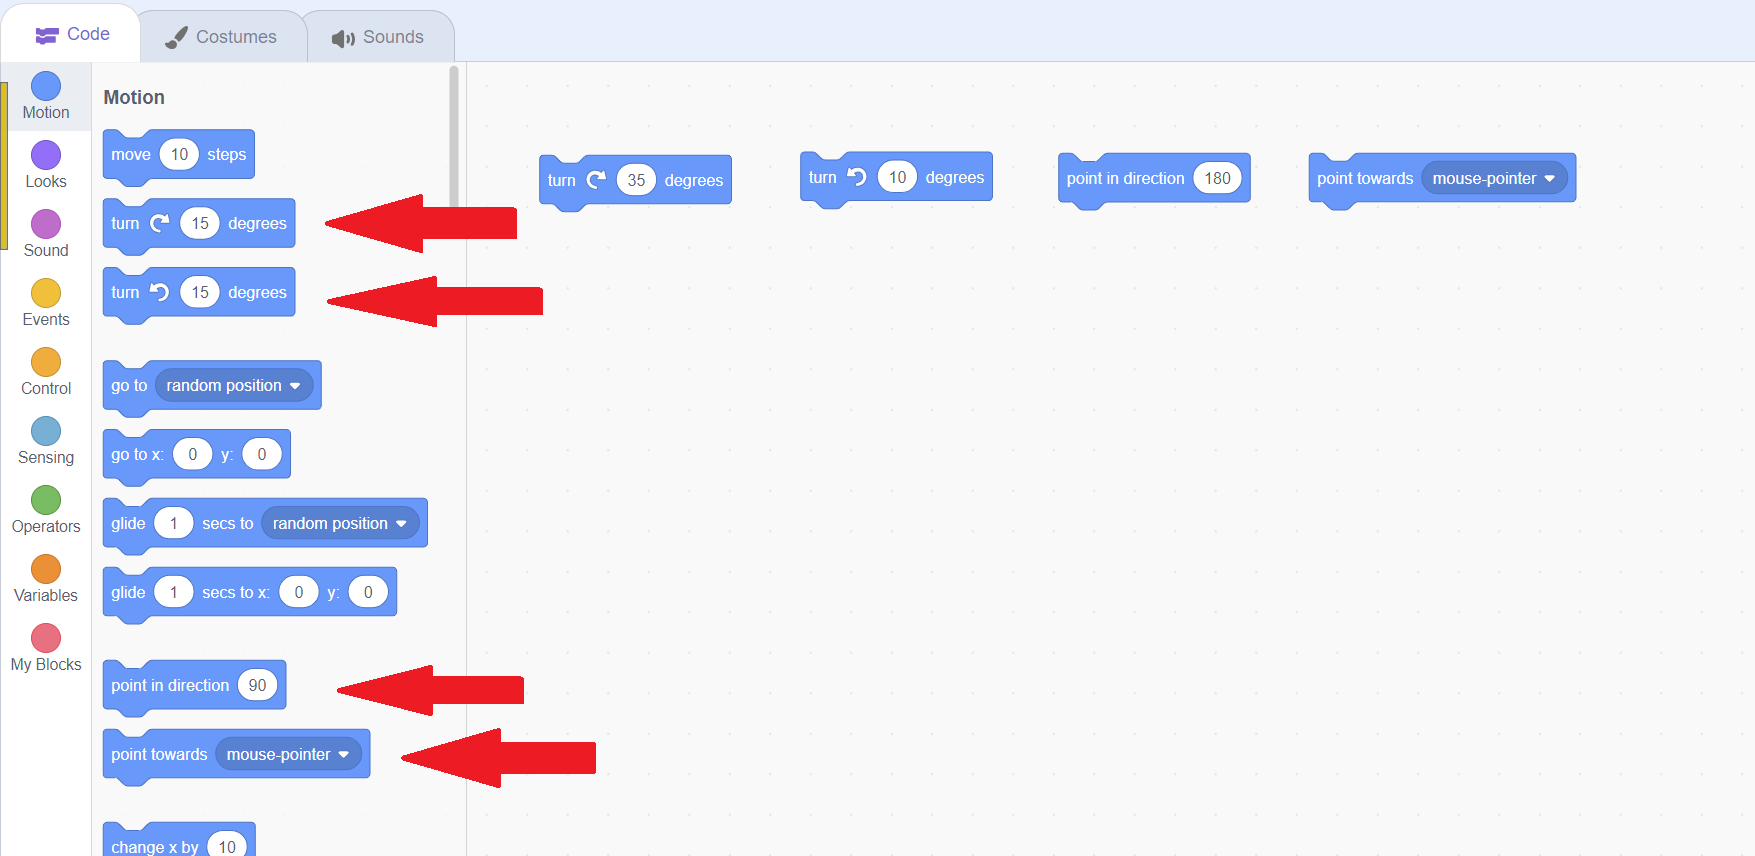
There are four different blocks we can use to change the direction on the code. We can turn the sprite clockwise (increase the direction number), turn the sprite counterclockwise (decrease the direction number), or "point in direction" to set a specific direction number. You can edit the numbers on these blocks to choose how much the direction changes or the direction to point to. Finally, we can have the sprite point to wherever the mouse is. Because we're clicking the block to make this happen right now, the sprite will always face to the left when you use that last one for now! We'll have to tie that block into an event to fix that issue, which we'll be learning about next.
That covers the primary motion blocks! Read on to learn how to tie our motion blocks into events.
Using Event Blocks
It can get very tedious and repetitive to keep clicking the code block to move! Luckily, with our code blocks, we can tie our motion code into events, so that the code runs when an event happens instead!
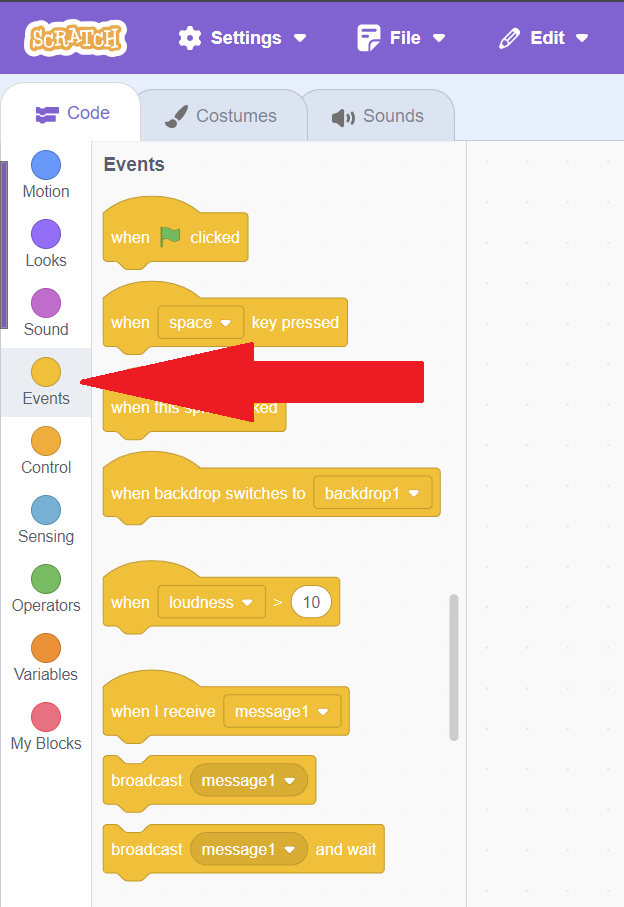
The most common way that code is tied to events in video games is through pressing keys on the keyboard! Think of how you move around in video games on your computer: by using the arrow keys or the w, a, s, and d keys! We call this "binding" a key to code. To do so, we will need to use our event blocks. Hit the yellow "Events" category on the left or scroll through your code blocks until you see the yellow blocks.
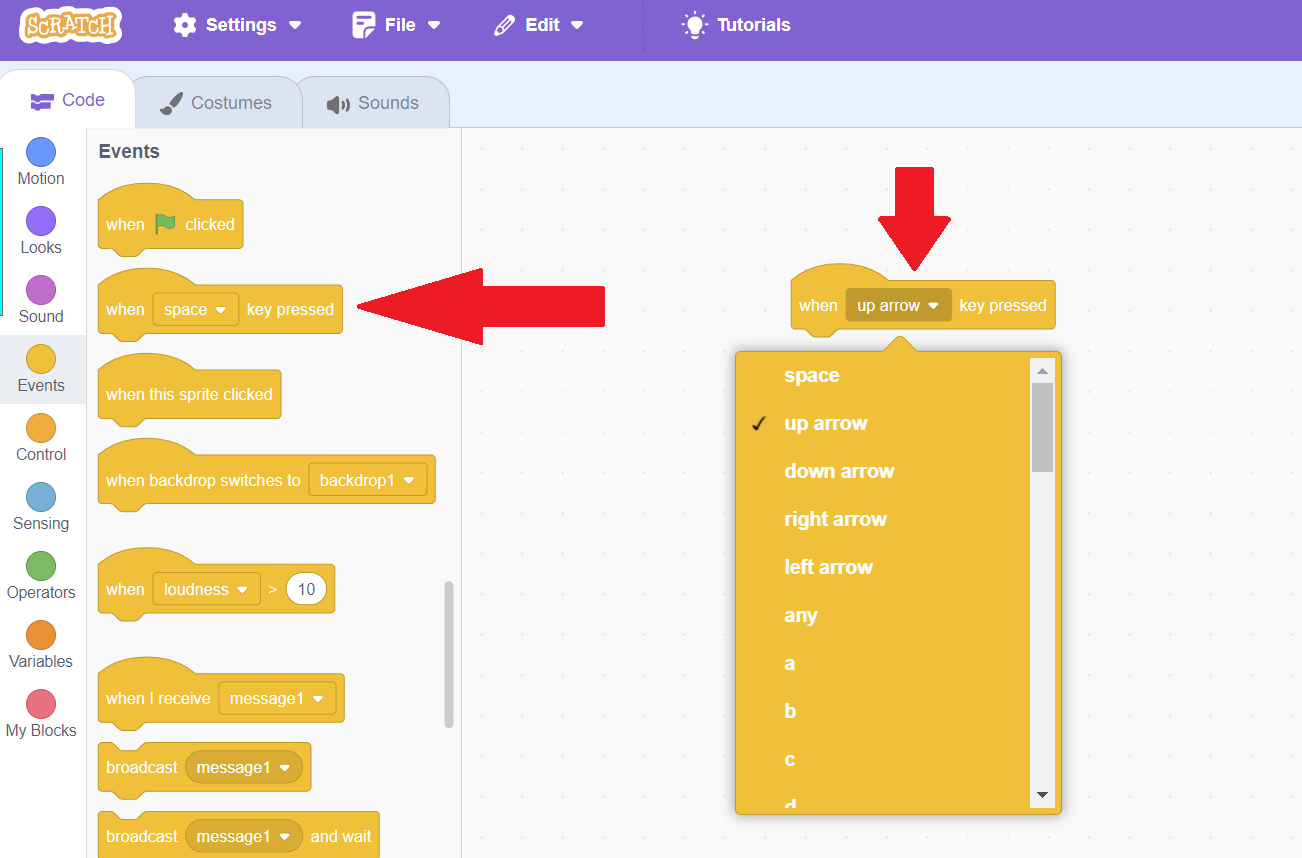
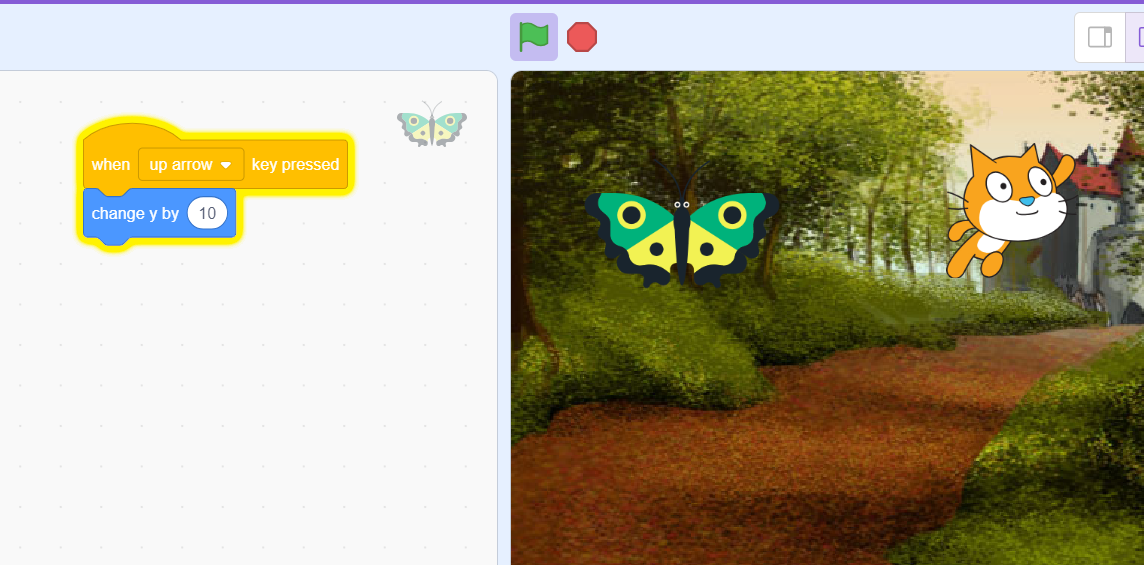
Drag "When space key pressed" into your code area. You'll notice that it's curved on the top. This means that when putting multiple blocks together, this block can only go at the very top! You'll also notice that the word space has a box around it. Click it to change what key we use! Try changing it to either "up arrow" or "w" by clicking the matching option in the dropdown.
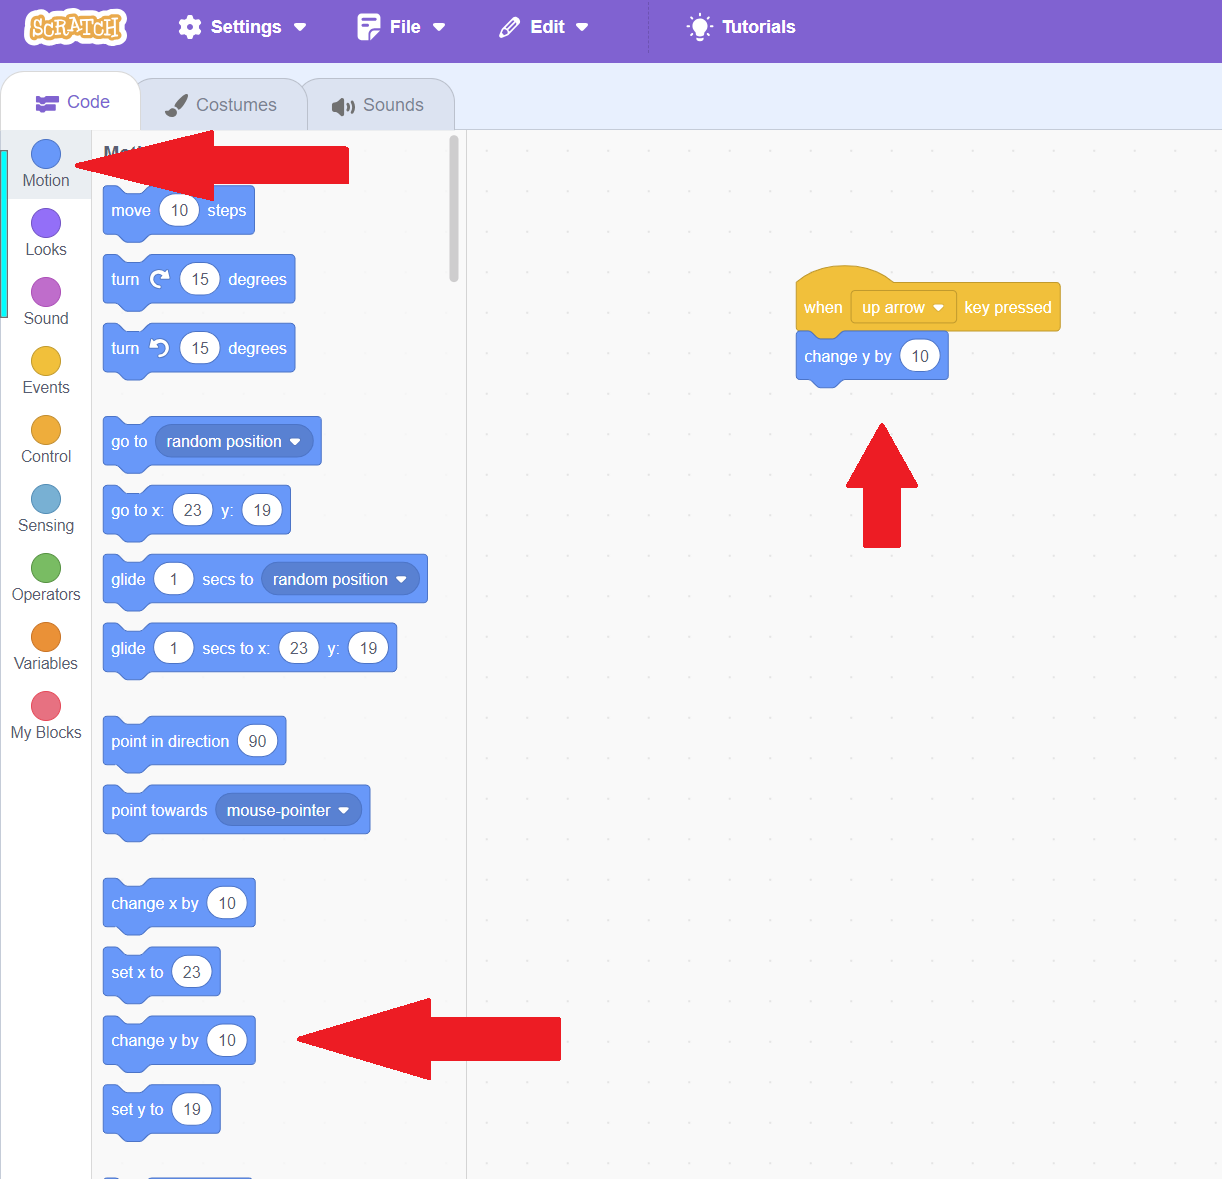
Now, click the blue "Motions" category to go back to the motion blocks, and then drag a "change y by 10" block and chain it with your key pressed block. After they are linked, clicking that key on your keyboard will run that code! Try pressing your key now. You can hold the key down to see it run lots of times! Whenever the code block is running, it will highlight in yellow in the code area, to show you which code is running.
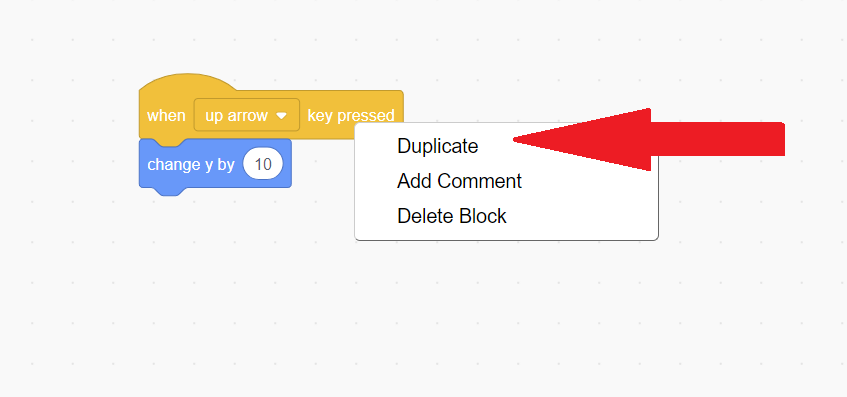
Now we can move up, but we want to be able to move in the other directions! We could do all those steps again, but that would take a long time. Instead, we are going to create a copy of what we already did. Instead, we are going to right click anywhere on our yellow "When key pressed" block that is chained with the motion block, and then choose "Duplicate". This will make a copy of that block and all blocks chained to that block. Then, left click in the code area where you want your new group of blocks to go. Do this 3 times, so we have 4 groups of blocks!
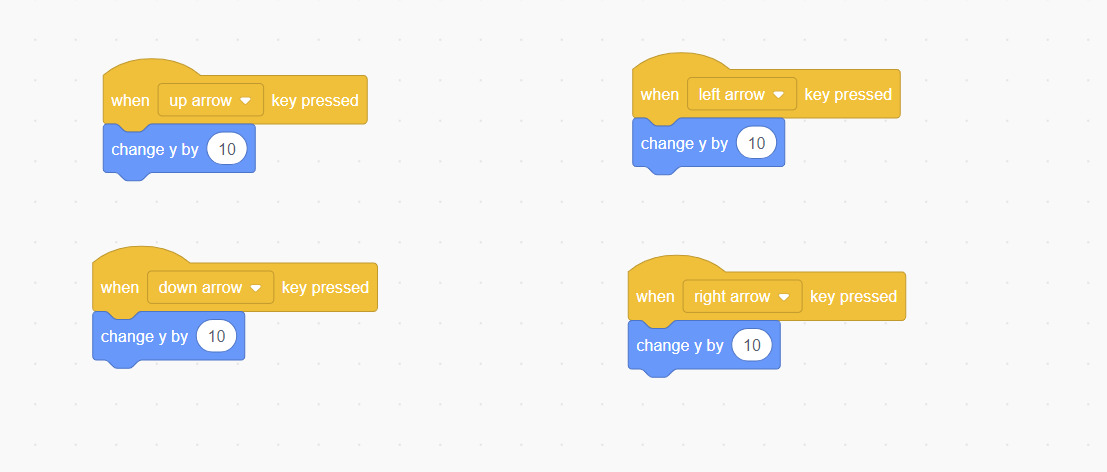
Click on key choice button to change "Up Arrow" or "W" to your other four movement keys. If you chose "Up Arrow", then this will be "Down Arrow", "Left Arrow", and "Right Arrow". You can also set it to "S", "A", or "D" instead. You can also be funky and make them whatever you want!
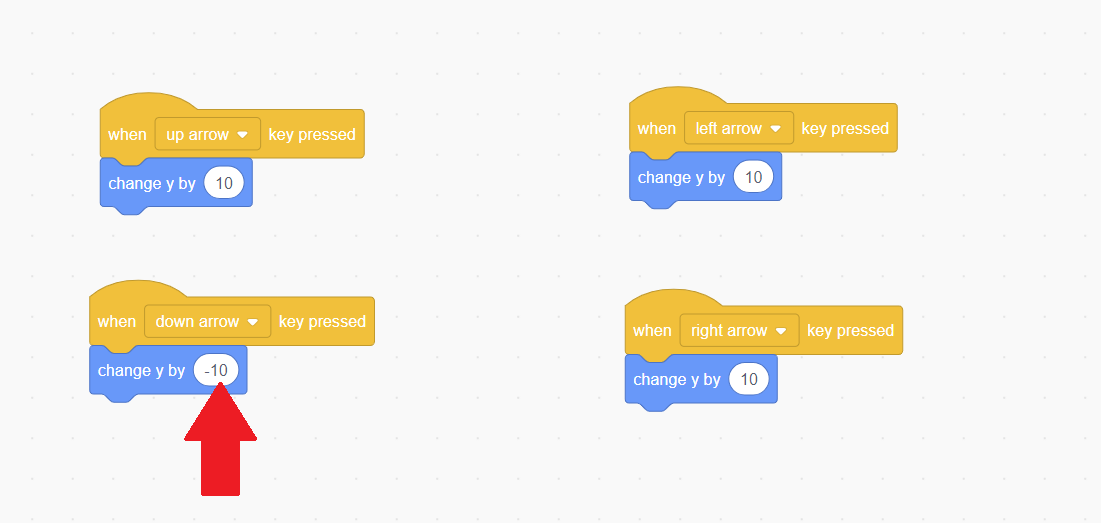
Now all 4 of our keys do something, but they all move up! To change that, we first need to make the y change on our key bound for downward movement, such as "Down Arrow" to negative. Edit the box to be -10, or whatever negative number you prefer. For consistent movement, it's good to have it match your positive direction!
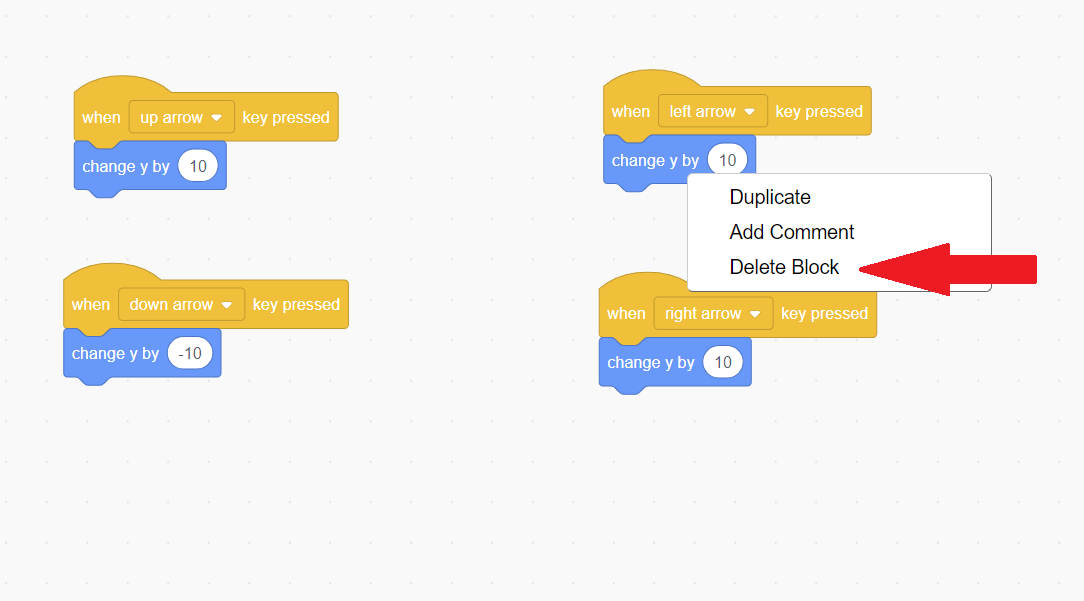
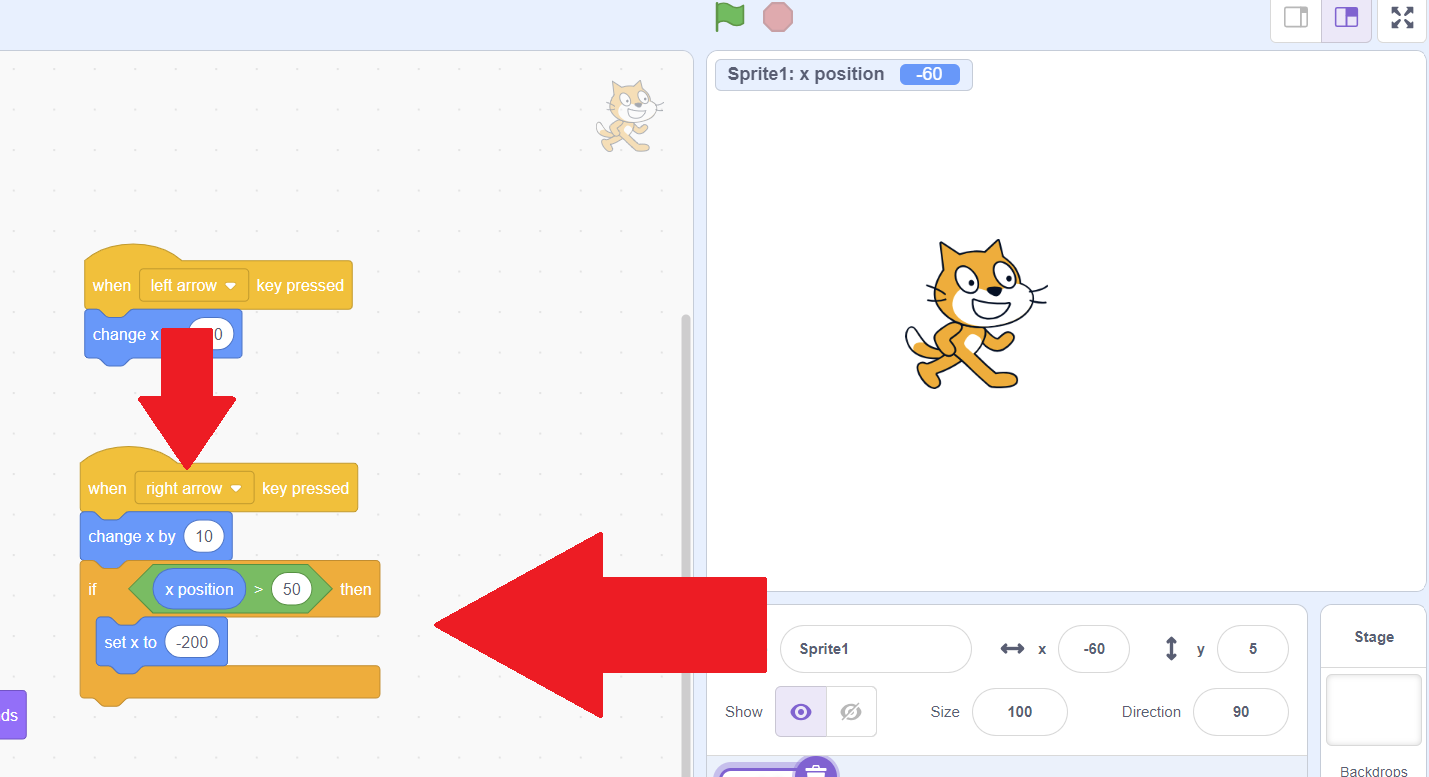
You can now move up and down, but to move left and right, we will have to have a "change x by" instead of "change y by". Right click your "Change y by" blue block and then choose "Delete Block"
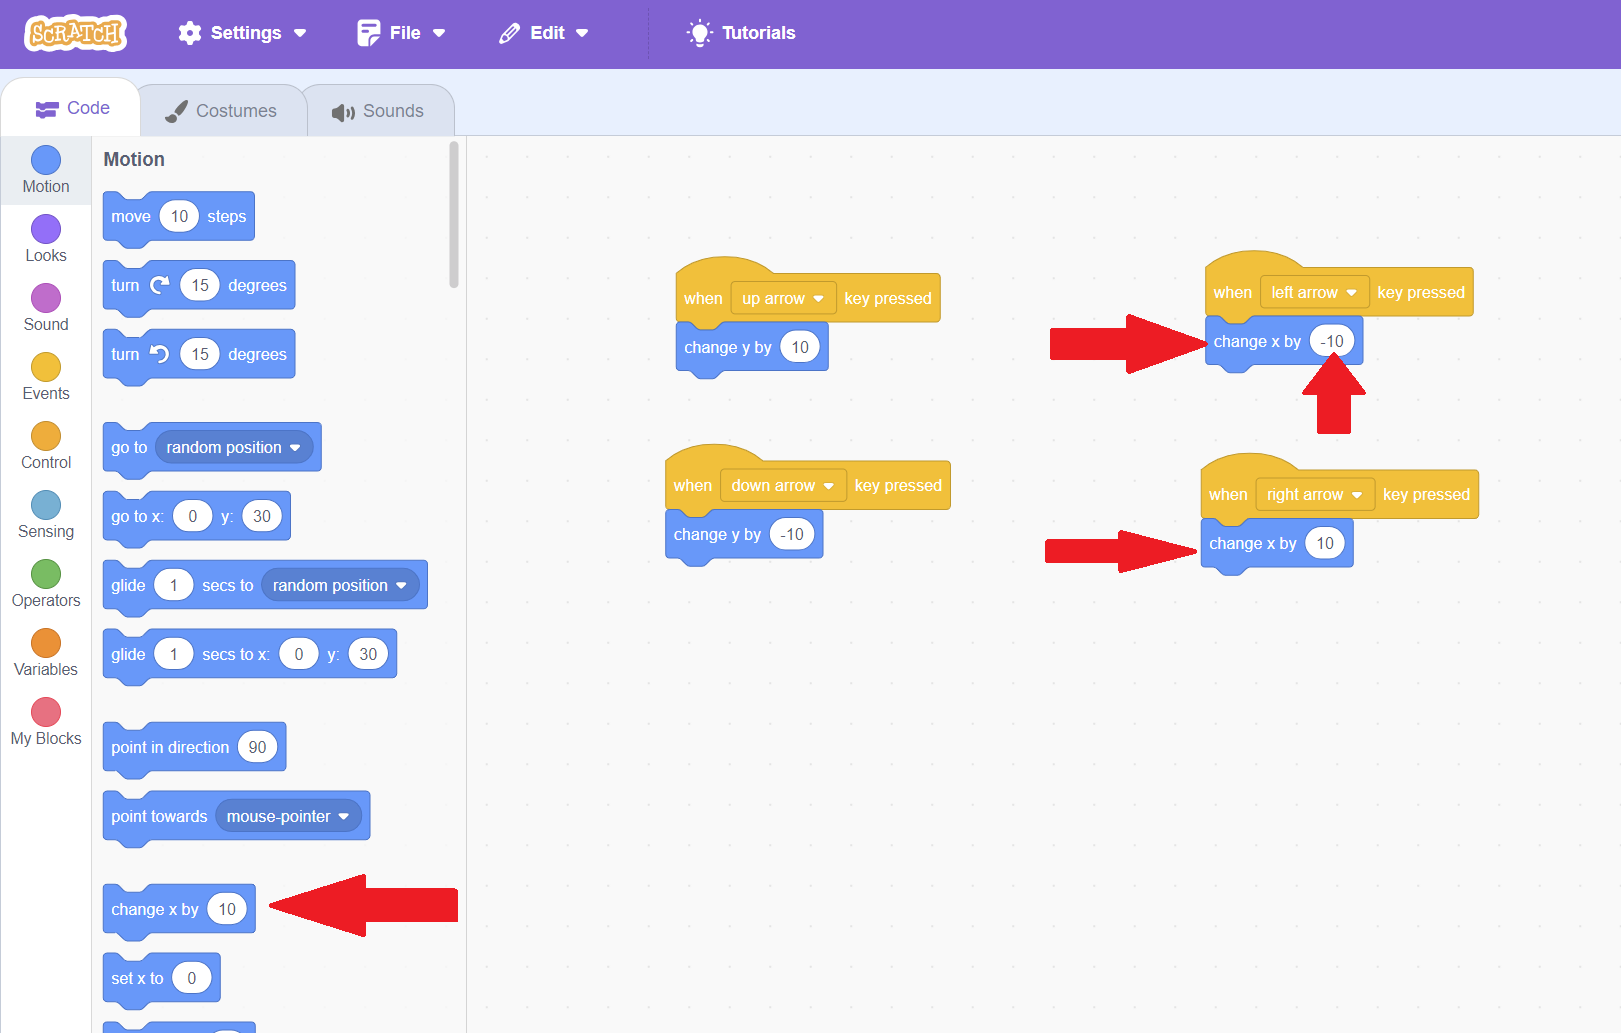
Do this for both your left and right movement keys, and then put a "change x by" block in their place. Edit the left movement one to be a negative number, and you will have full ability to move using the keys!
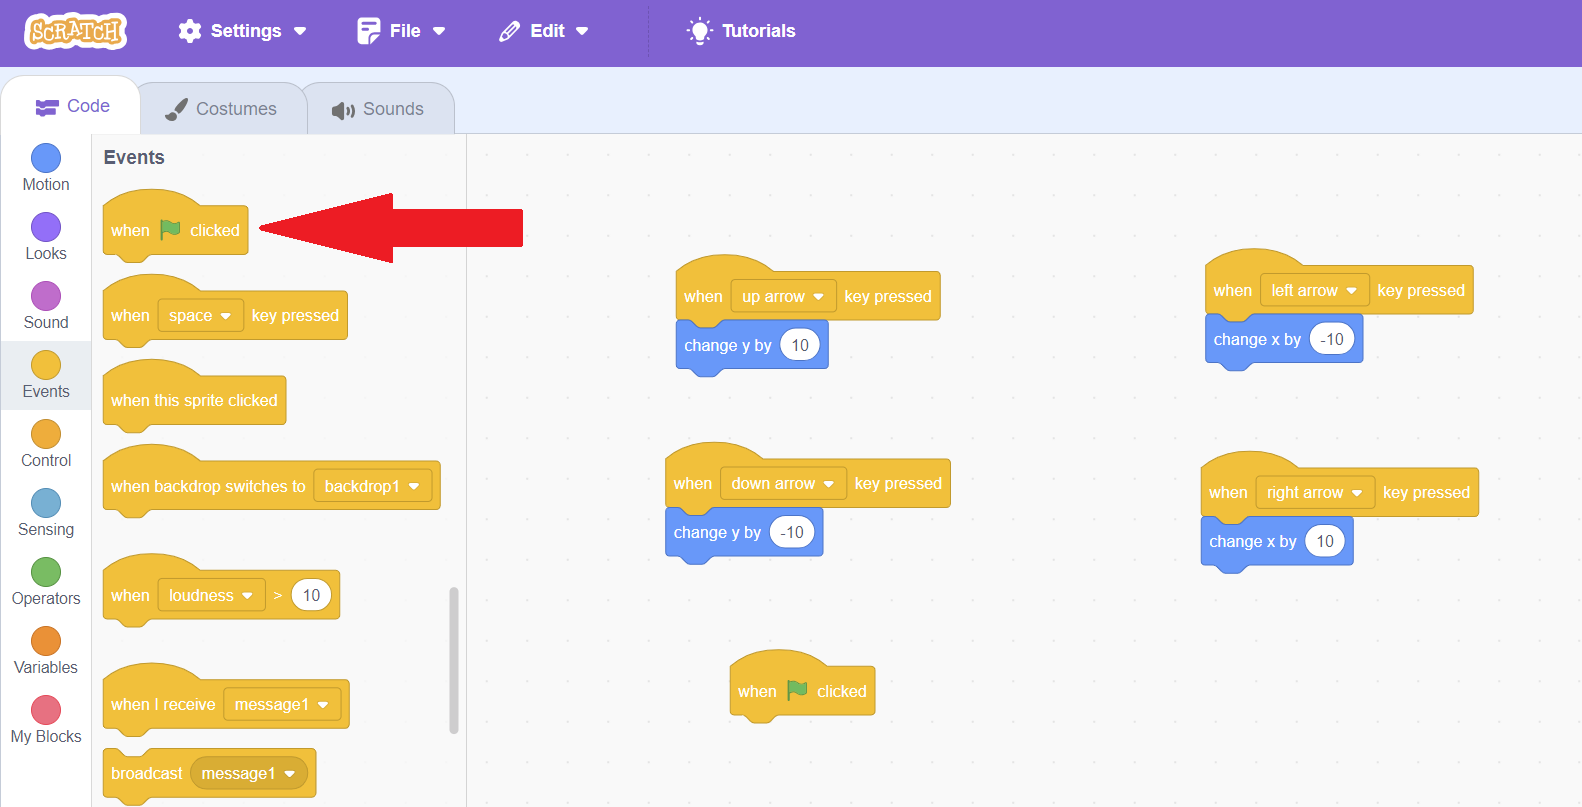
Sometimes you might just want your code to run as soon as someone presses "Play". If you are making a story instead of a videogame, you want everything to happen when someone presses play, For a videogame, you might use it to give instructions. In Scratch, code that should run when pressing the play button is indicated by a big green flag. Let's drag that event block to our code area.
Now, let's put our sprite speaking when it happens! Speaking blocks are under the purple category "Looks". Let's add the "Say Hello for 2 seconds" to our green flag event.
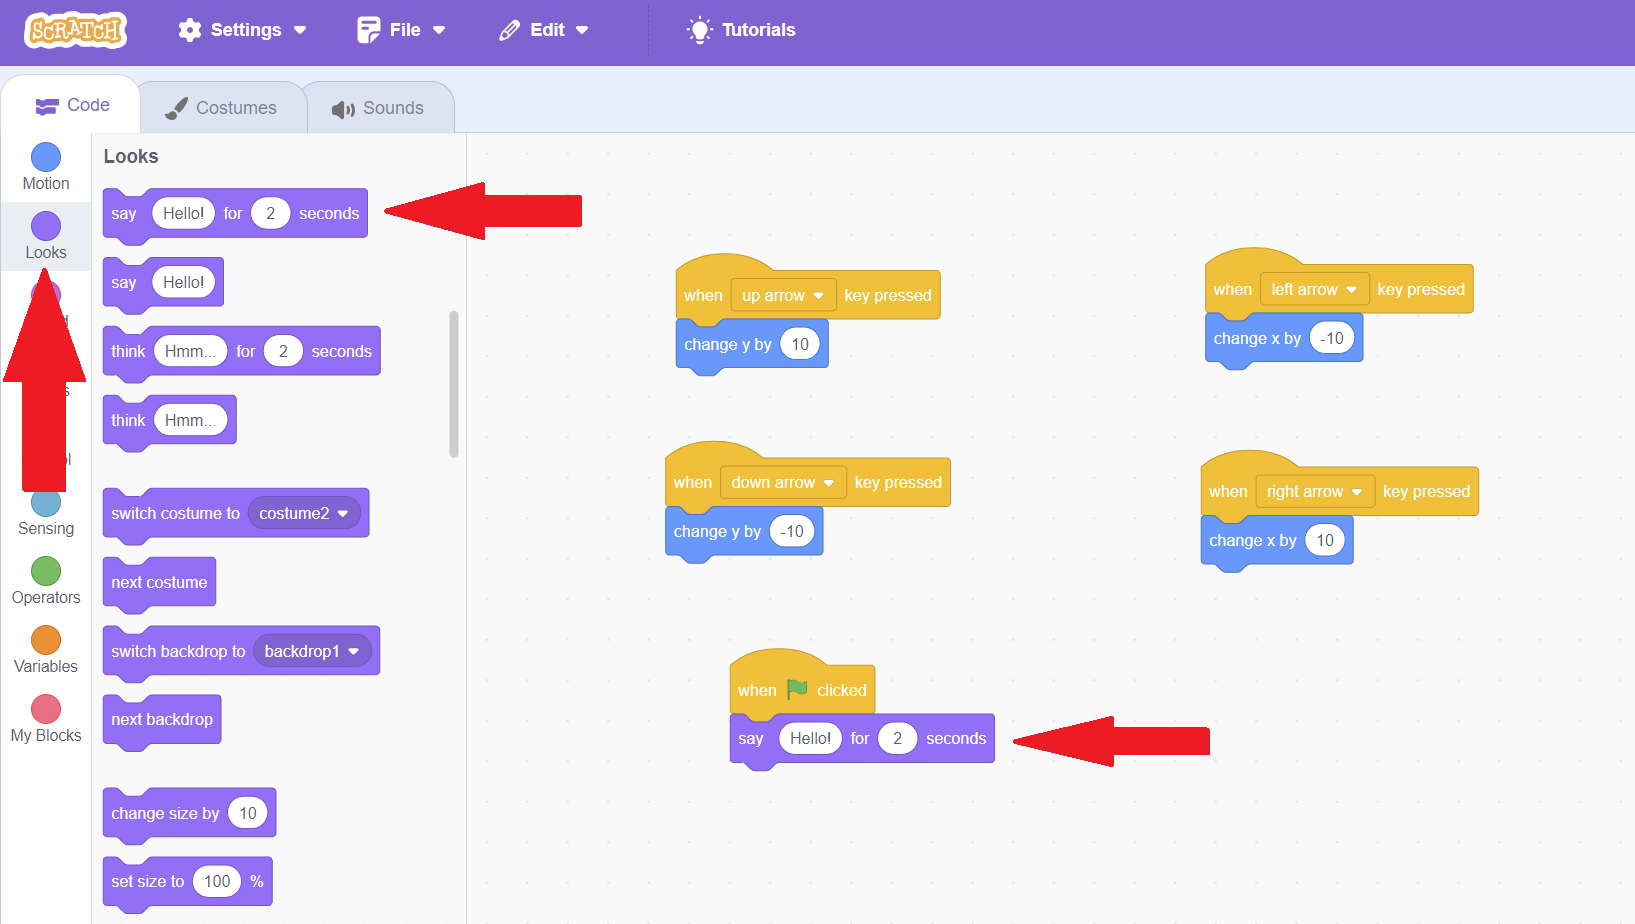
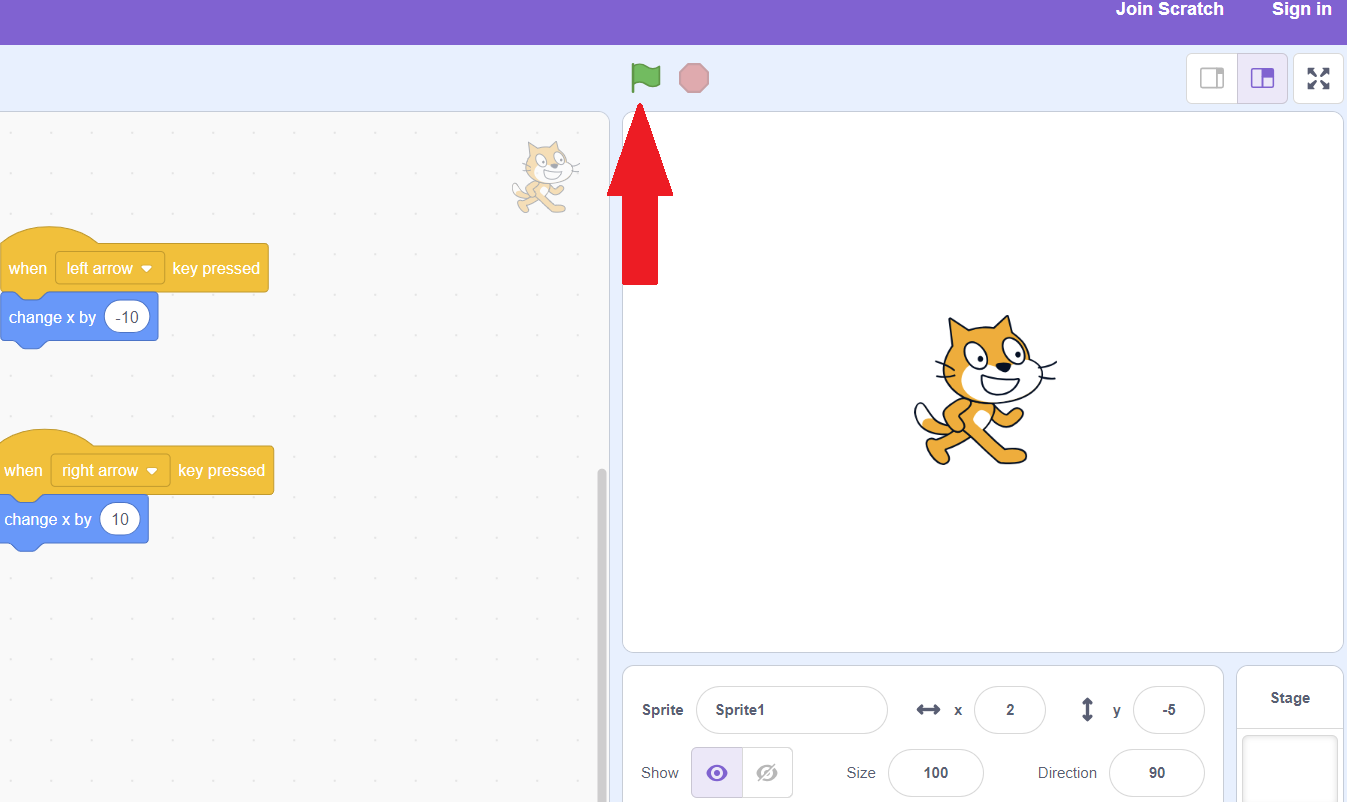
Now, click the green flag above the stage to see what will happen when people press play on your game!
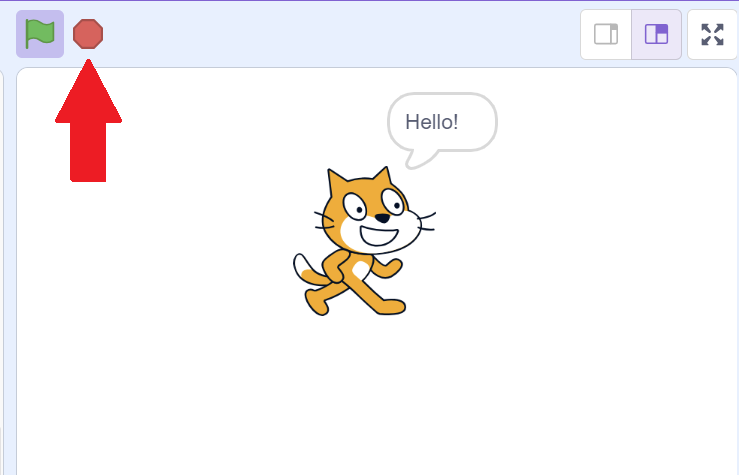
There will be a speech bubble above your sprite that says "Hello"! Note that you won't hear anything, we'll learn about adding sound later. You'll see that after clicking the green flag, the red stop sign next to it will no longer be greyed out. It will stay red for as long as the code underneath your green flag event block is running. You can press the stop sign to stop the code. Once all of the code in that block finishes, the red stop sign will be greyed out again.
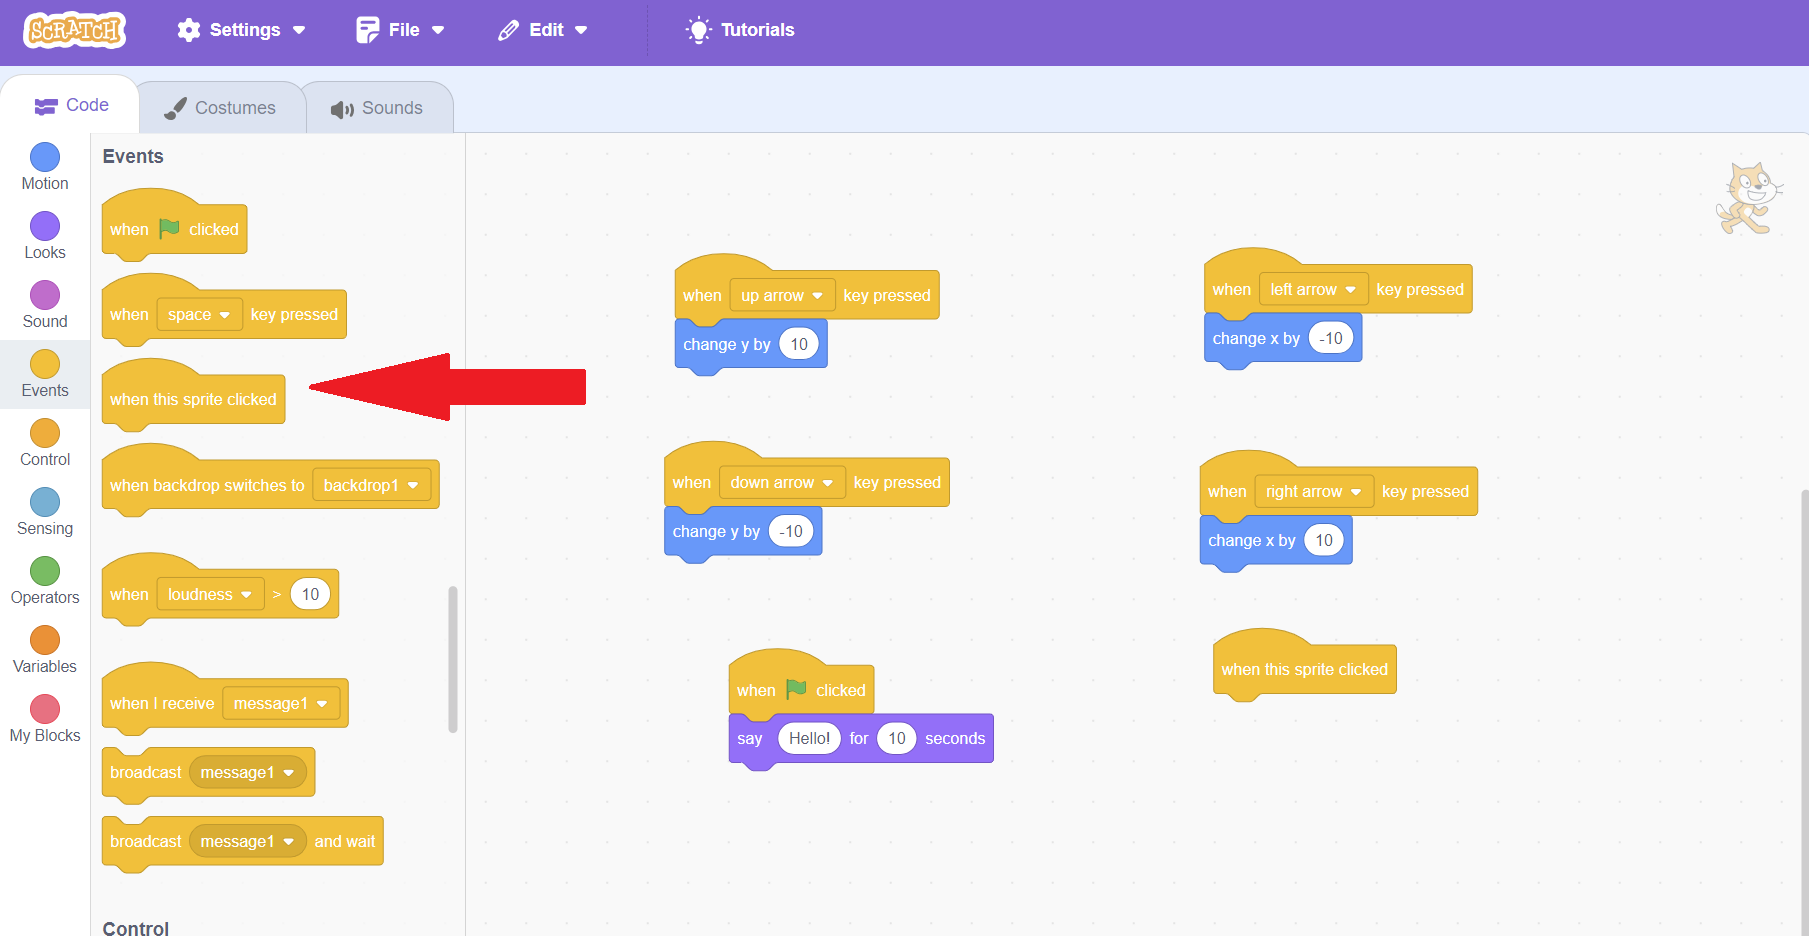
One other common event block is when you click your sprite. Let's try that one now. Go back to Event blocks and bring "When this sprite is clicked" to the code area.
Let's make our sprite move to a random place on the screen when we click him! This block can be found under the blue "Motion" category and is called "go to random position". Put it under your click event block.
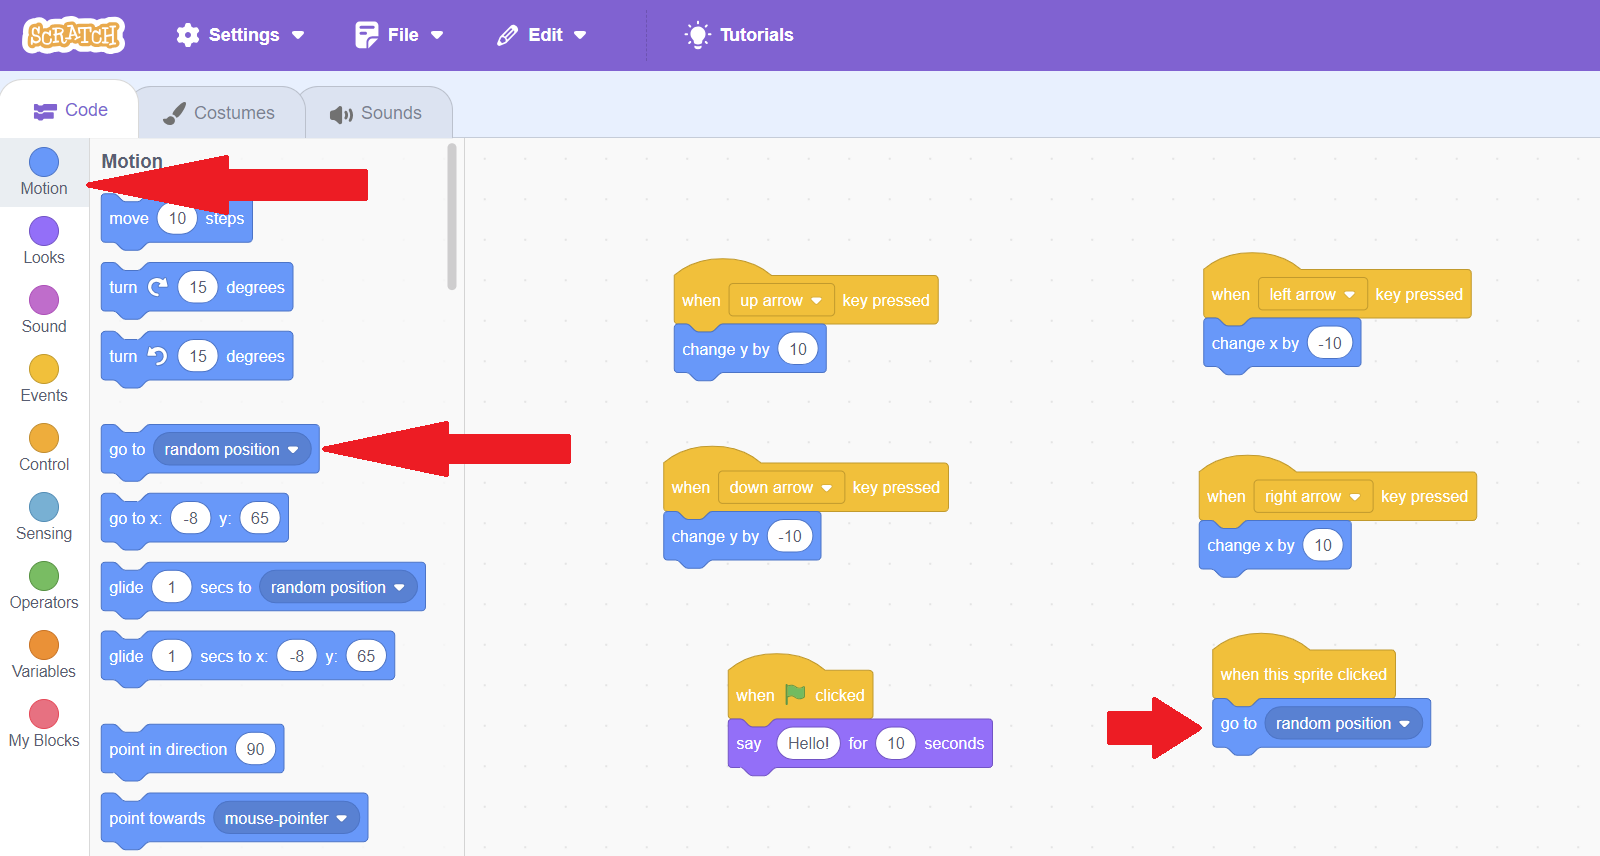
Try clicking the scratch cat on the stage. He will appear in a new position each time you click him.
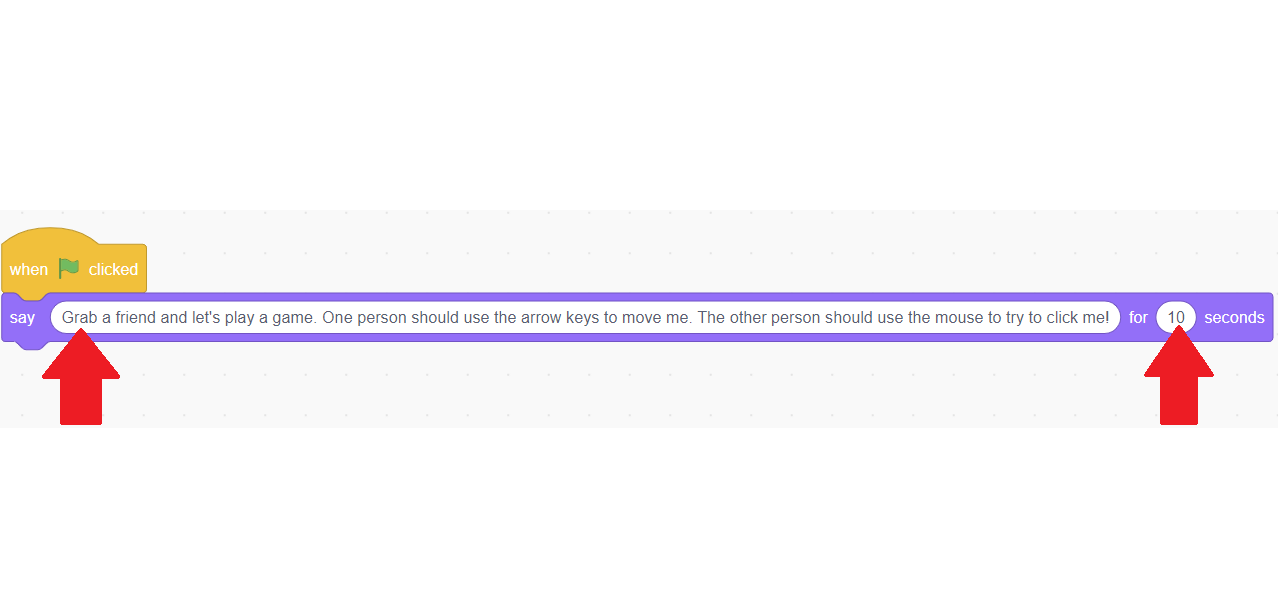
We already have the makings of a two-player game! One person can use the movement keys to move scratch cat, while the other person plays against the first player by clicking the cat before the cat can be moved away. Let's change our speaking text so we can tell people how to play, by clicking where it says "Hello" in our code area and writing instructions. Then, since we're writing a lot of text, let's increase how long it stays on the screen to 10 seconds!
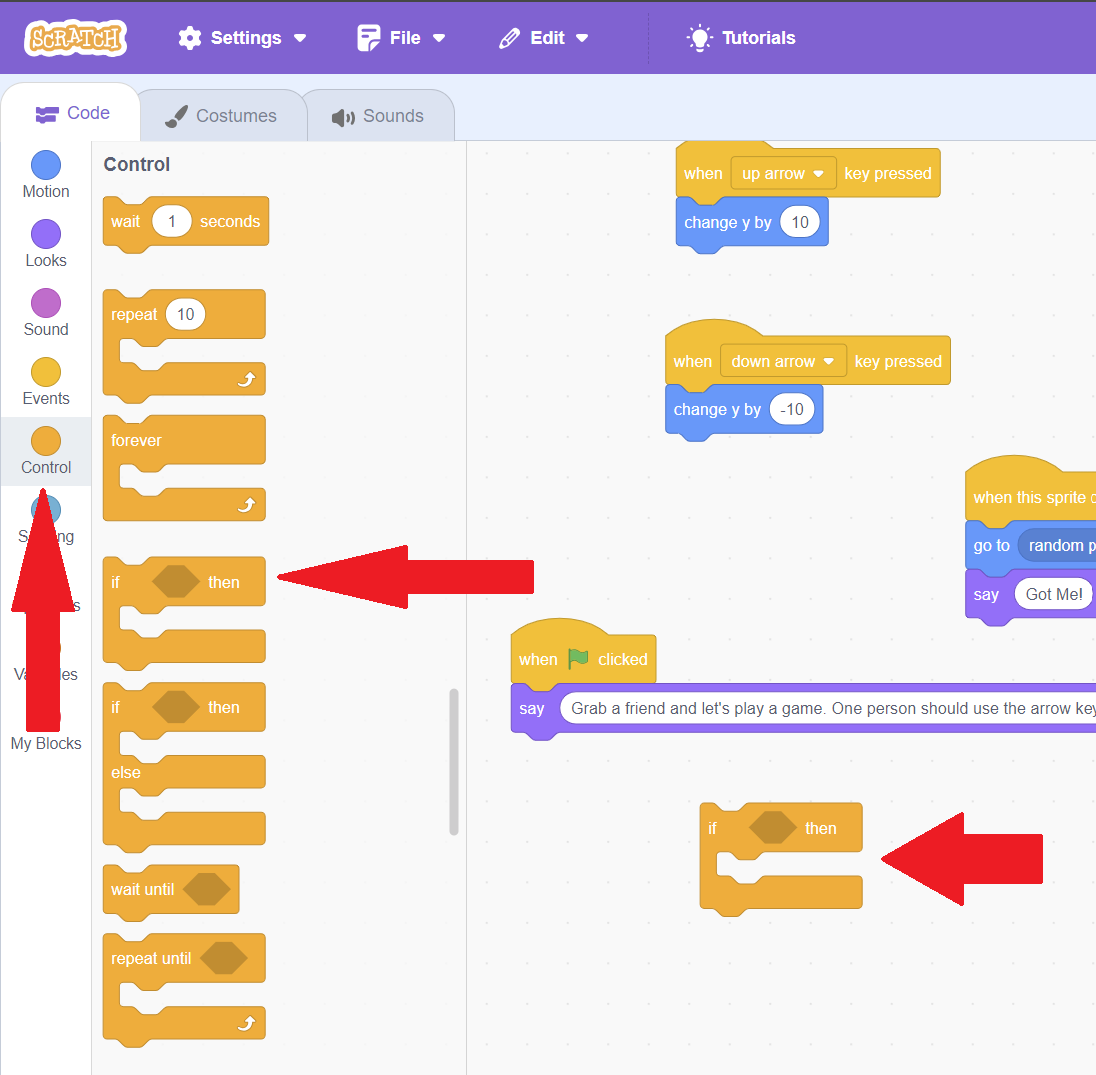
As the last touch to our game, let's make the cat say "Got Me!" after he's clicked, so the other player can know when they've won. We can do this by going to Looks, grabbing "Say Hello for 2 seconds", and then editing the text to say "Got Me!"

We've made a simple game now, but there's still a lot more we can do! The person playing the cat will get stuck if they go to the sides, which can make the game a bit unfair. We'll learn how to make the cat jump to the other side of the screen when it hits the edge using "If Statement" control blocks. Read on to find out how!
Variables, Operators, and If Statements
In a lot of classic games, such as Pacman, when you reach the edge of one side of the screen you automatically appear on the other side of the screen. In this way, you don't get stuck and gameplay is more smooth. This is done using something called "If Statements". "If statements" are types of code that check whether something is true or false. If it is true, then it runs certain code.
We can find If Statement blocks in Scratch under the orange "Control" category. Let's drag one to our code area.
You'll see that the block looks like a sandwich, so we can put code blocks, our sandwich filling, in between the if block. Let's put a motion block as our filling, putting "set x to" in between the if block and setting the number to -200. Try clicking the code block. Nothing will happen!
This is because the code is INSIDE our if block. It will only run if whatever is inside the diamond at the top of the if block is true, and right now, it's empty! To fill the diamond, we have to use green operators. Click into the "Operators" category on the left to see the types of operator code blocks we have.
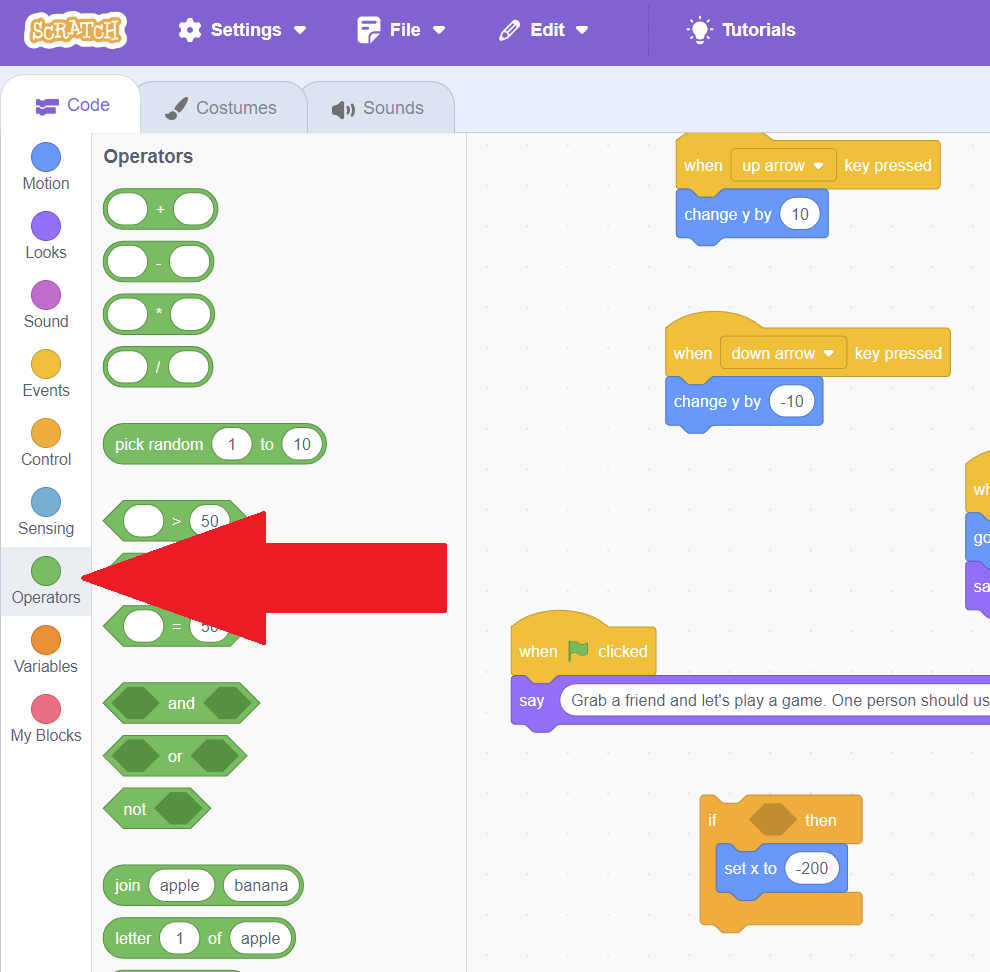
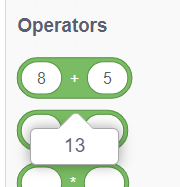
Some of our operators are diamond shaped. They can only be put in diamond shaped holes in the code, such as in an if statement, rather than in regular code. Operators are called "Operators" because they do work for us! You will see that the first four are math equations. Try putting two numbers in the first one, and then clicking the block. It will add them together for you!
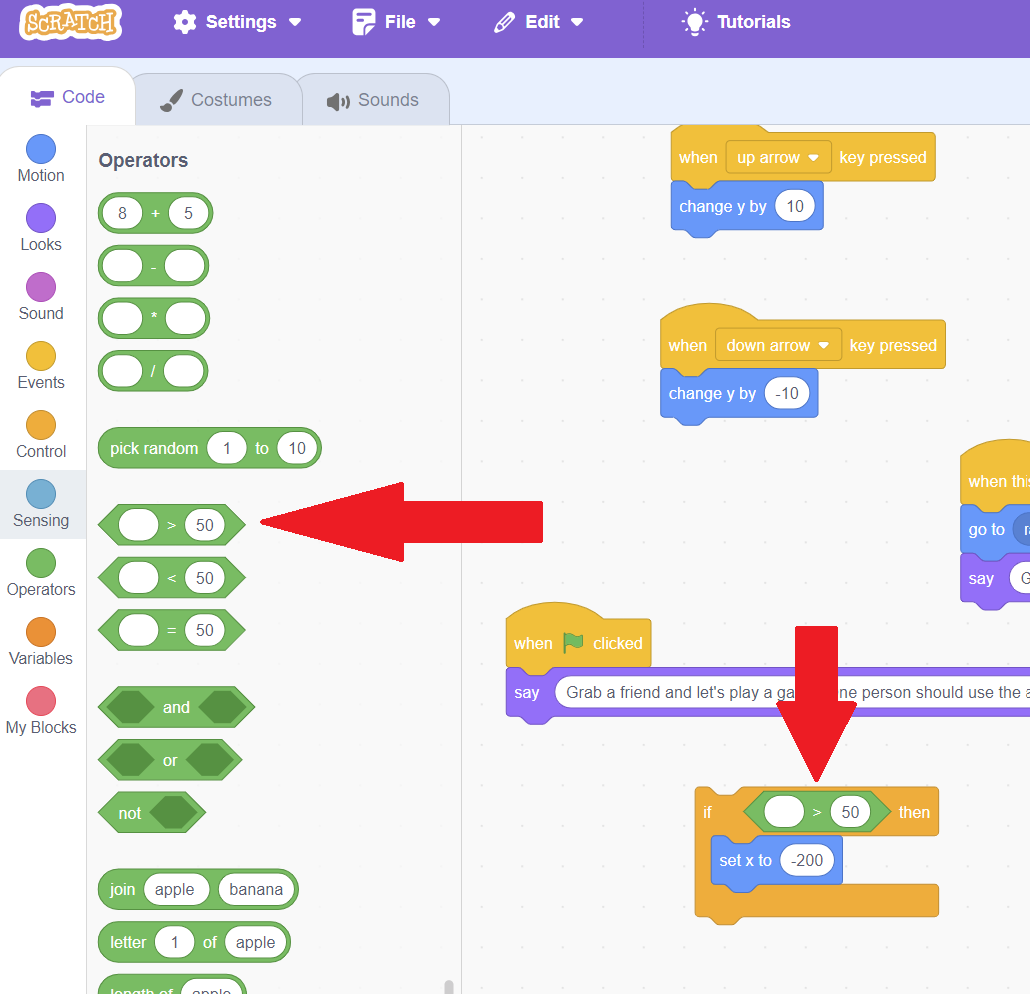
For this code, we are going to be working with the greater than operator block. Drag that into the diamond shape in our if block.
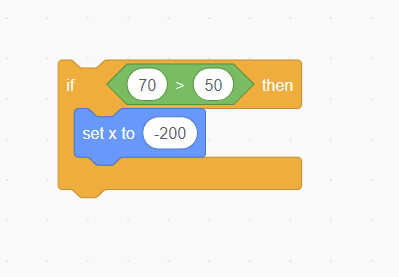
Try filling the empty spot number in with "30" and clicking the if statement block. Nothing will happen. That's because 30 is less than 50, so it's not true! Try again, but change the first number to "70". 70 is greater than 50, so your sprite's x position will move all the way to the left when you click the if statement code.
But 70 > 50 is always true, so that doesn't help us out much in the game! We want to base it on something that changes. A "variable" simply means something that changes. In Scratch, variables are represented by circles. At the bottom of the "Motion" category, you will see a circle variable called "X Position". Hit the checkbox next to it, and you will see that your x position is tracked in the top left of the stage. Try moving your sprite around and you will see that the x number in the stage changes to match the sprite's x position!
Instead of checking if 70 > 50, let's check if our x position is greater than 50. Drag "X Position" into your greater than operator in the first spot.
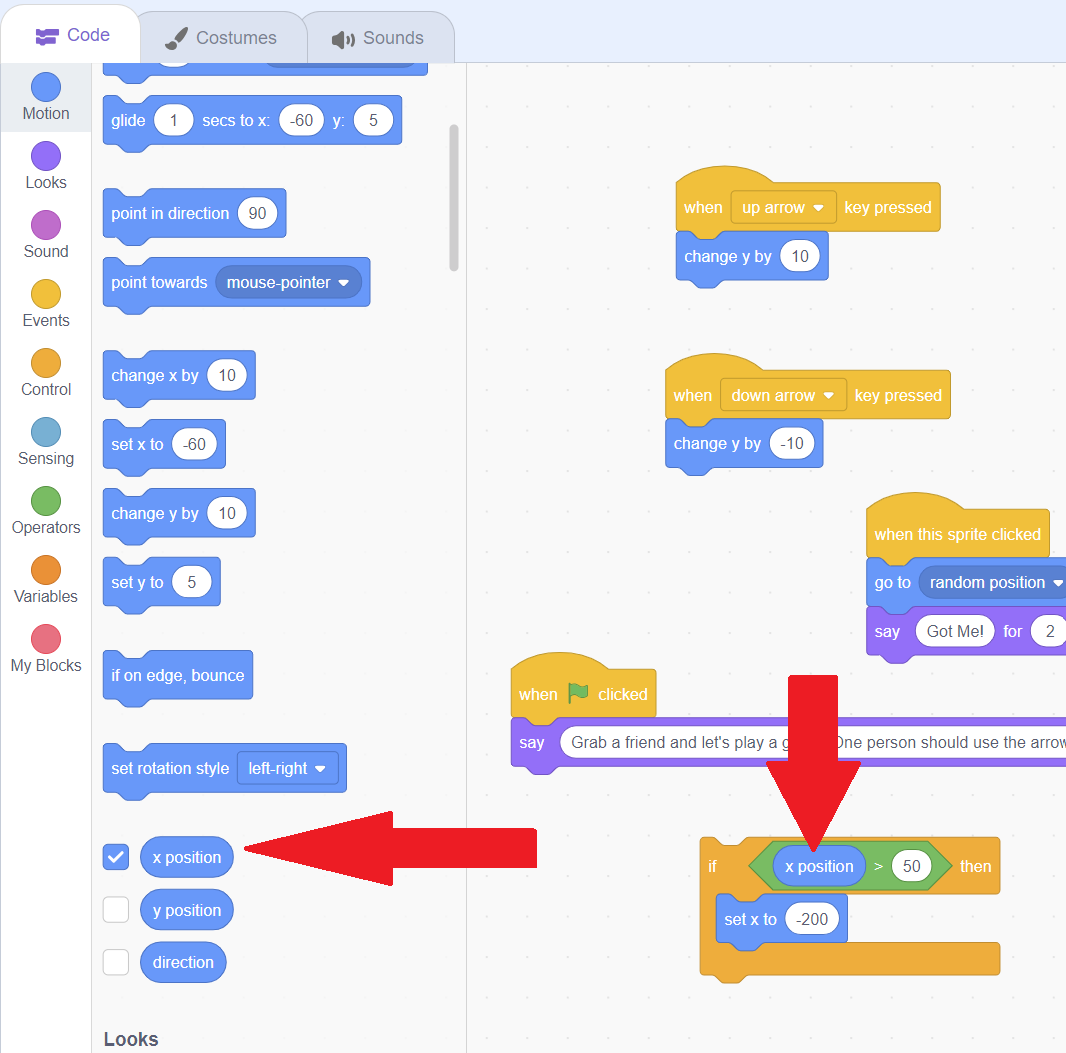
Now, let's drag our If Statement so that it is checked when we move right, after the sprite moves! Once the code blocks are linked, move your sprite right using your binded key until your X position is greater than 50. When that happens, your sprite will jump back to the beginning!
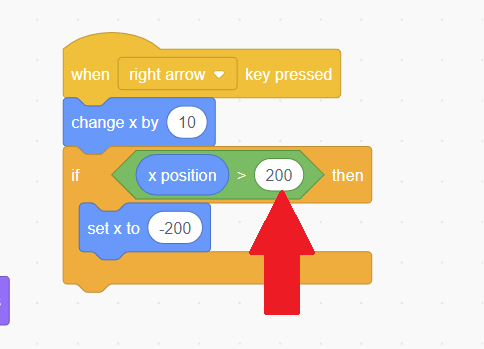
Now, every time we move our sprite to the right using our binded key, our system is checking whether our x position is greater than 50. If it is, the code puts our sprite back at the start. But our sprite is jumping to the beginning before it reaches the end. Let's change "50" on the second part of our operator to 200 and try again. After we do that, our sprite won't jump back until it reaches the end of the stage.
We've now learned all about variables, operators, and if statements. With these, we can make a pretty complex game, but to make a really good story or game, we need to be able to add sounds and change how things look. Let's start with sound!
Adding Sound
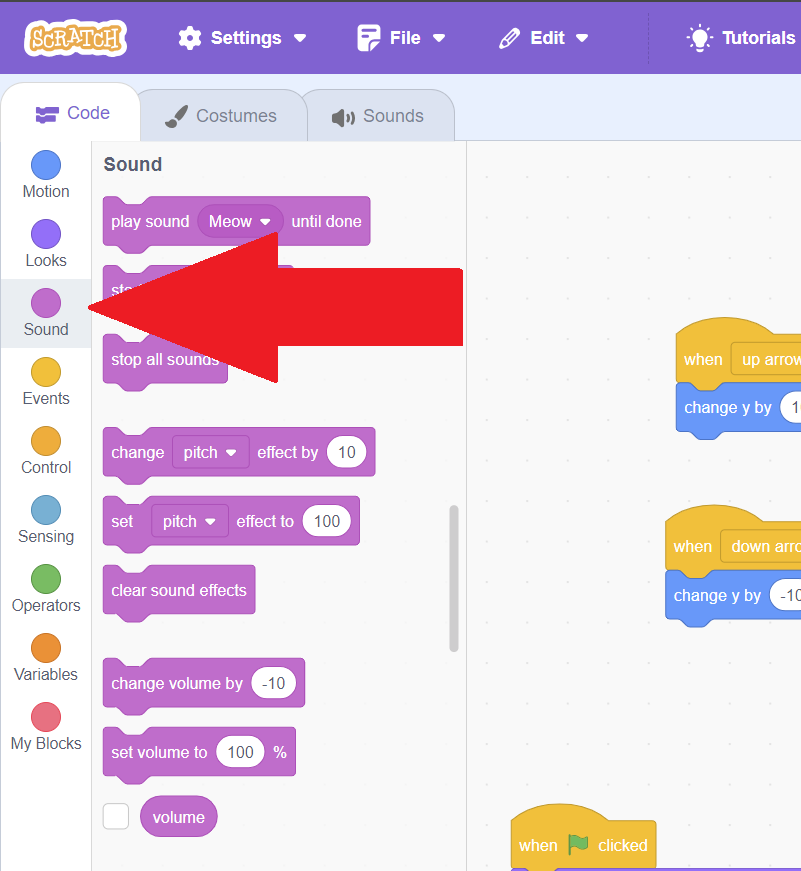
Games and stories are a lot more enjoyable when they have sound! Scratch has a whole code category for sound, which is a purple-pink color. Let's click into that section and see what we have.
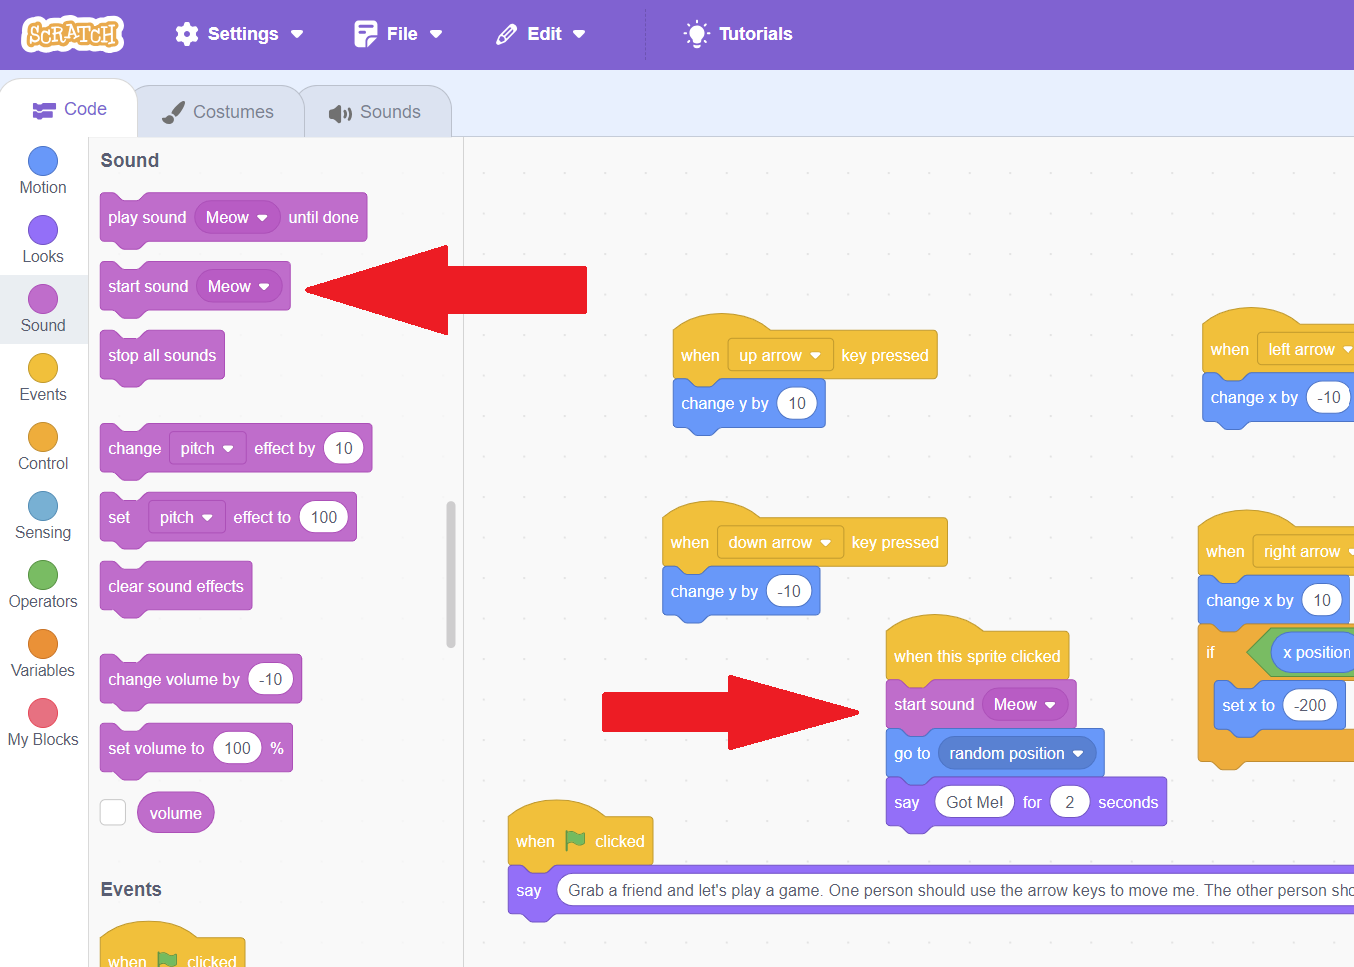
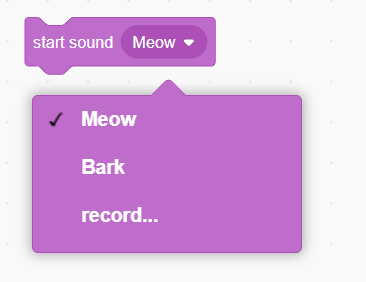
Now, let's make it so our scratch cat meows when we click him. Let's drag the "Start Sound" code block to be the first thing that happens when our sprite is clicked, before the other code runs. Try clicking your sprite and he will meow (as long as your volume is turned on)!
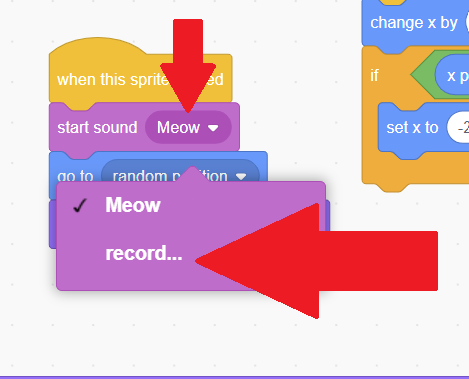
If you click the dropdown with the word "Meow" currently selected, you'll see that "Meow" is the only sound that is included when you start. If we want to add our own sounds or music, we will have to add them ourselves. One option is using the record... button at the bottom of the dropdown and record your own voice, but Scratch already has lots of sound options you can use!
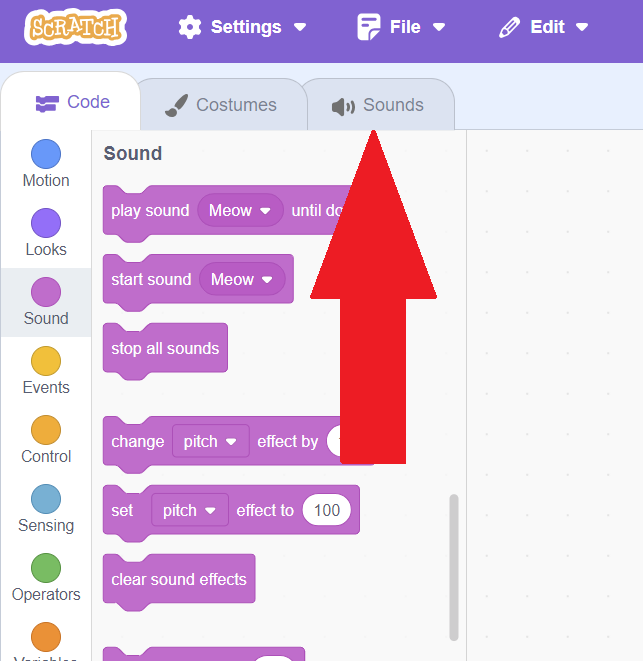
Above the block palette, you will see there are three tabs: "Code", which is currently active, "Costumes", and "Sounds". Click "Sounds".
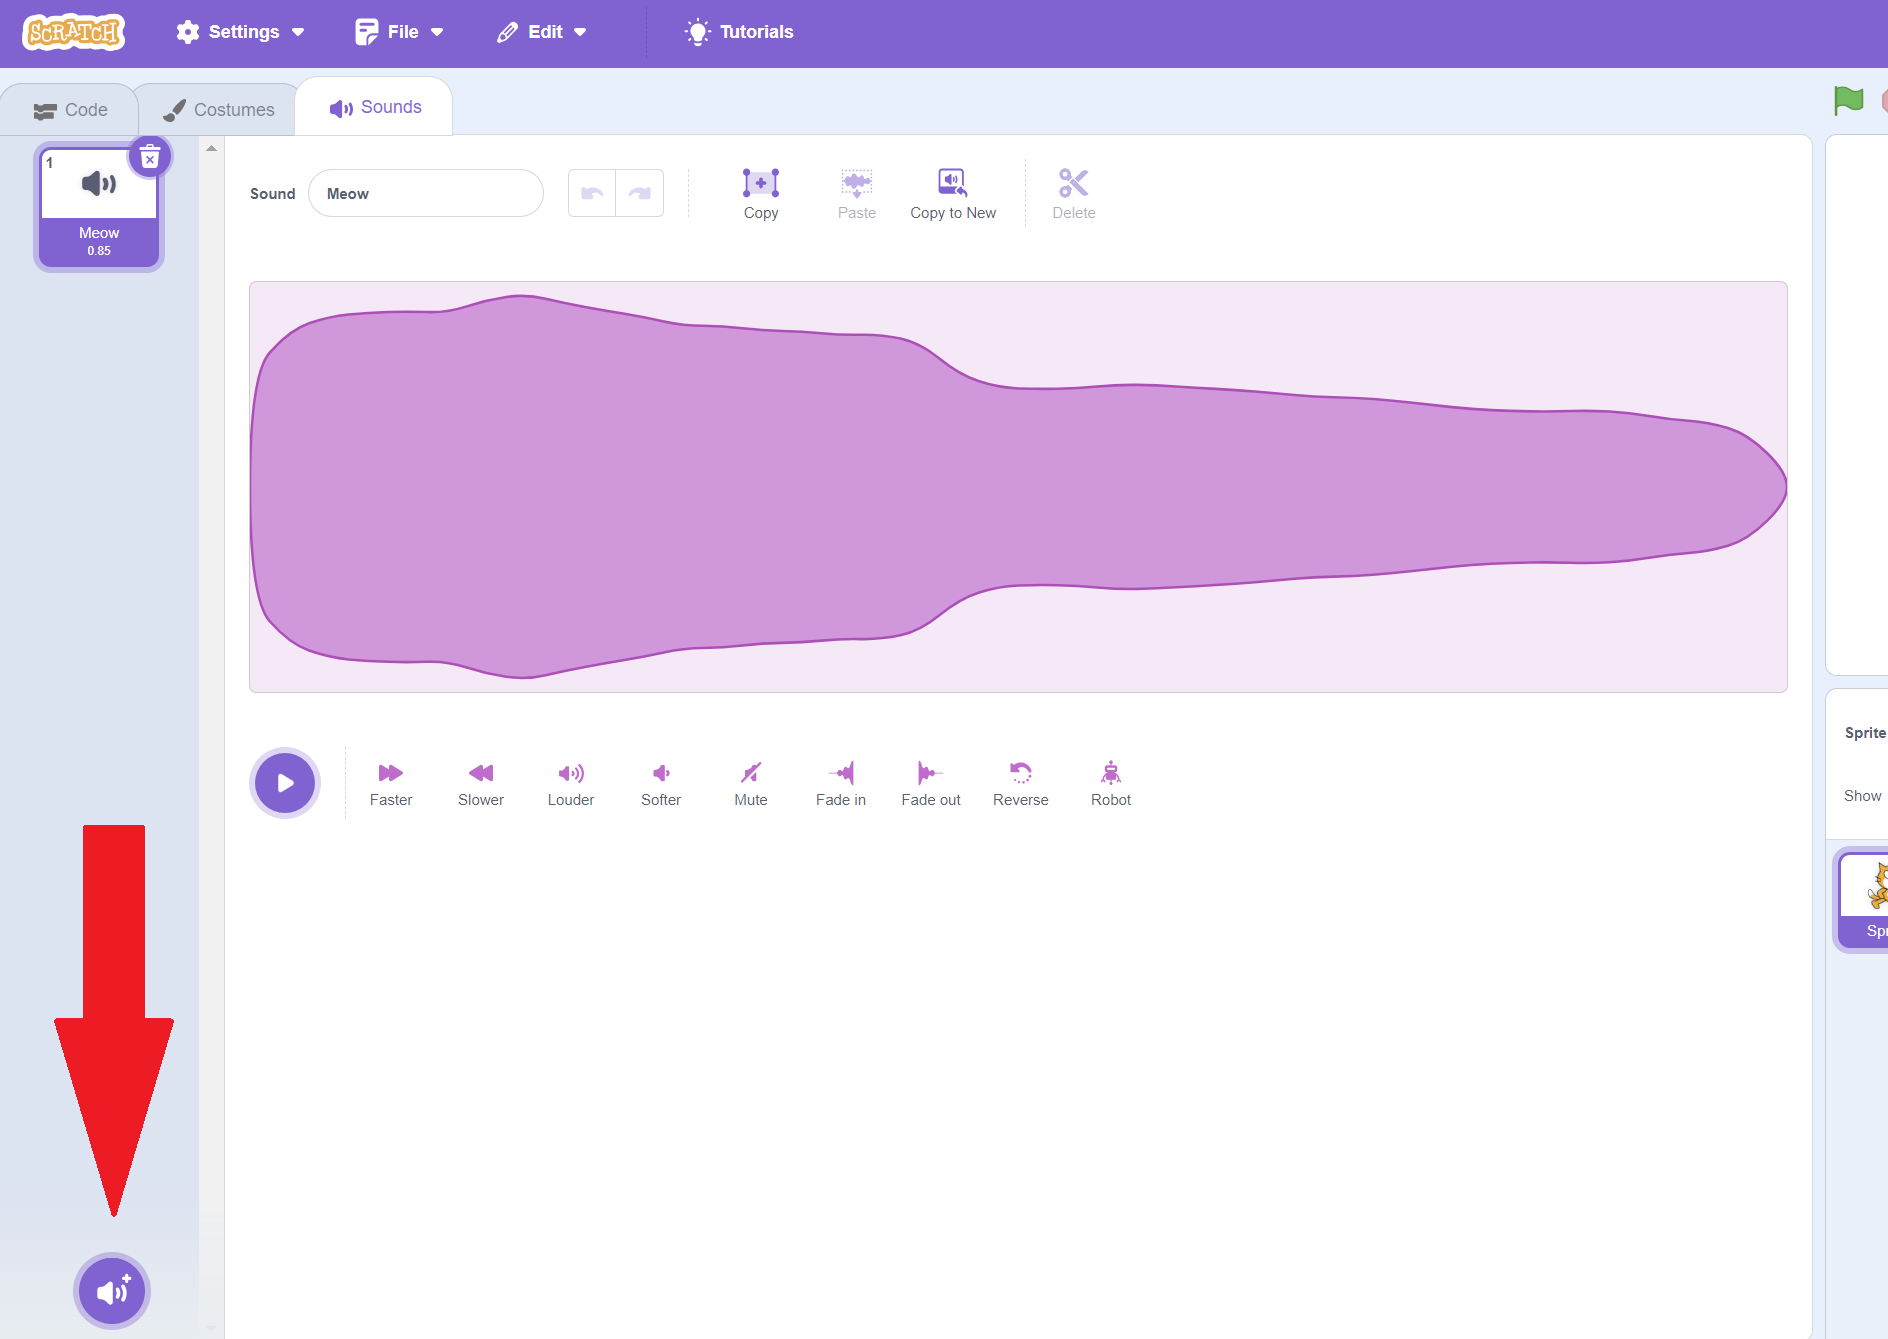
From this page, we can add new sounds so that they are available to use in our code. To add new sounds, hover over the "Add Sound" icon in the lower left. From here, you can either upload a sound, get a surprise sound, record a sound, or choose a sound. The most common will be to "Choose a sound", so just clicking on the icon will also take you to "Choose a sound". Click it now!
Here, you can hover over the purple play button near any sound to hear what it sounds like. You can use the search bar if you are looking for something specific. To make one of the sounds available to use in your code, simply click on it.

After choosing a sound, you will be taken back to the sounds tab. You can see what sounds you have available in your code on the left hand-side. You can also edit your sounds on this page. First, click on sound you want to edit on the left-hand side, if it's not already selected (the selected sound is highlighted in purple).
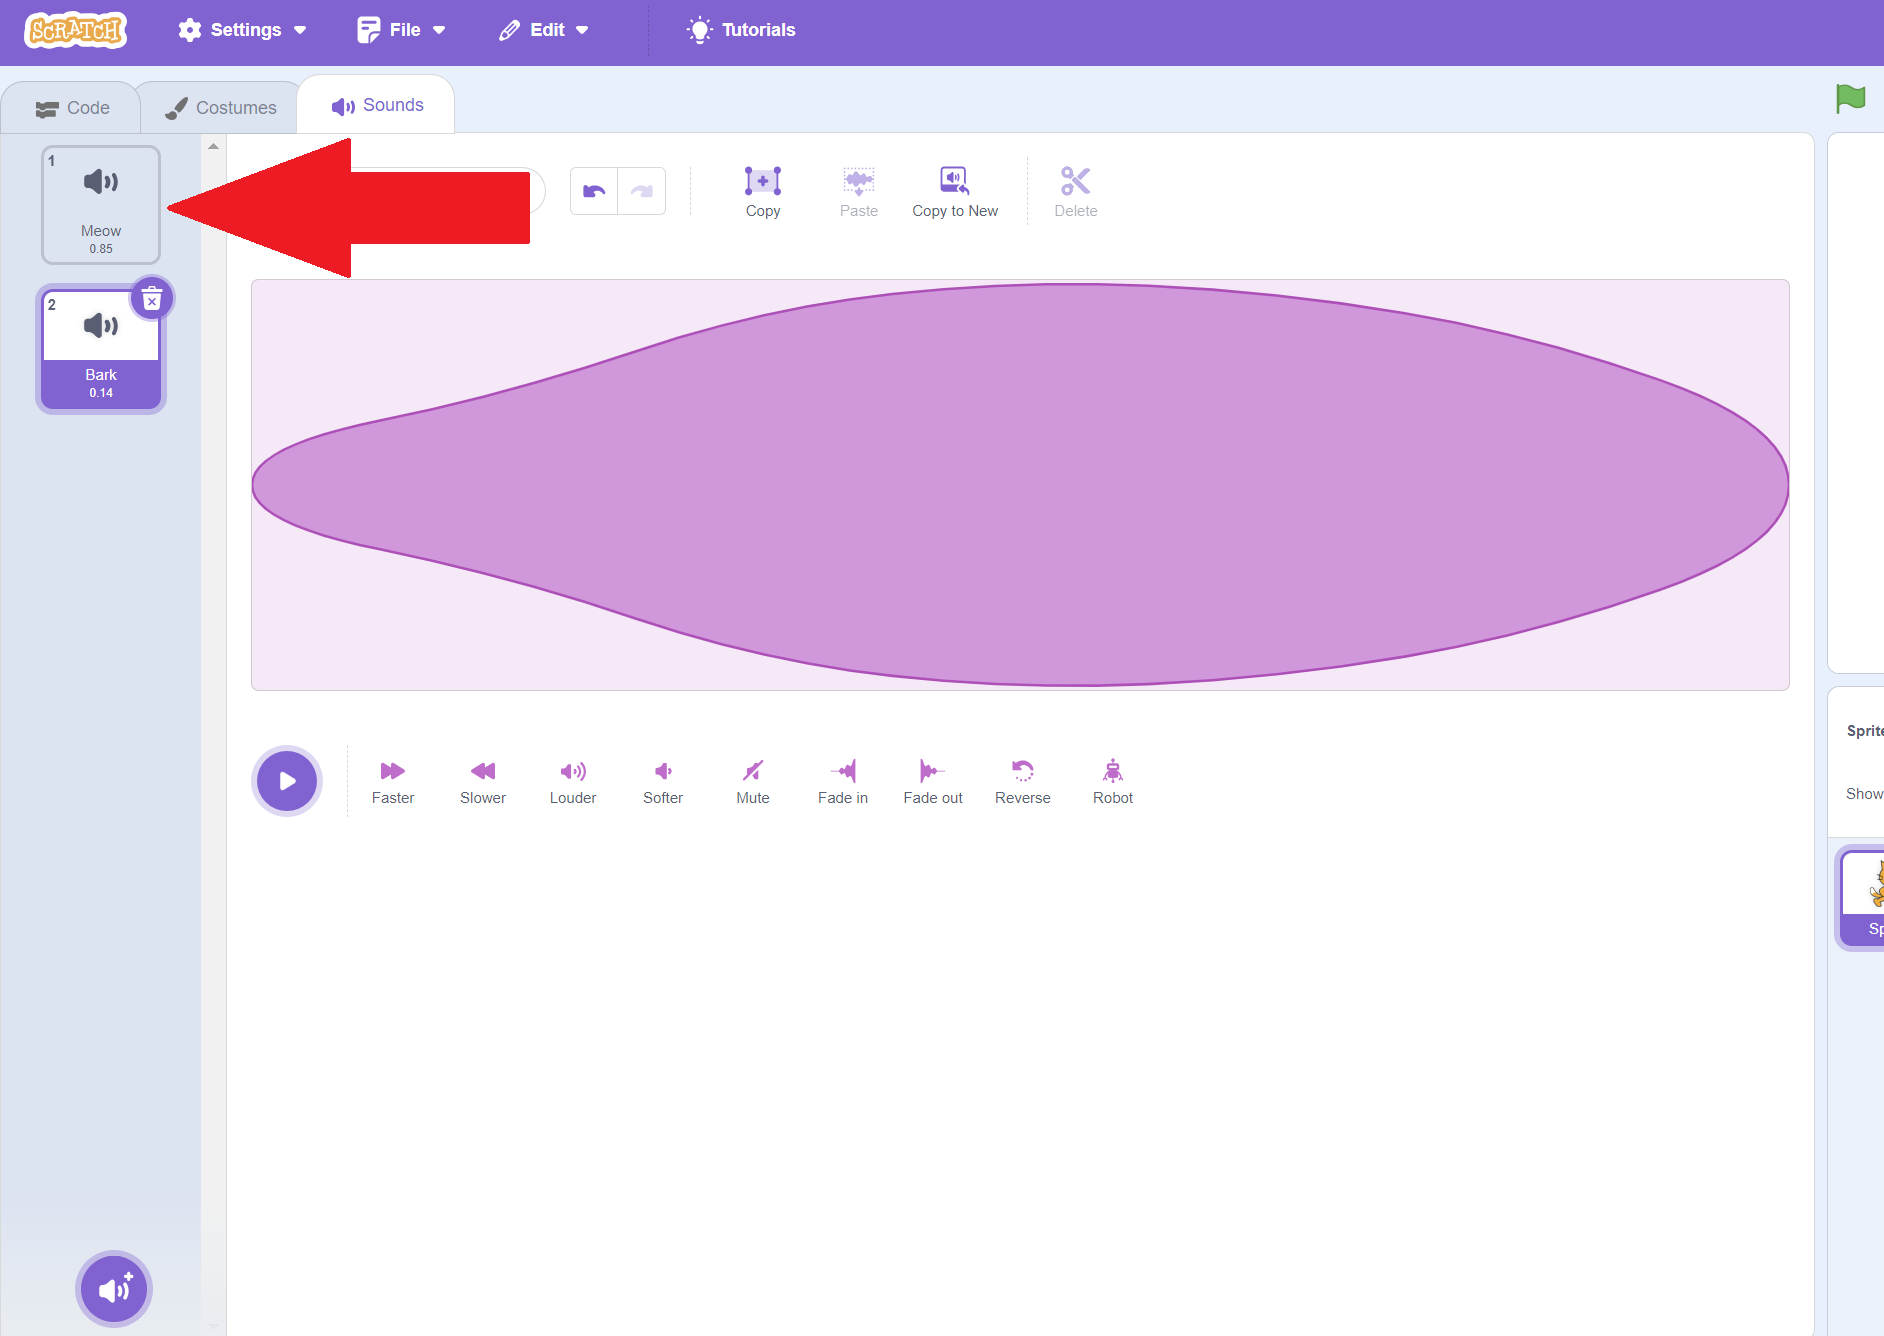
There are lots of ways you can edit the sound you picked! For example, you can make it, faster, slower, softer, louder, or even make it sound more robotic! If you don't like the change you made, just hit the undo button!

Once you are happy with your sound, you can hit the "Code" tab to return to the code area.

You will now see any sounds you added to the library in the select dropdown!
Feel free to add sound wherever you like in your code, either by using the sound from the Scratch library, or recording/uploading your own!
Adding Backdrops
Another important aspect for improving our code visually is adding a background. The default is just white, which isn't very exciting. We can see our current backdrop in the sprite pane. Beneath that, it will say a number, which represents how many backdrops you have added to your code: you'll start with just 1, which is the white backdrop.
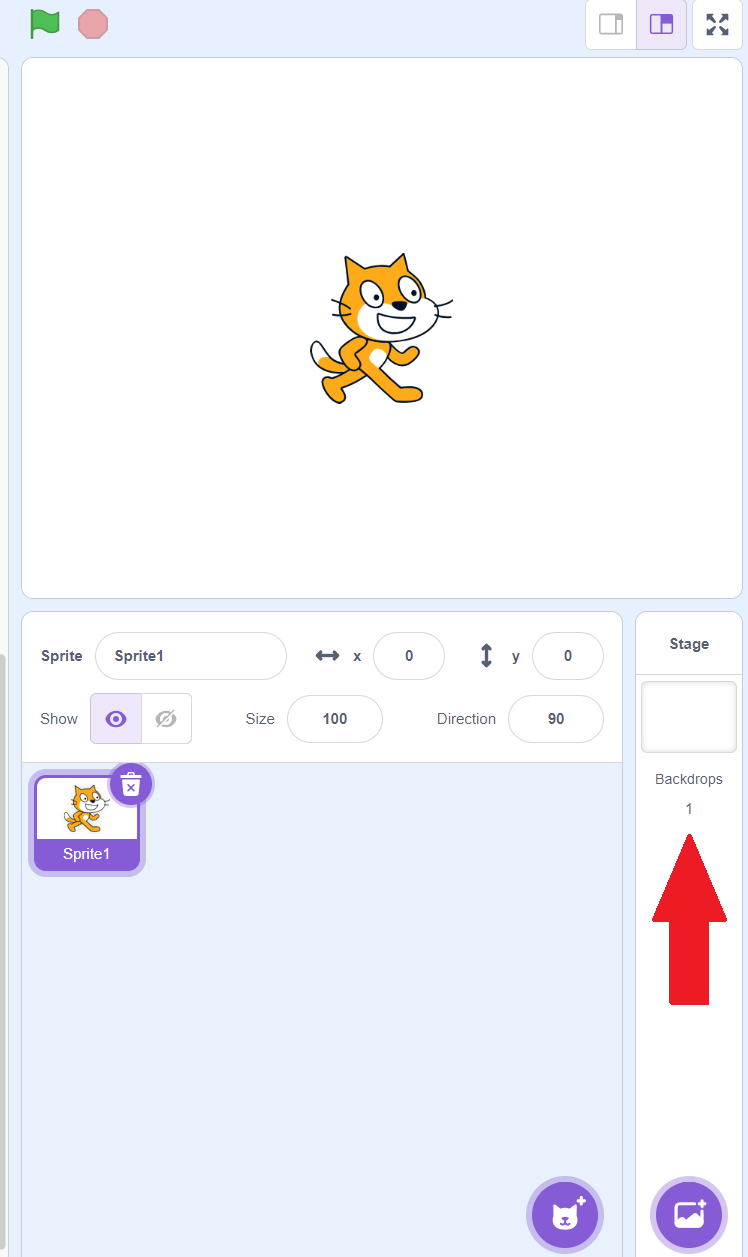
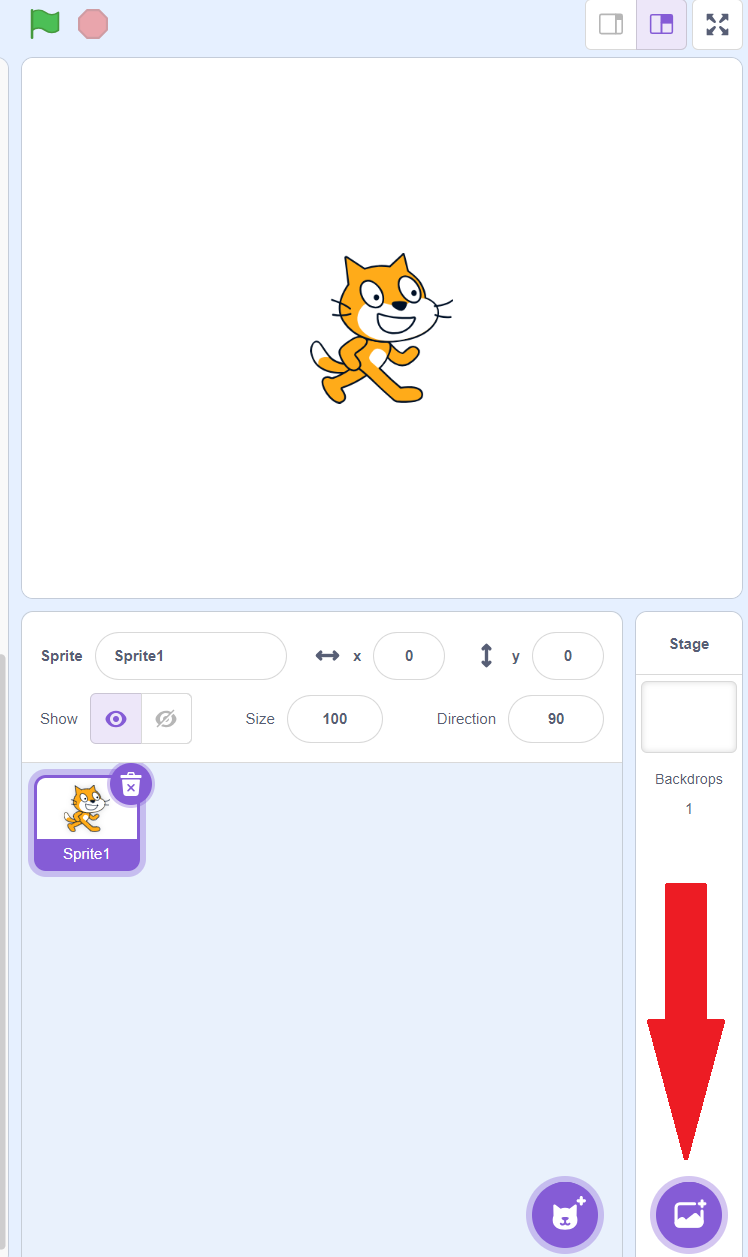
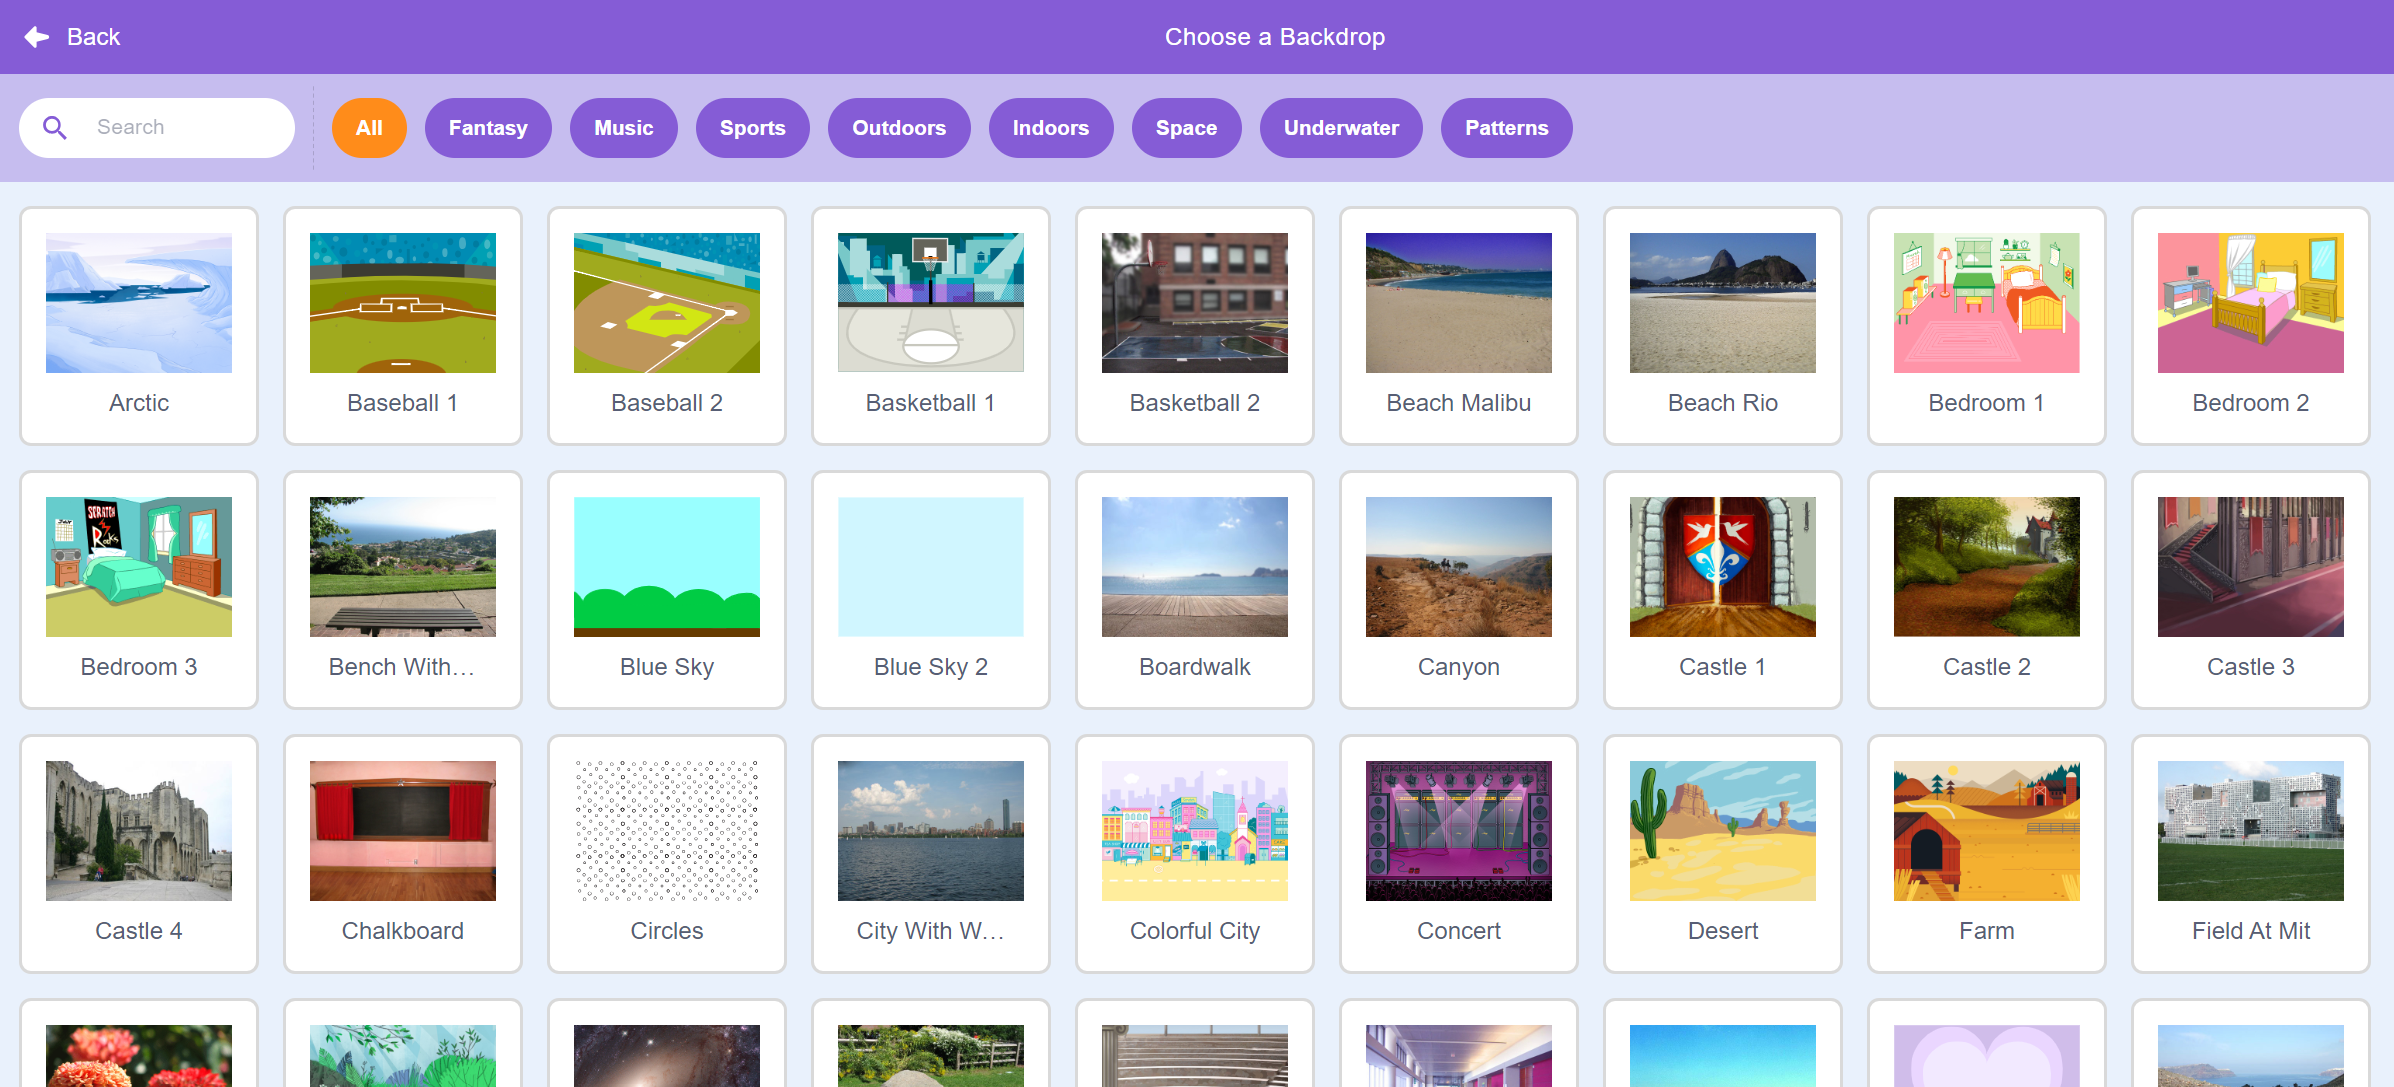
To add a backdrop, we hit the purple "Add Backdrop" button in the lower-right corner. You can hover over it to choose from uploading a backdrop, getting a surprise backdrop, painting a backdrop, or choosing a backdrop. You can also click it, which will take you to the default of choosing a backdrop. Try clicking it now!
On this page, you can use the top bar to search for a particular backdrop, or look at backdrops of a particular category. When you find a backdrop you like for your project, just click on it!
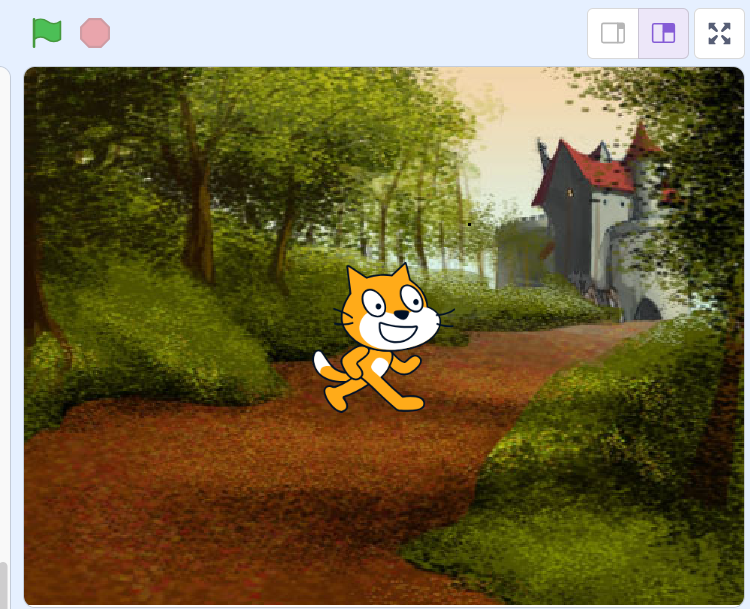
Your current backdrop will switch to the backdrop you just selected and you'll see your Sprite in the new location! The number of backdrops will increase to 2.
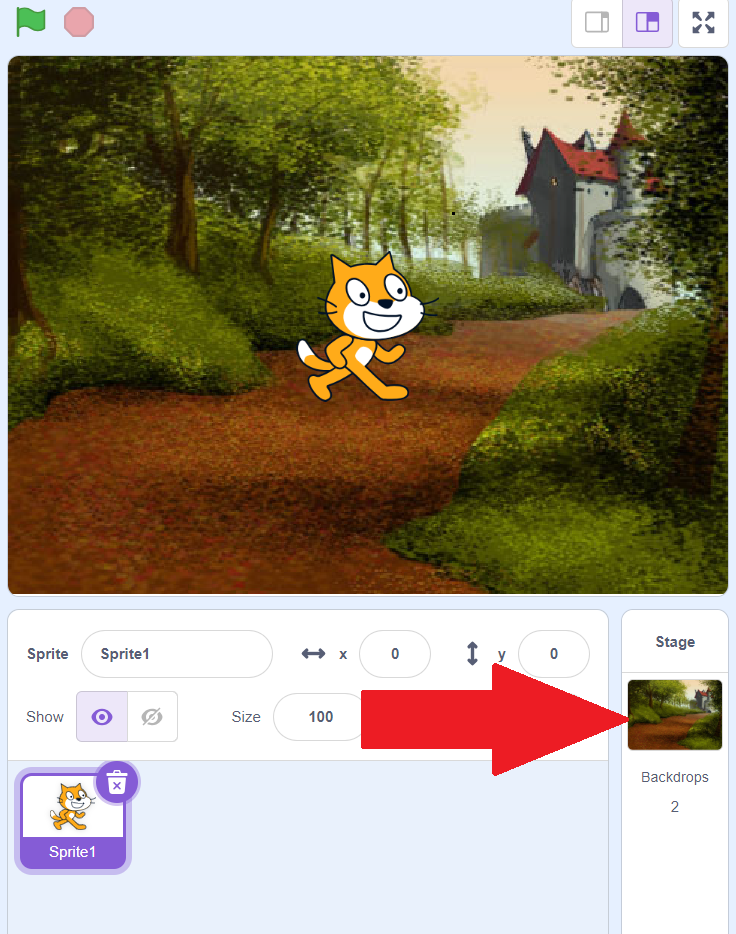
Just like we can add code for a sprite, we can add code for a backdrop too! To edit the code for a backdrop, click on the active backdrop in the sprite panel.
You'll see that your code area is now blank, and you'll see a picture of your backdrop in the top right of the code area, to show what you're creating code for right now.
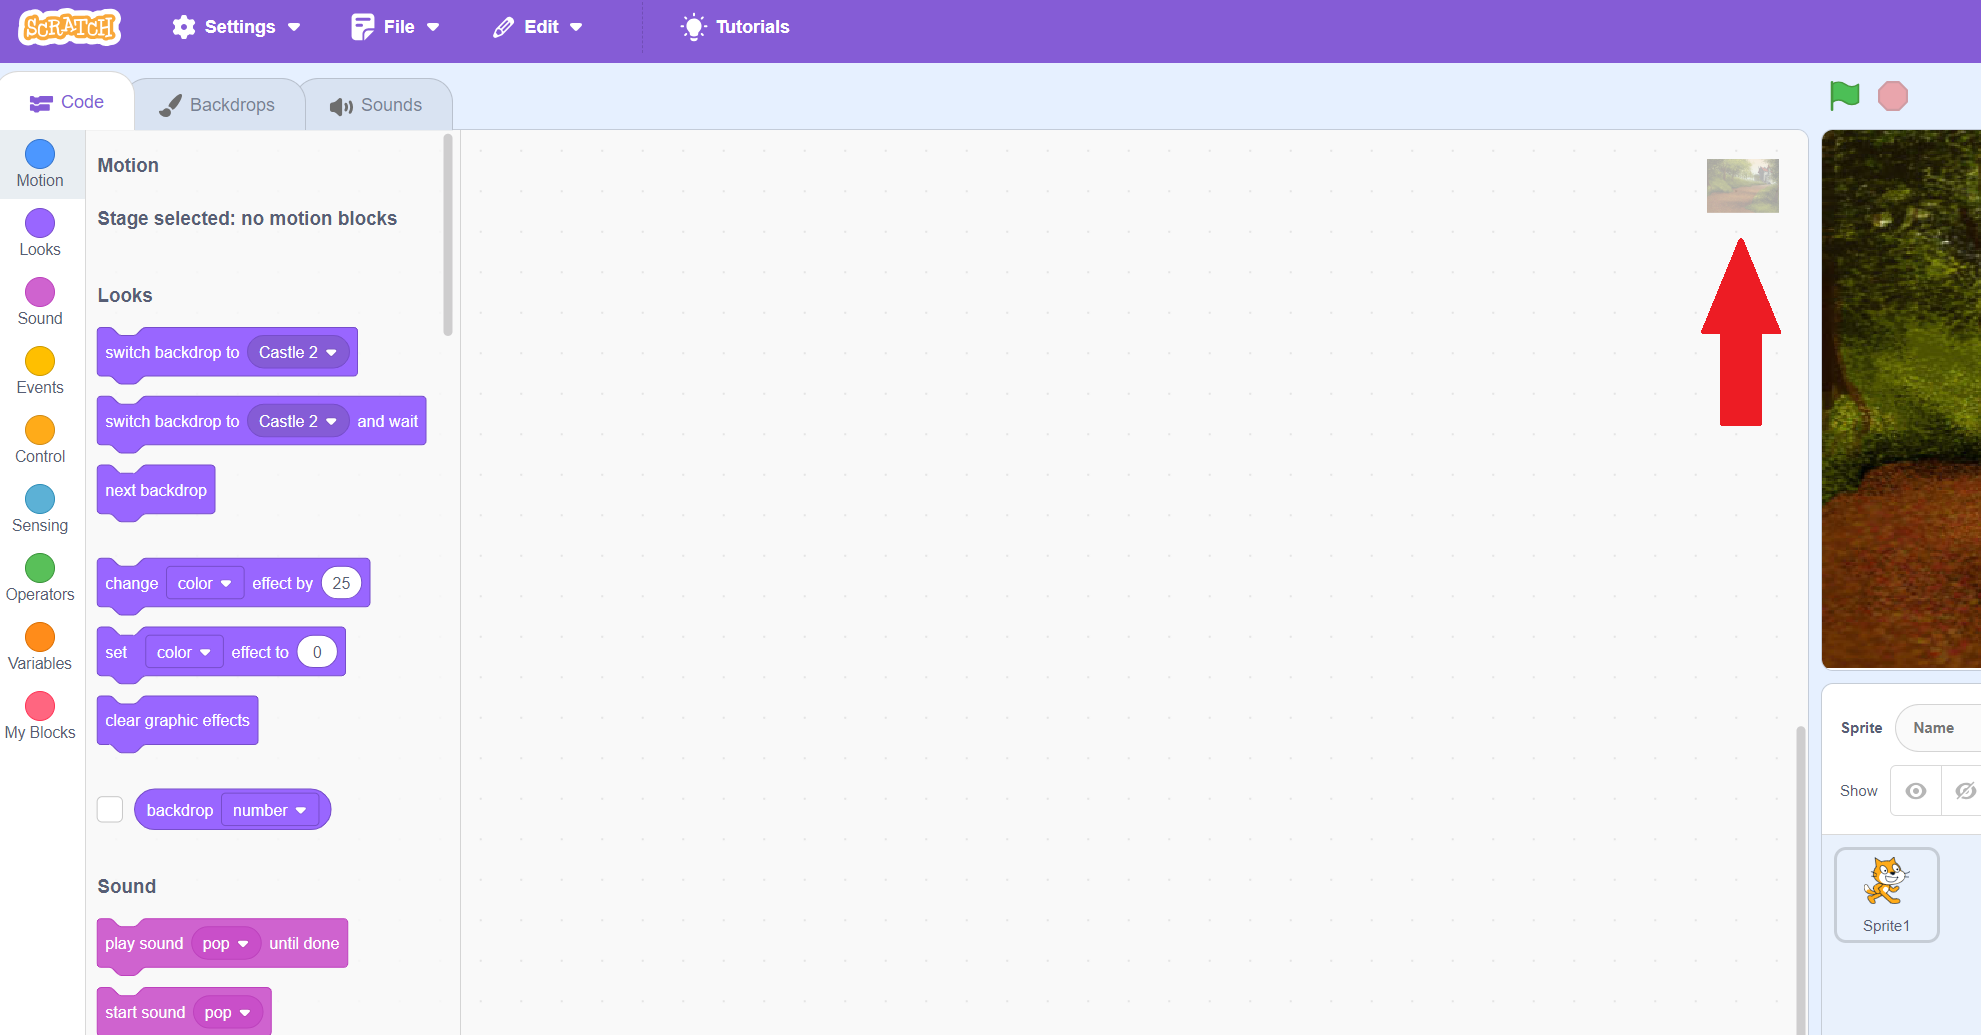
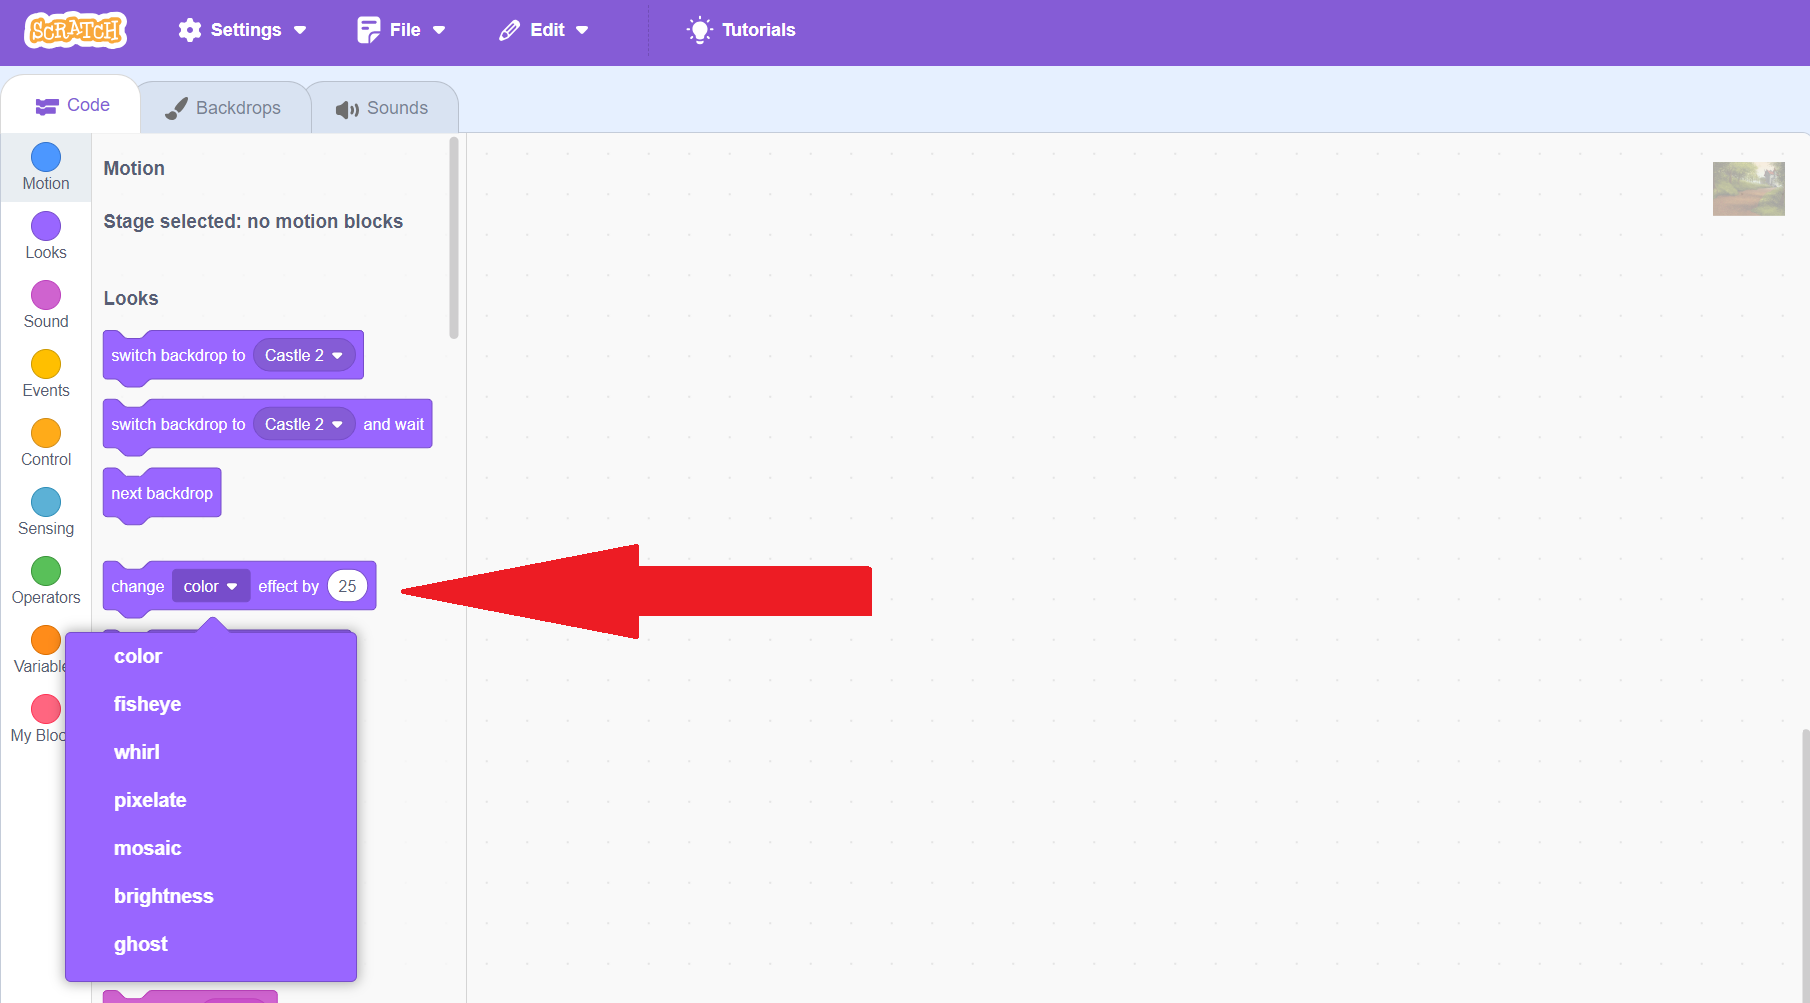
The options in the block palette have also changed, to be relevant to the backdrop. Try changing the option in the select dropdown of the "change effect" block and clicking on it to see how it affects the backdrop!
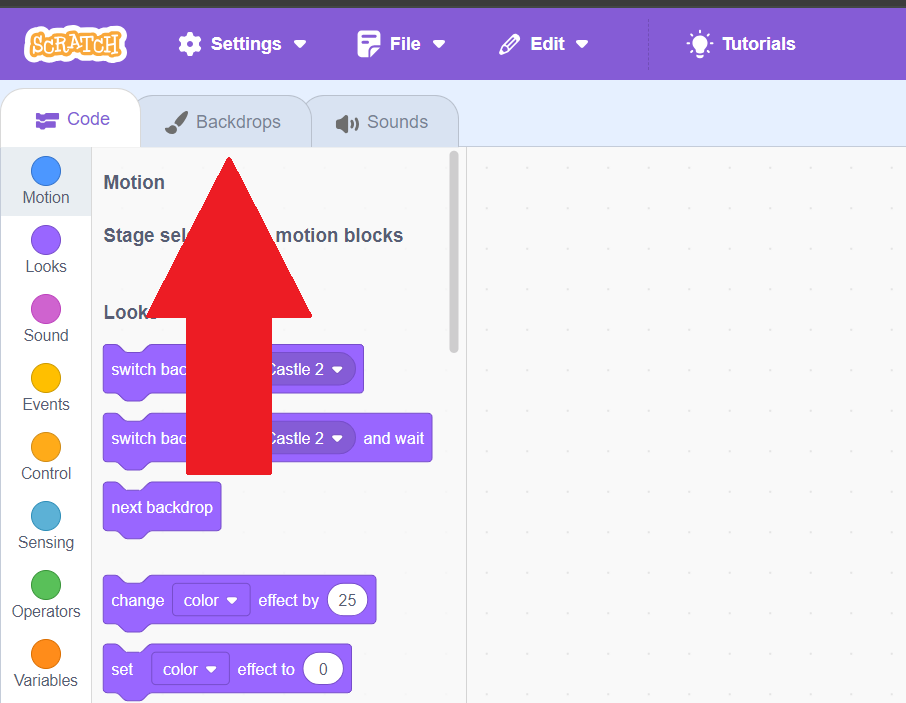
When you are coding for a backdrop, you'll see that the second tab in the block palette changes to "Backdrops". Click this to see all of your backdrops!
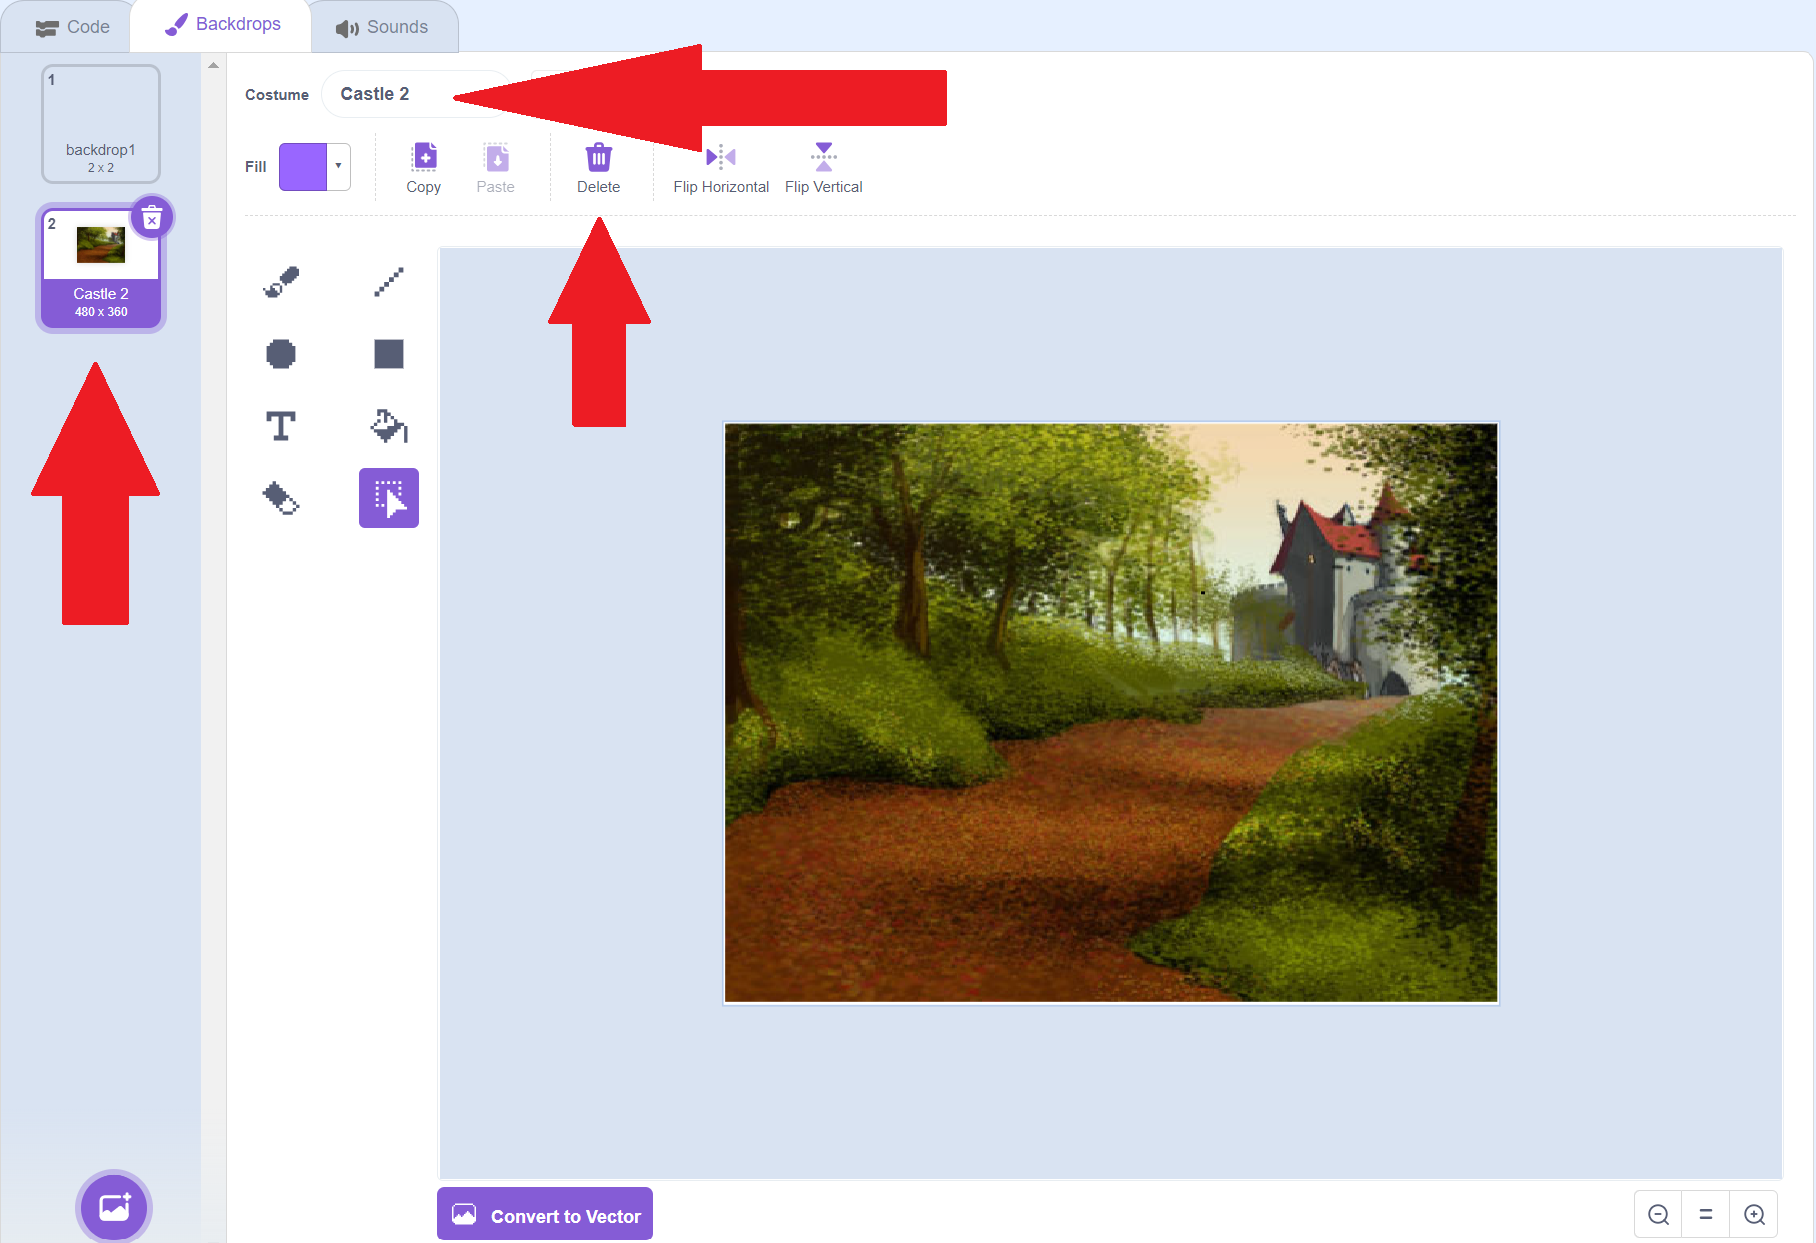
On this page, you can click between your backdrops on the left-hand side to switch between them, and change which one you're editing. In the editing panel, you can rename them or use the main screen to edit them by painting on them! You can also delete them, but the big delete button won't do that, that's for deleting your editing work. To remove a backdrop, you would hit the trashcan on the left panel where you switch between backdrops!
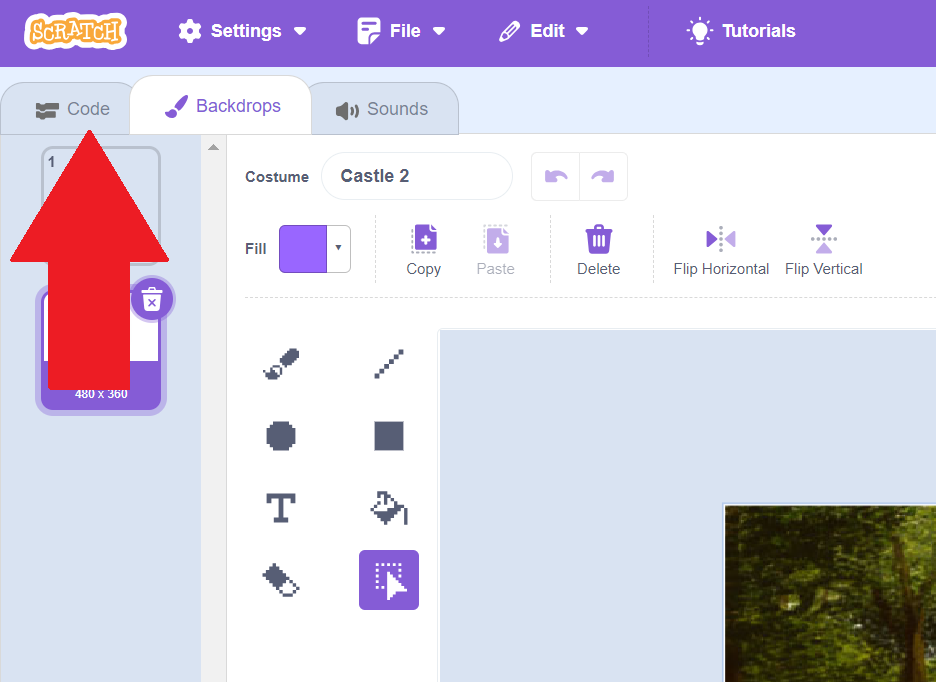
When you are done editing, you can hit the "code" tab in the top left to return to coding for the backdrop.
You can also make it so that the code for your sprite changes your backdrop! Click on your sprite to go back to the code for your sprite.
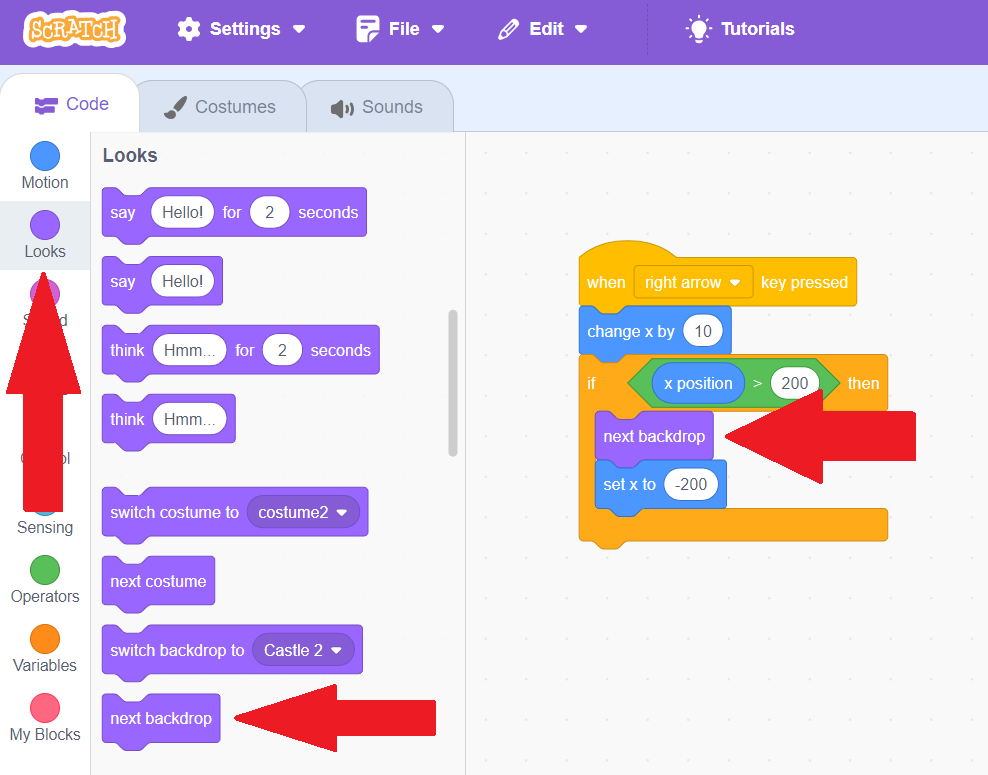
Let's make it so that we don't just go to the beginning of the stage when we hit the edge, we also go to the next location! Go to "Looks", and then find the code for "Next Backdrop". Put the "Next Backdrop" code into our if statement and press your right movement key until you hit the edge. Your sprite will switch locations!
Feel free to add as many backdrops as you'd like to switch between! Next, we'll learn how to change our sprite's costume, so we can change how our sprite looks!
Changing Costumes & Forever Blocks
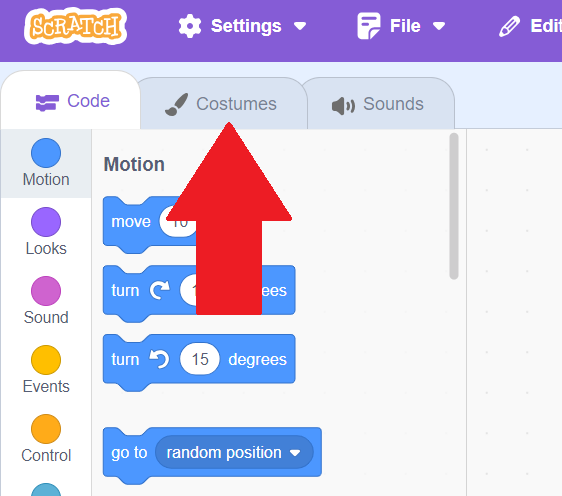
To make our game feel more real, we want out sprite to look different when he's moving than he does when he's standing still! You may also want to have your sprite change outfits in the story or game you are creating. We do this through costumes! To look at a sprite's costumes, click the second tab called "Costumes".
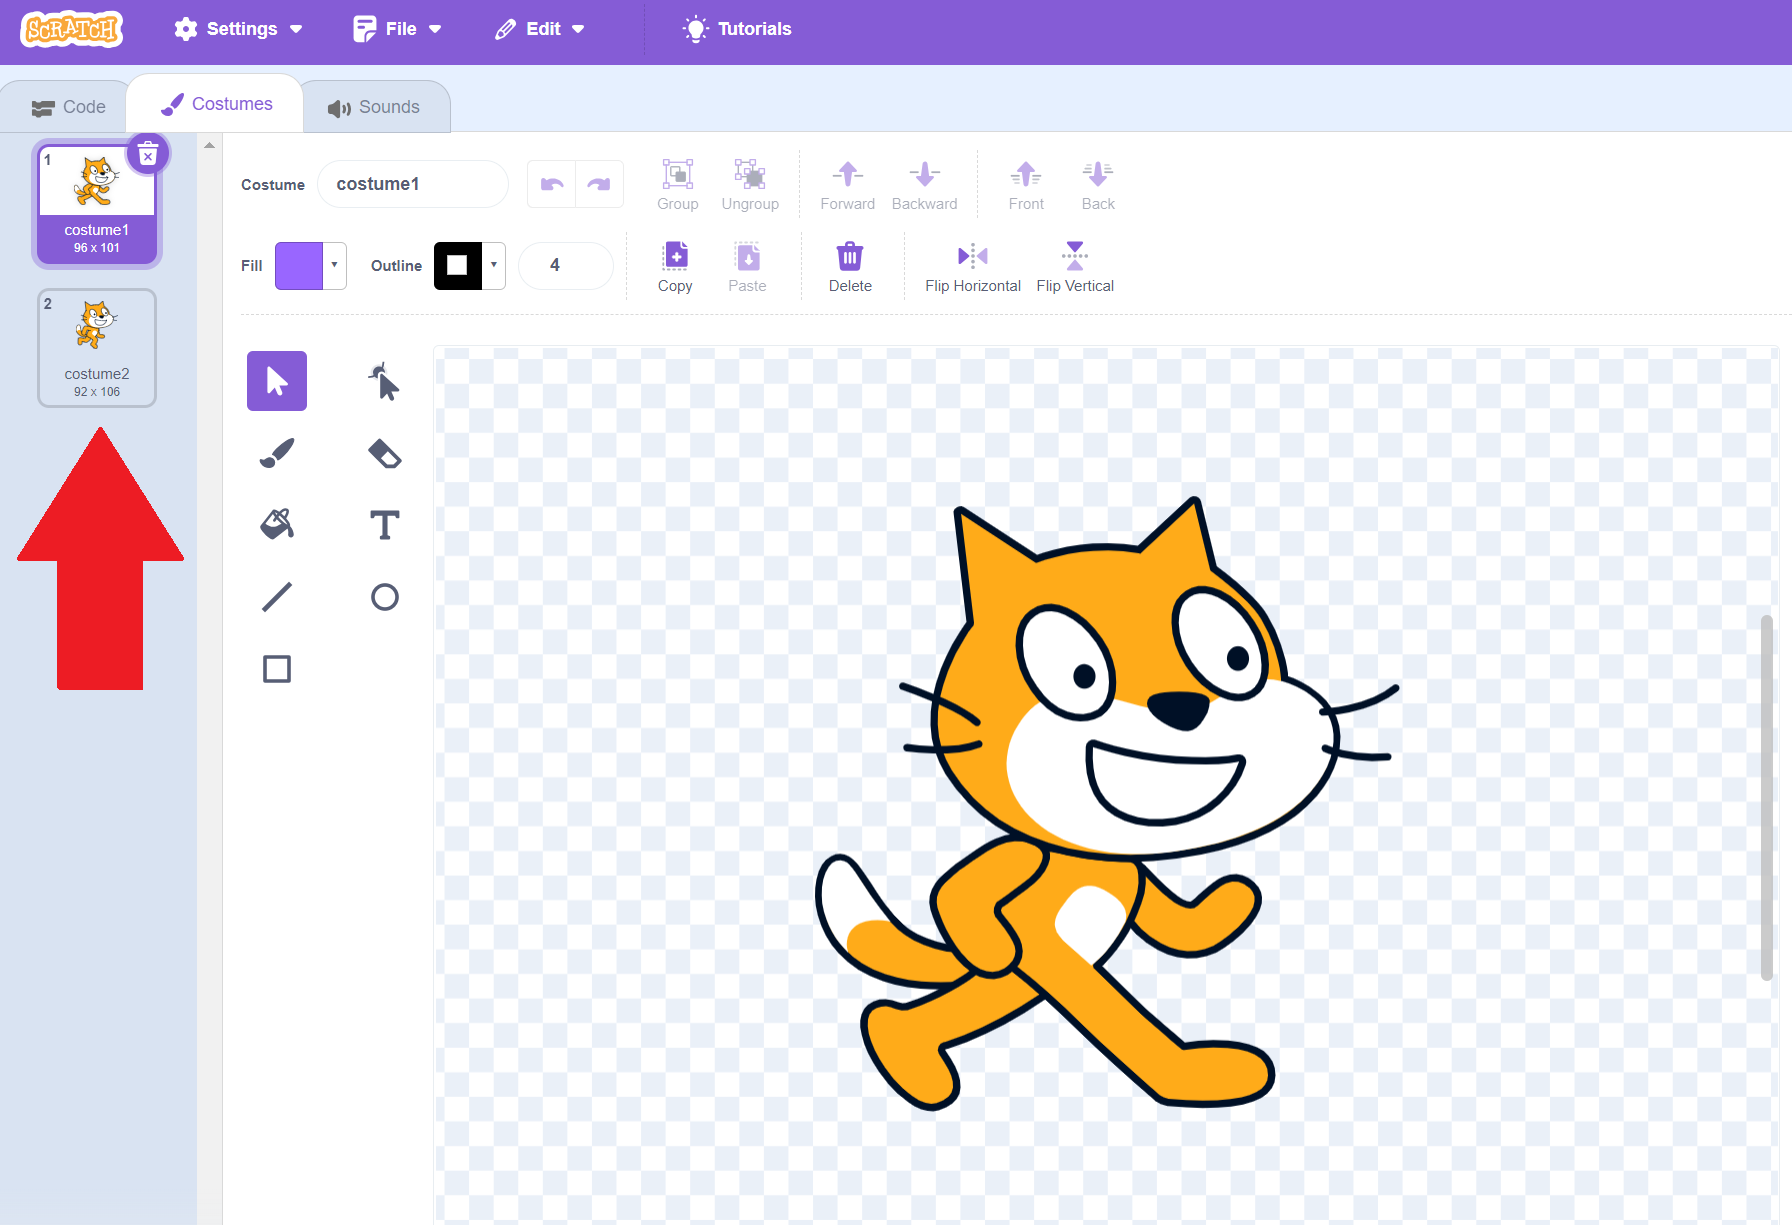
Scratch Cat comes with two default costumes: walking (costume1) and running (costume2). You can click the costumes on the left-hand side to see what they look like.
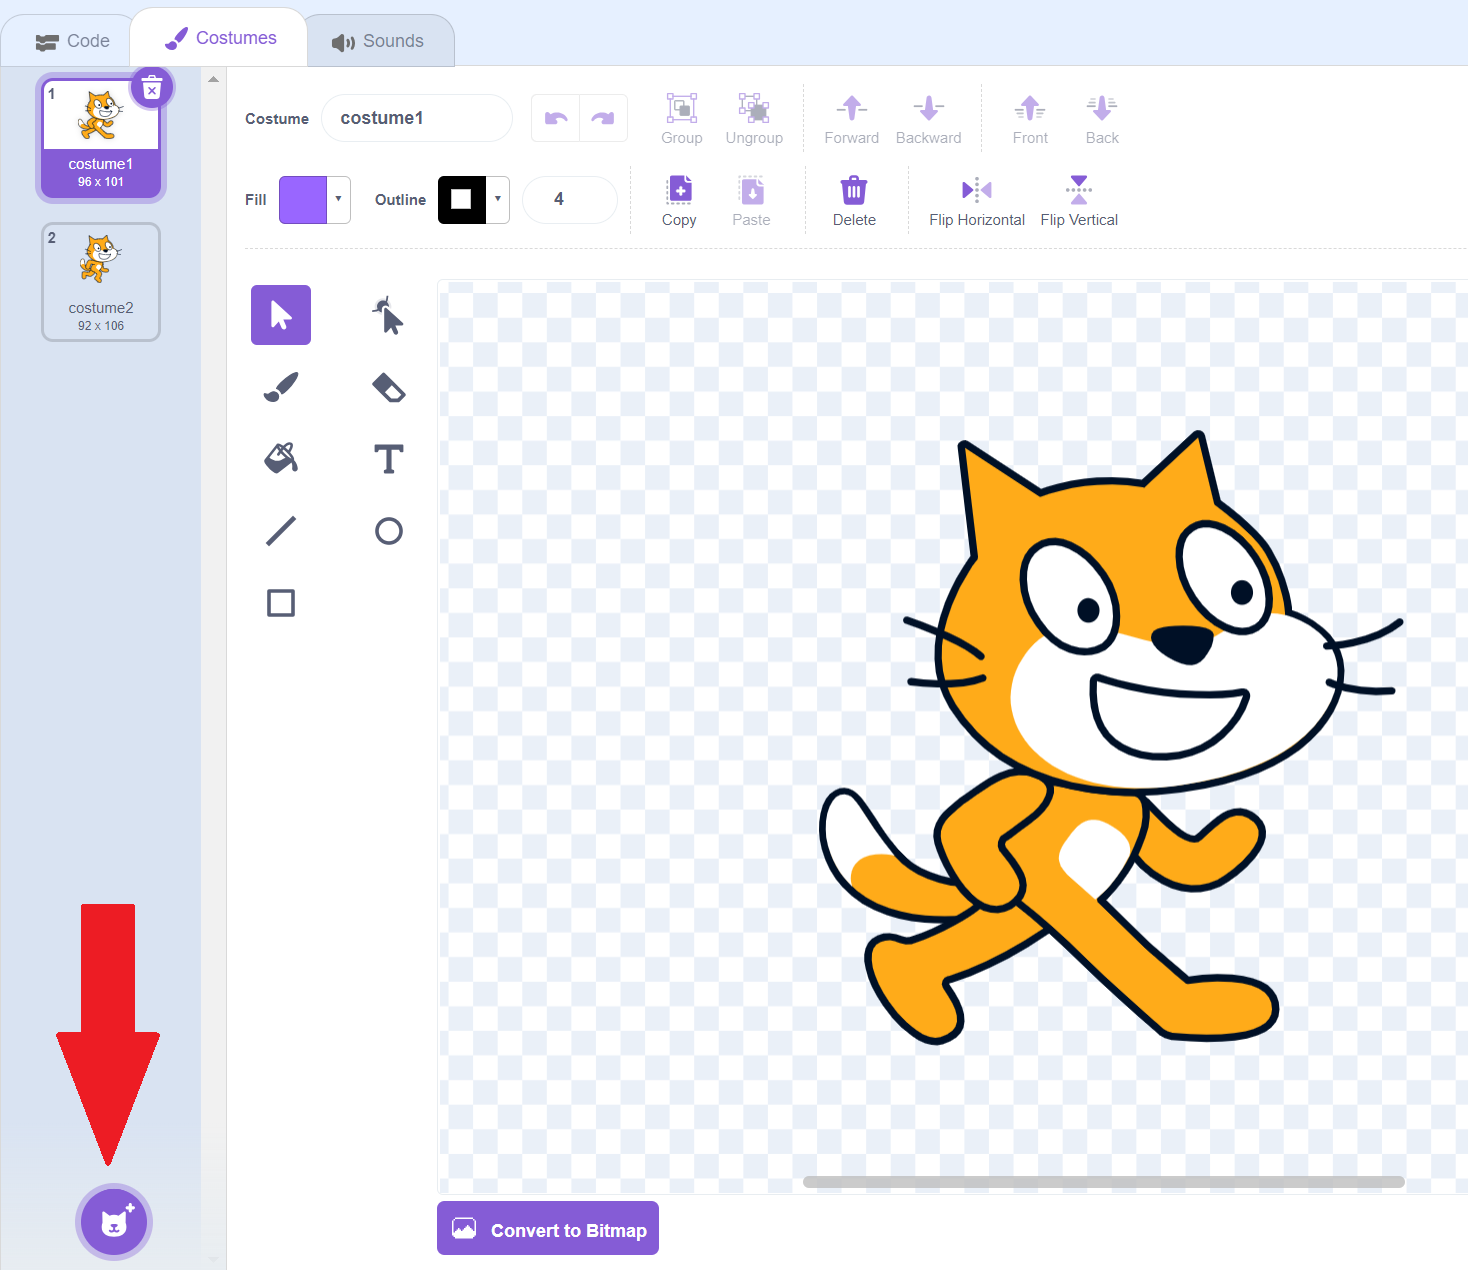
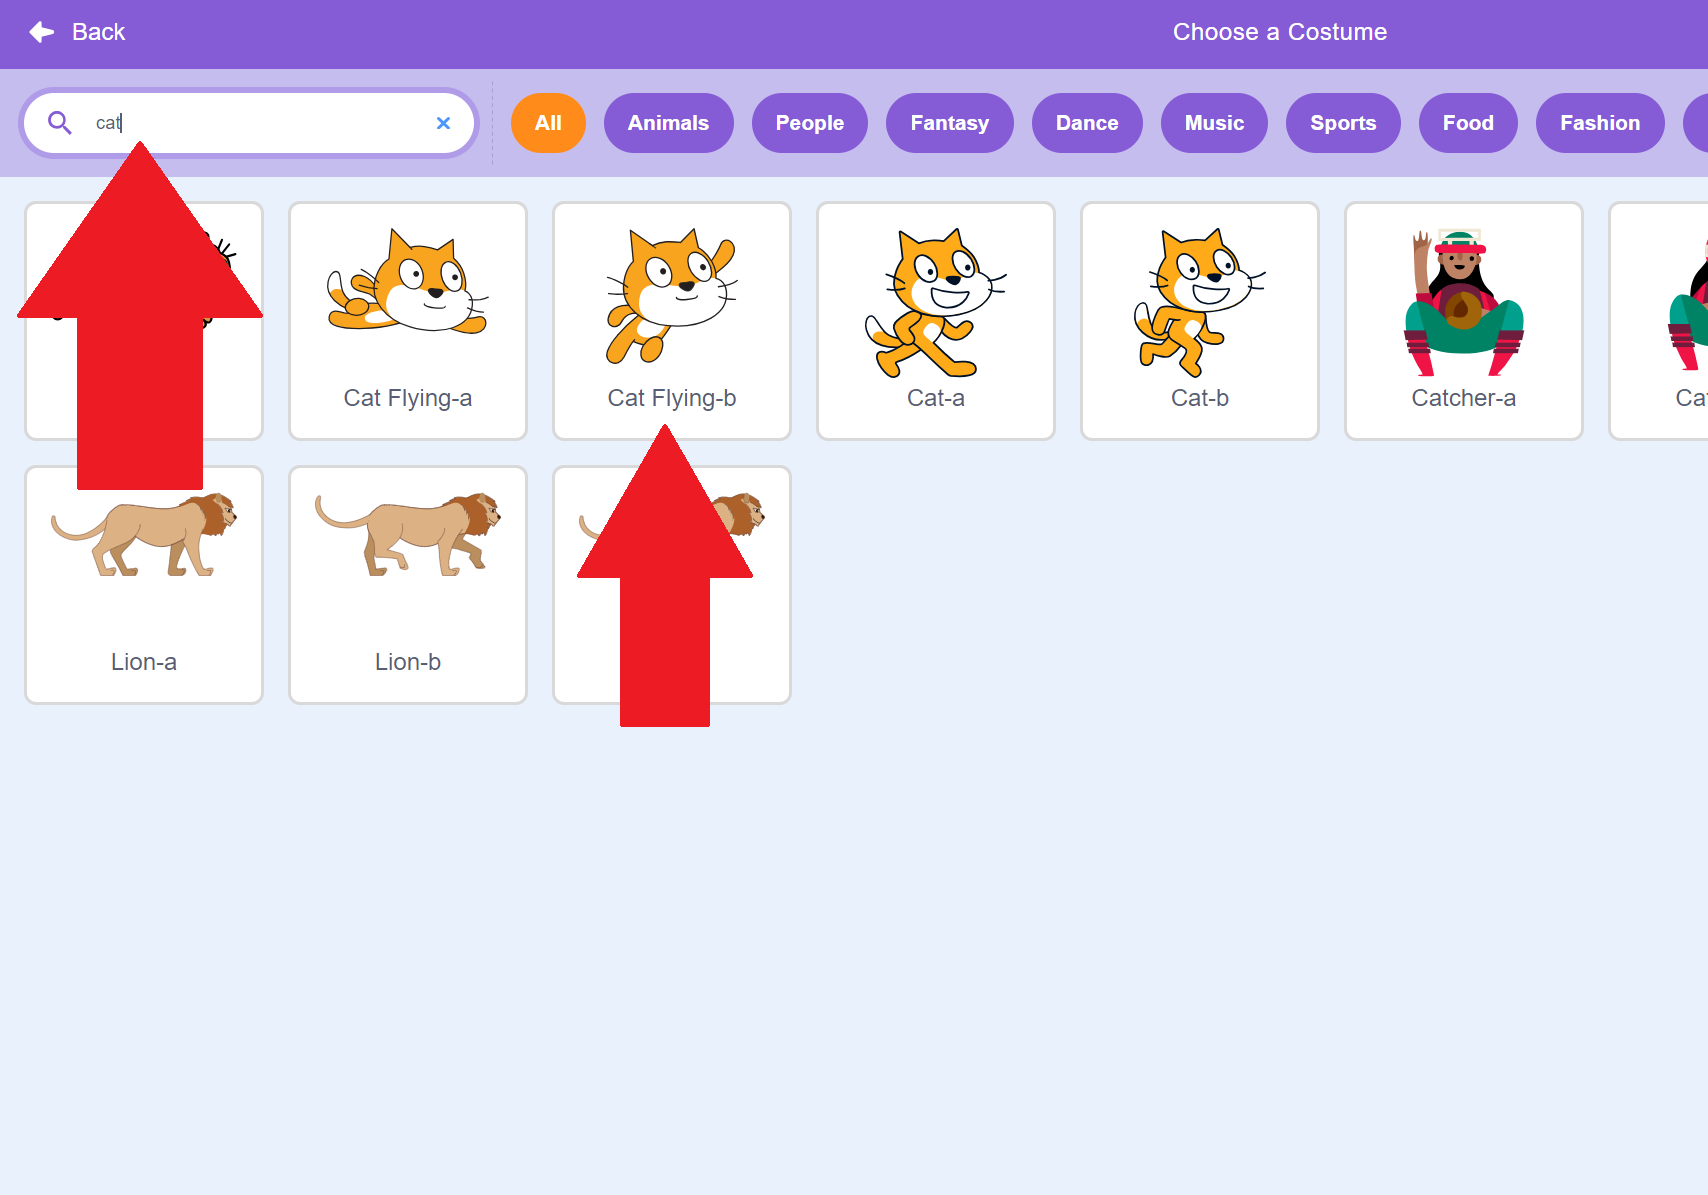
To add a new costume, we want to hit the Choose a Costume button in the bottom left. As with the other add buttons, you can hover to upload, get a surprise, etc, but this time, we just want to choose! Click that button.
You'll see a lot of options that look nothing like our cat! Let's type cat in the search bar to see ones that look like our character. One of them shows him flying up, called "Cat Flying-b". This will be useful for our upward motion. Click on that.
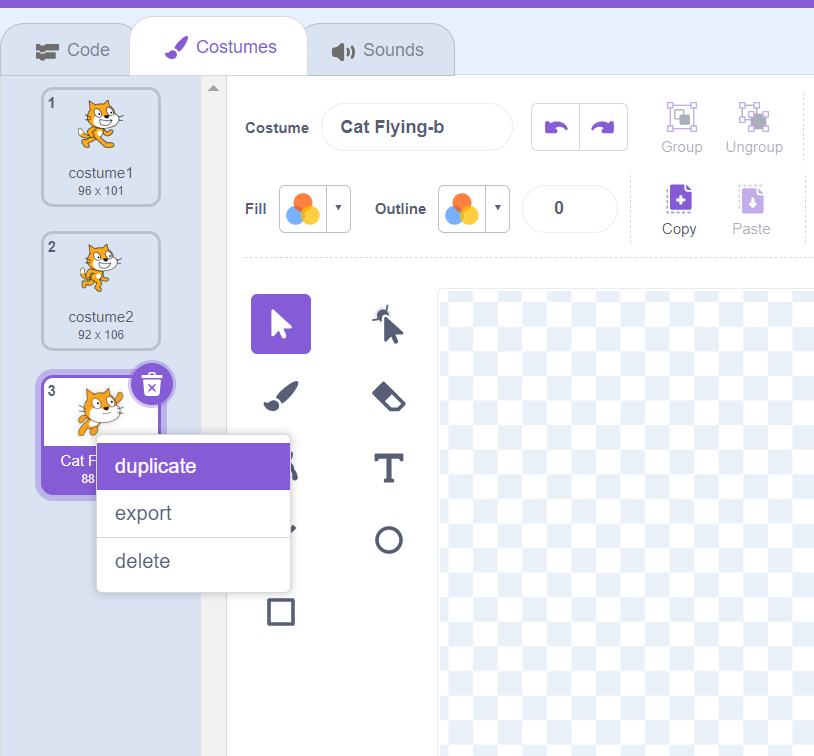
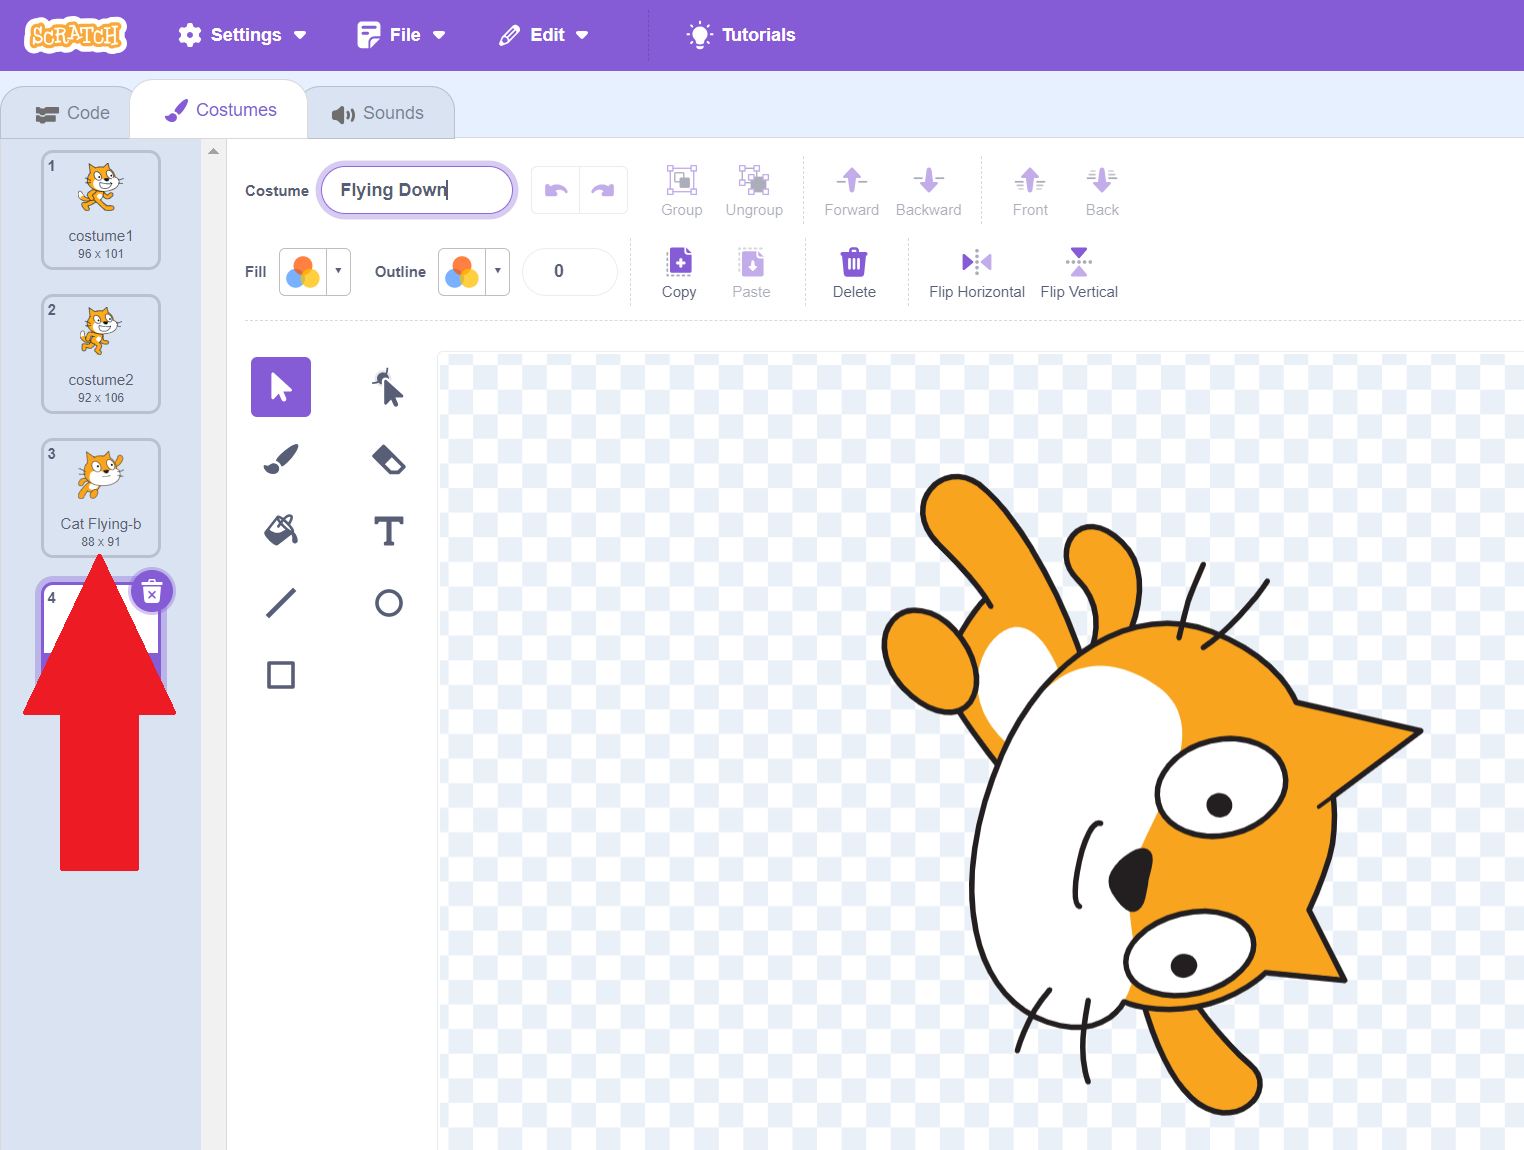
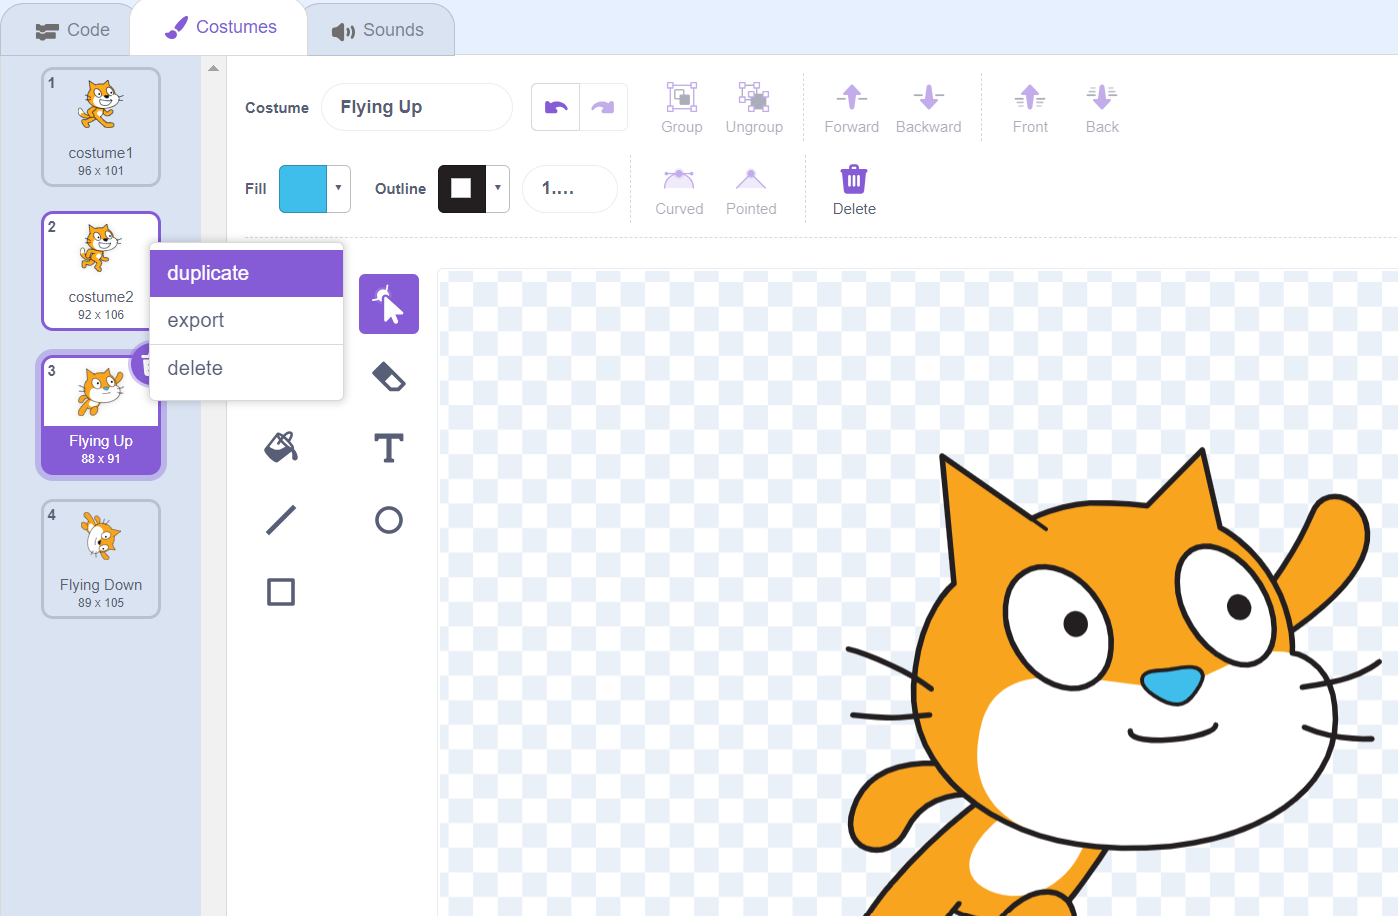
We now have one for flying up, but what about flying down! We can make a similar costume that is the same as this one, but turned to be facing downards. To make another costume that's similar, we want to duplicate it! Right click our third costume and choose "duplicate" to make a fourth costume!.
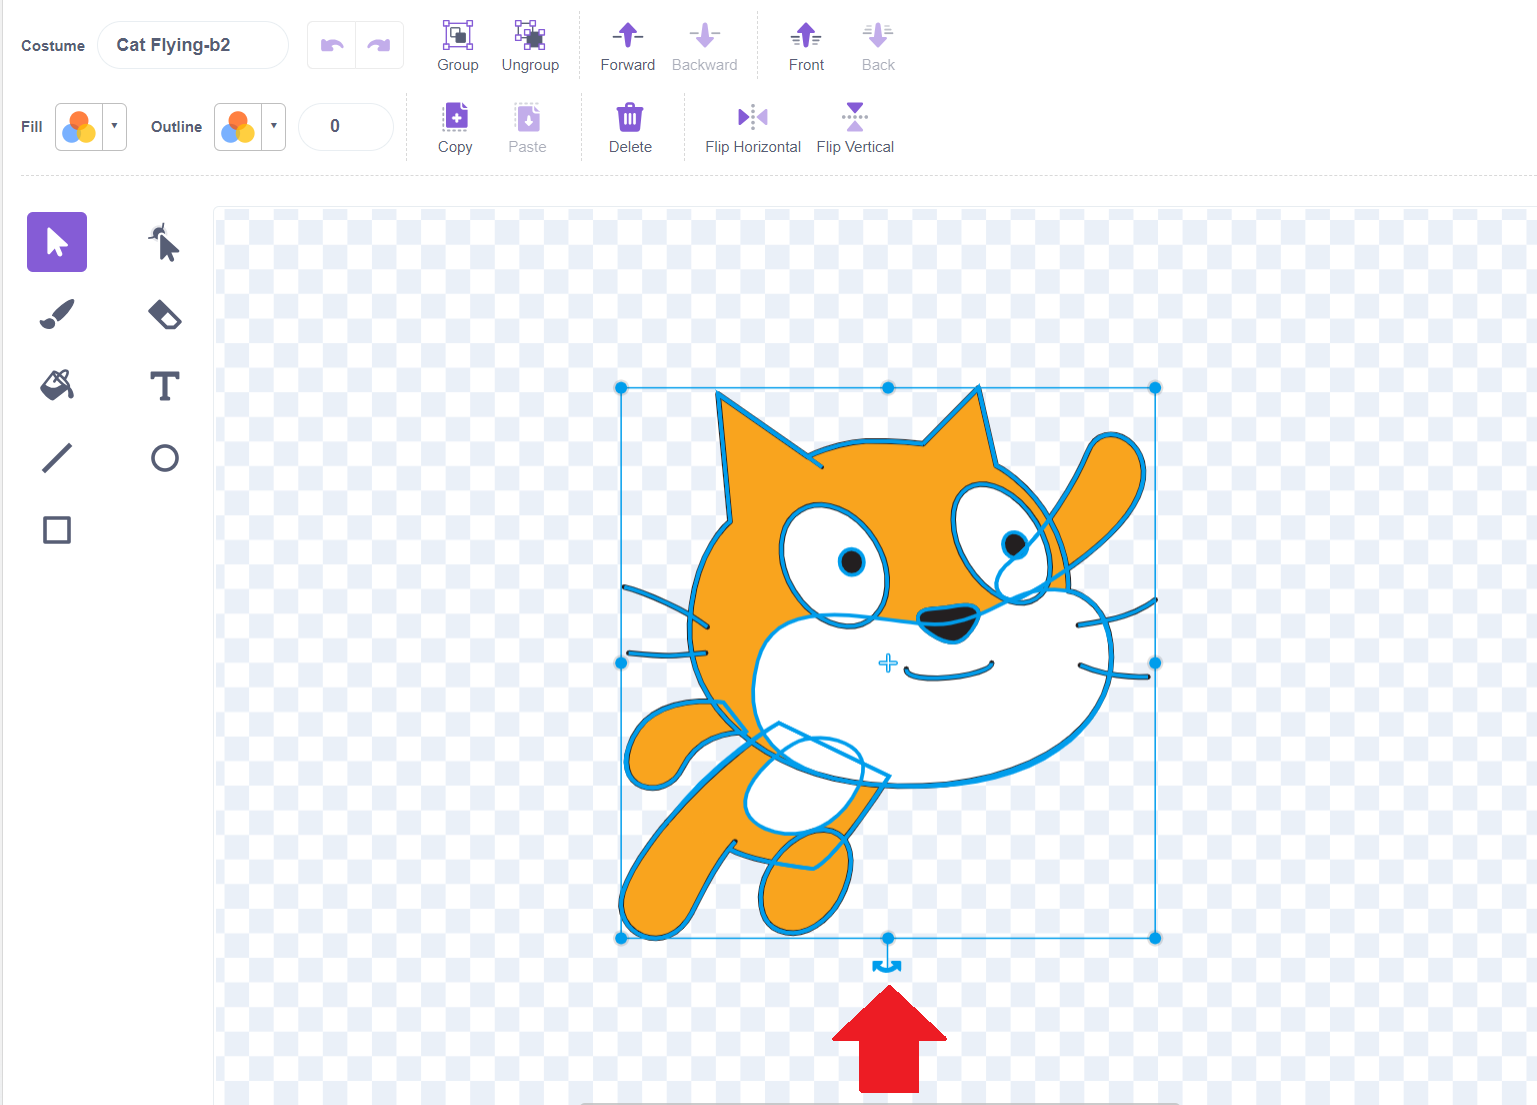
Click on the top left of the costume in the editor, and then drag the mouse until the rectangle covers the whole cat. Let go, and the cat will be selected in blue! You can then click and drag the curvy arrows at the bottom to turn the cat so that it's facing down.
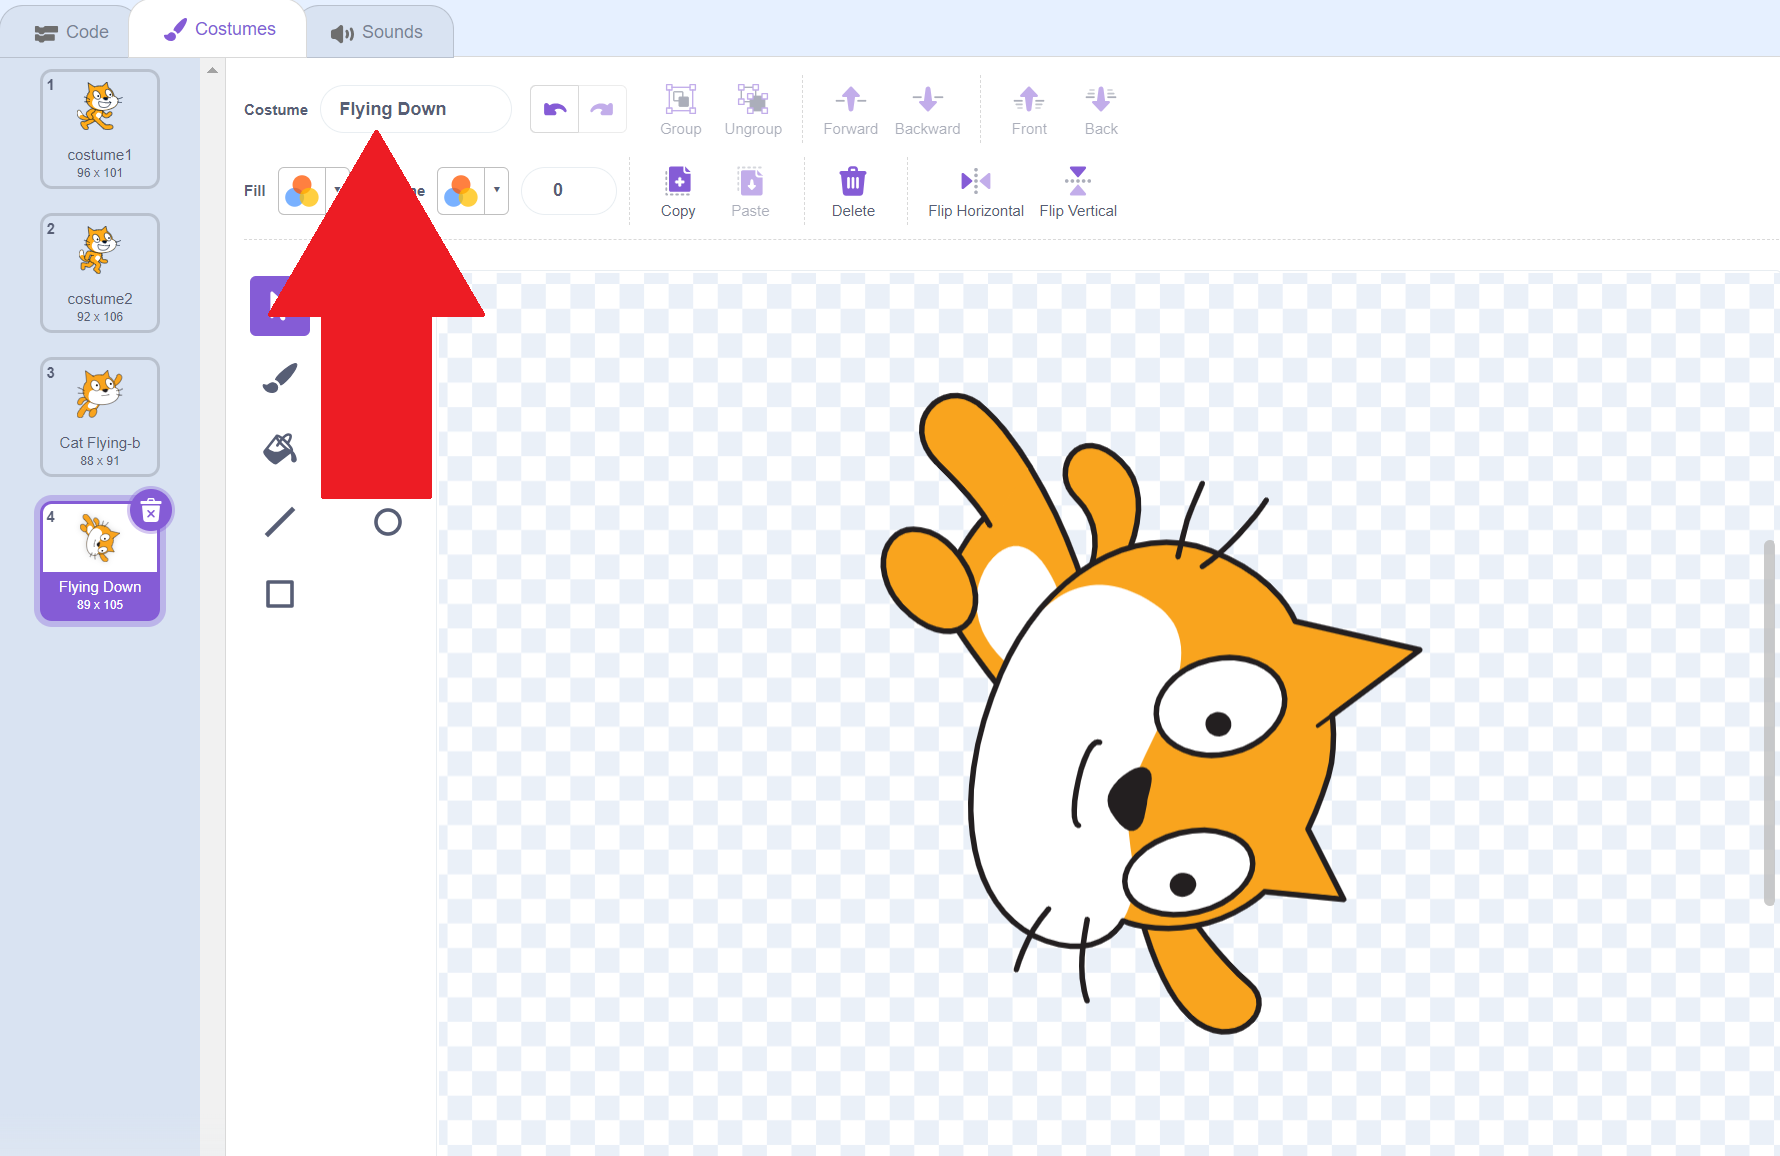
Click anywhere off of the cat in the editing area (with the grey and white checkerboard) to unselect everything. Then, let's rename it to "Flying Down" so we can easily remember it. This is done by typing in the box in the upper left of the editor.
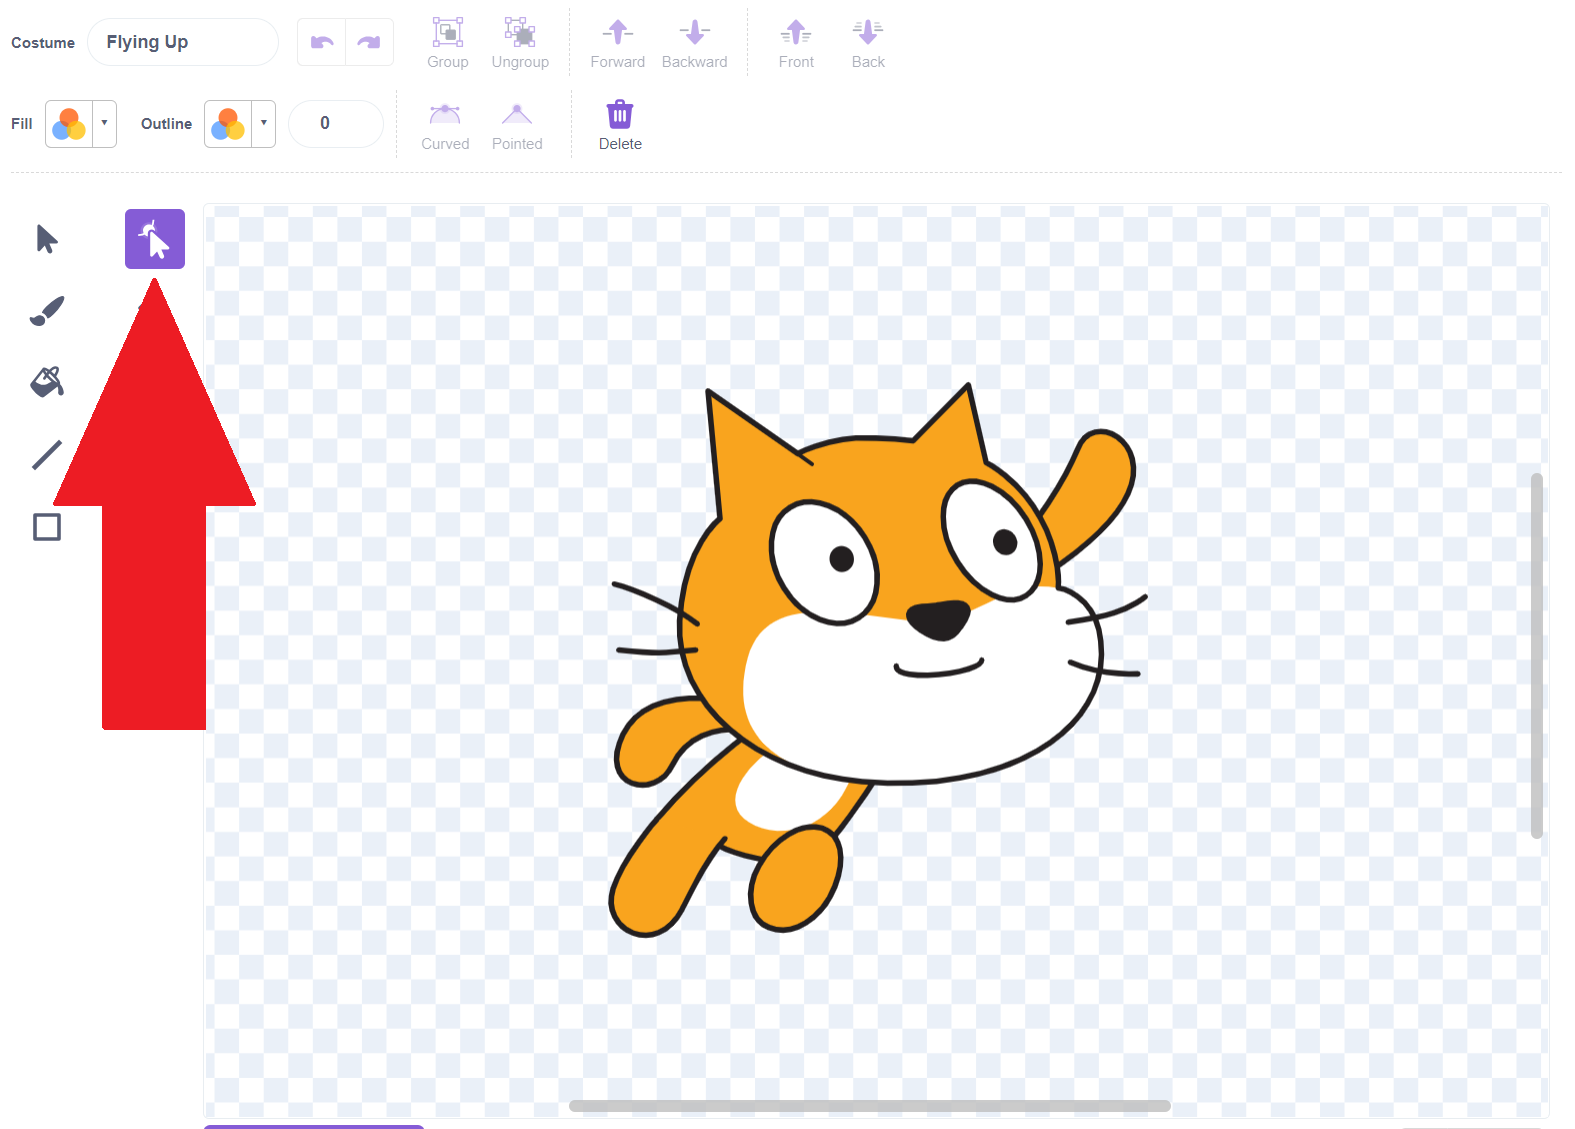
Let's change the name of our flying upwards costume so it's more clear! Click on that costume on the left-hand side to go back to it. Then, change the name to "Flying Up" or whatever will help you remember!
We can also make changes to the costumes in the editor. When we're flying up in the sky, it gets cold. Let's show that his nose is cold when flying up by making his nose blue! First, we want to click on the reshape tool.
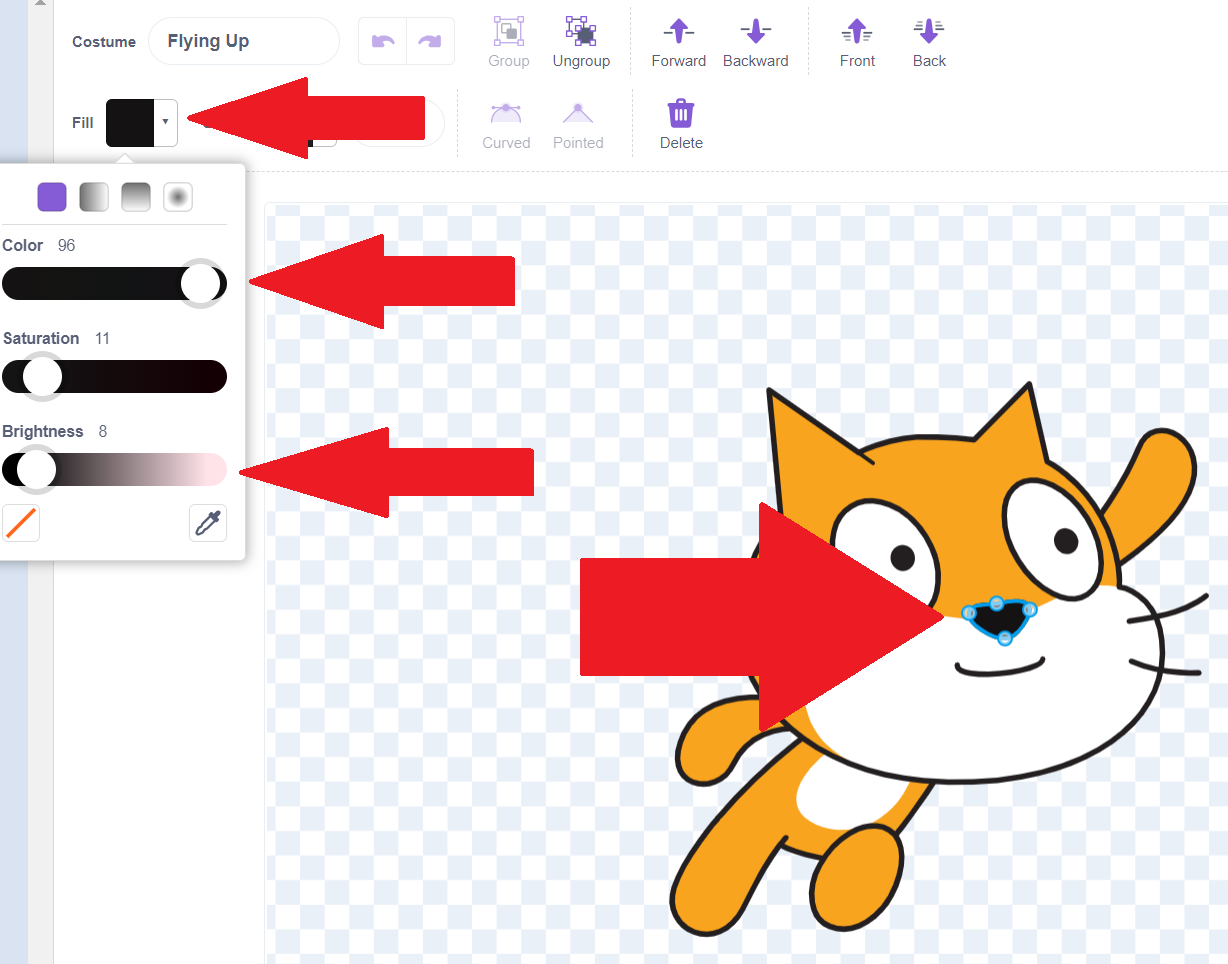
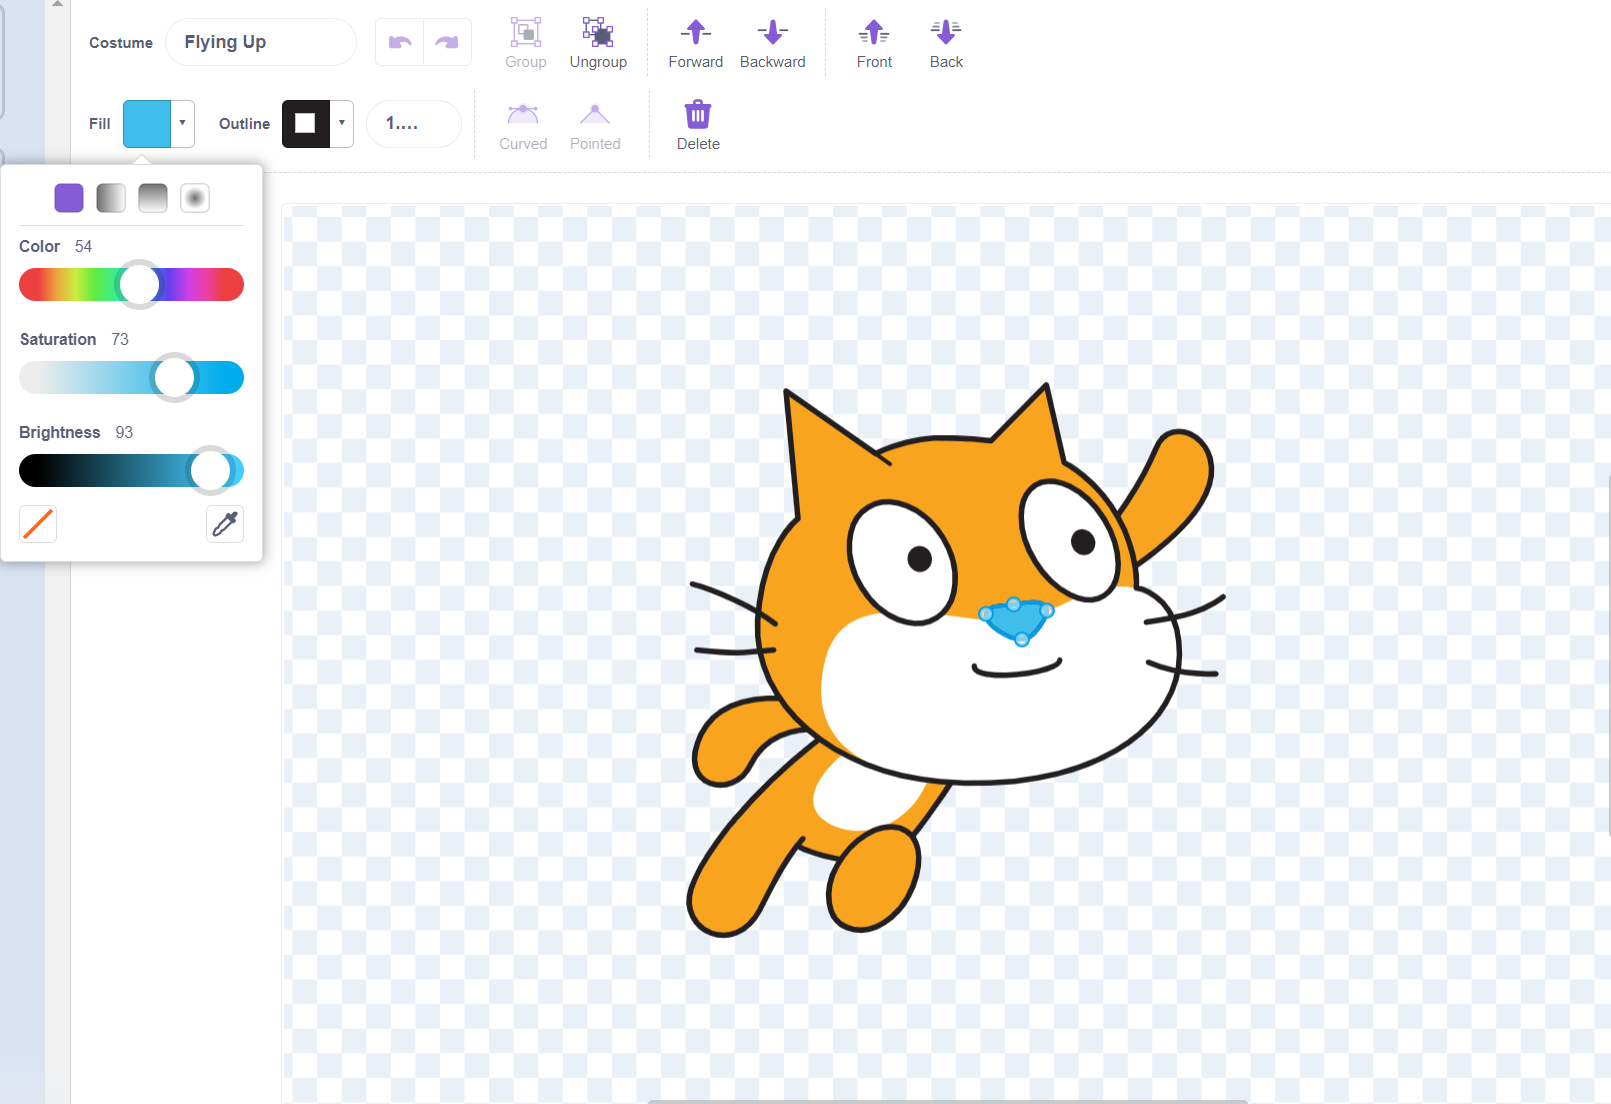
Click on the cat's nose. It will show it's selected by highlighting in blue. Then click the arrow by "Fill" in the top right. All of the colors in the first slider look black, so let's first drag the 3rd slider up to make the brightness higher! You may also want to increase the saturation to make the color more intense. Then, you will see colors in the top slider. Drag it until the nose is the color you want, then click out of the fill box to close it.
Finally, we need a costume for when our cat is moving to the left! Let's right click on costume2 and duplicate it.
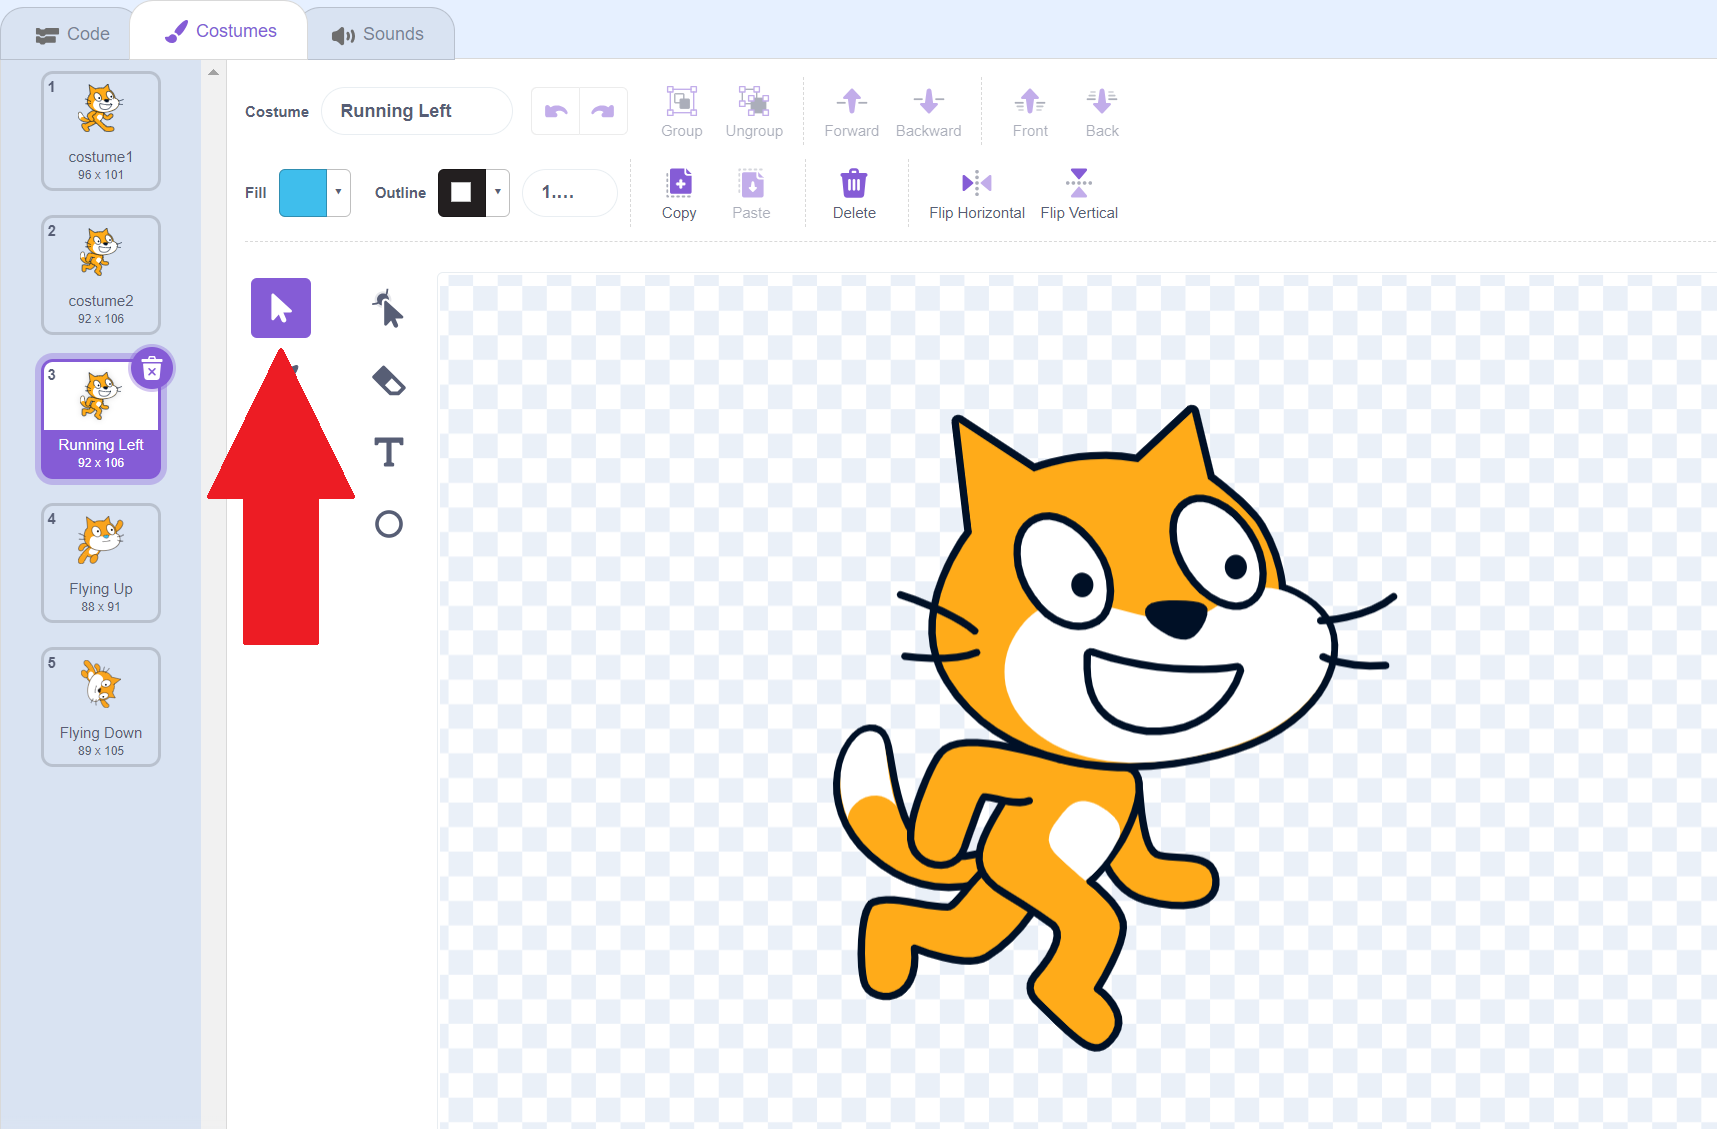
Let's rename our "Running Left" costume, and then click on the select tool. This select tool will give us new design options!
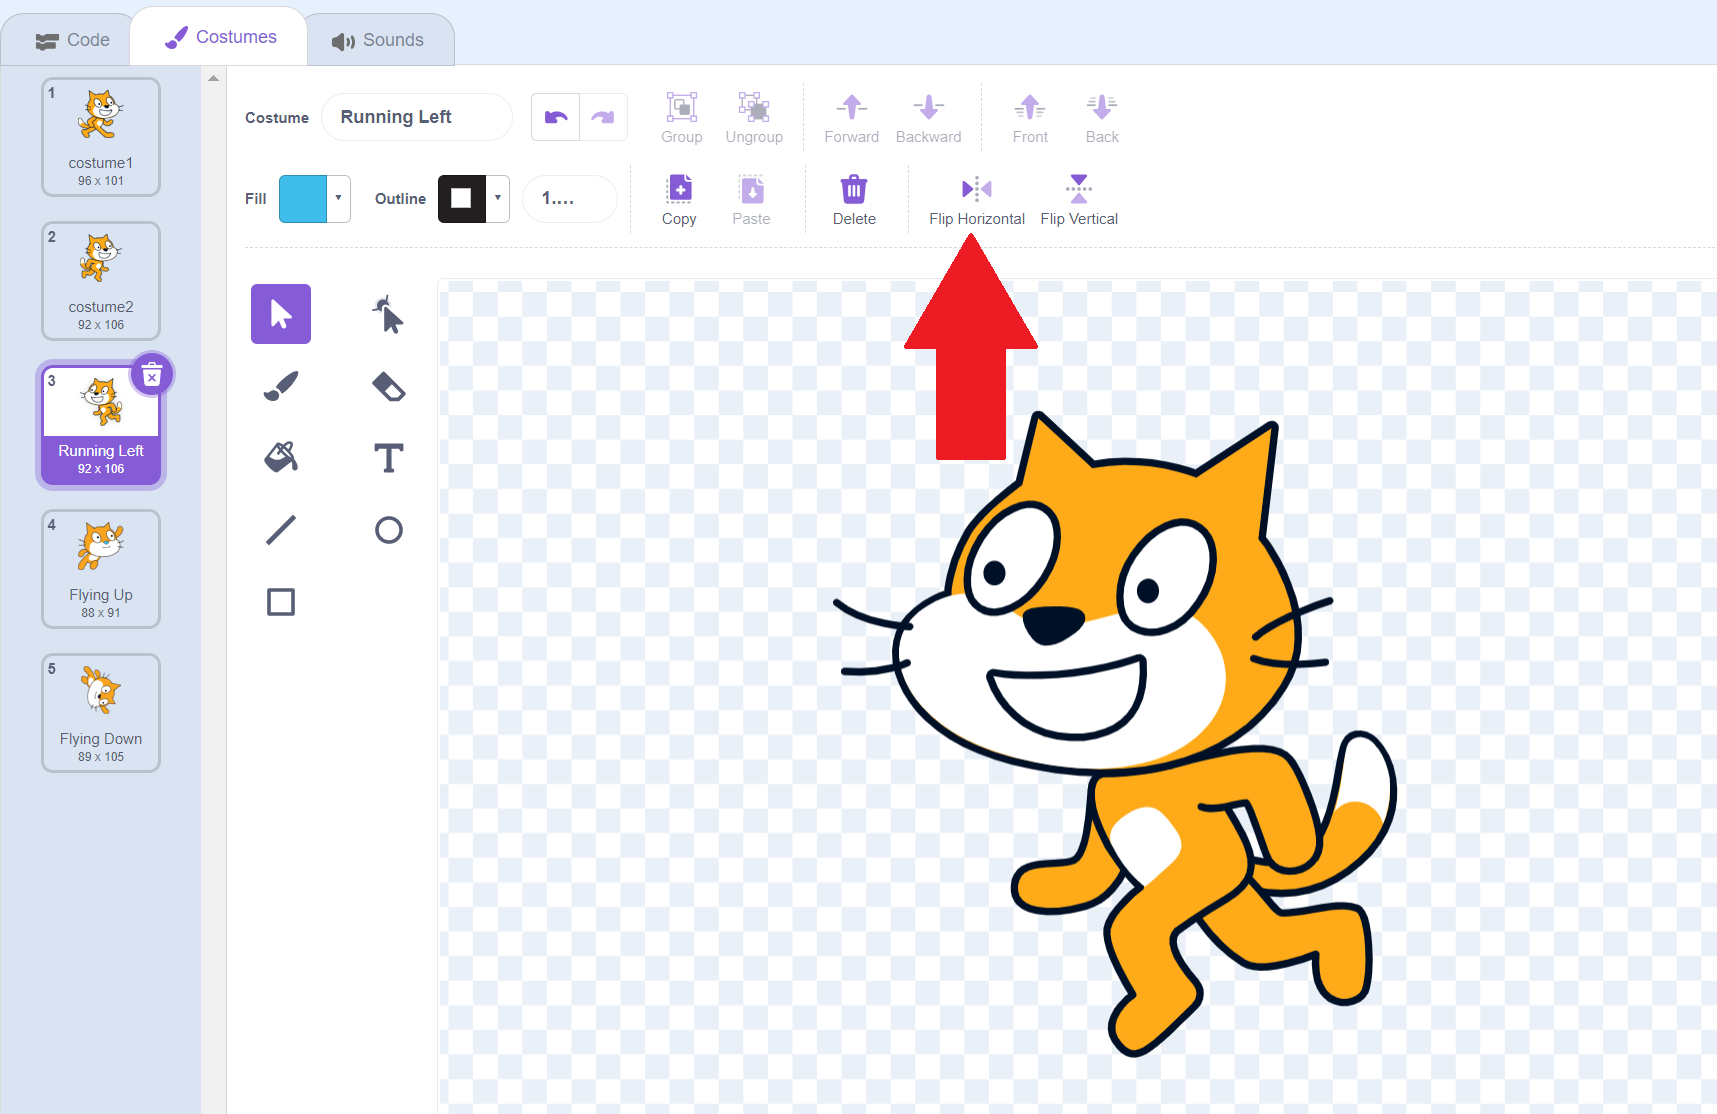
Now that you are on the select tool, you will see an option that says flip horizontal. Click that to make the cat face the other way!
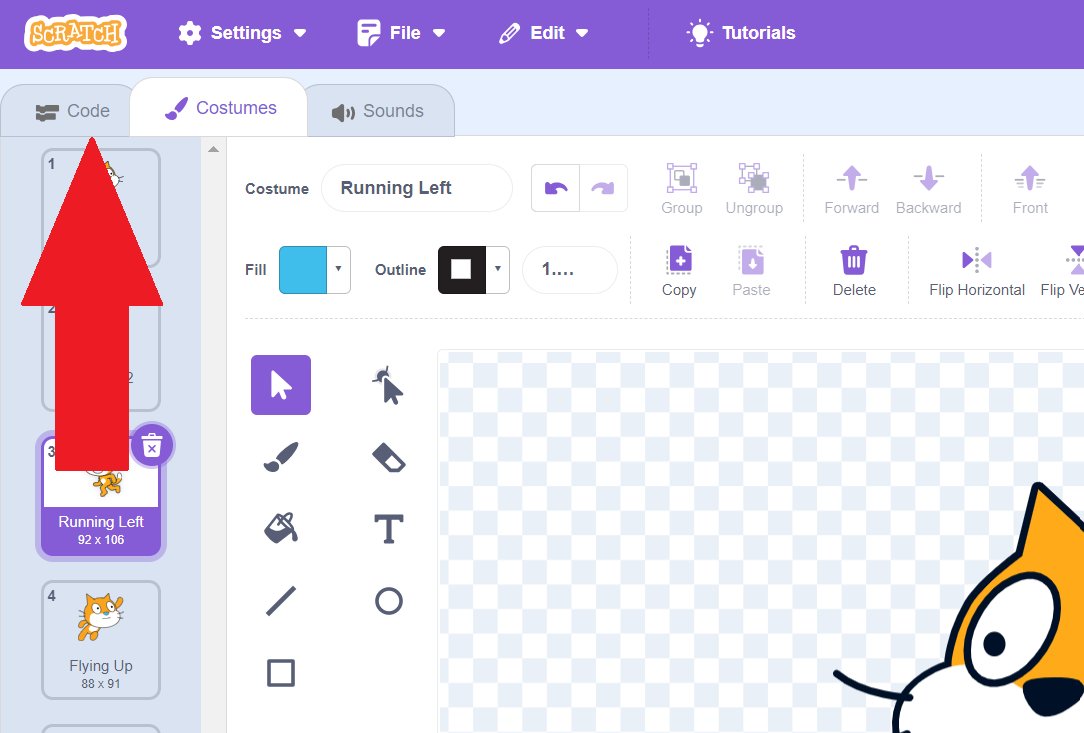
We now have a walking costume, and then a running/flying costume for each direction! Let's go back to our code so we can actually use these costumes. Do this by clicking the code tab in the upper left.
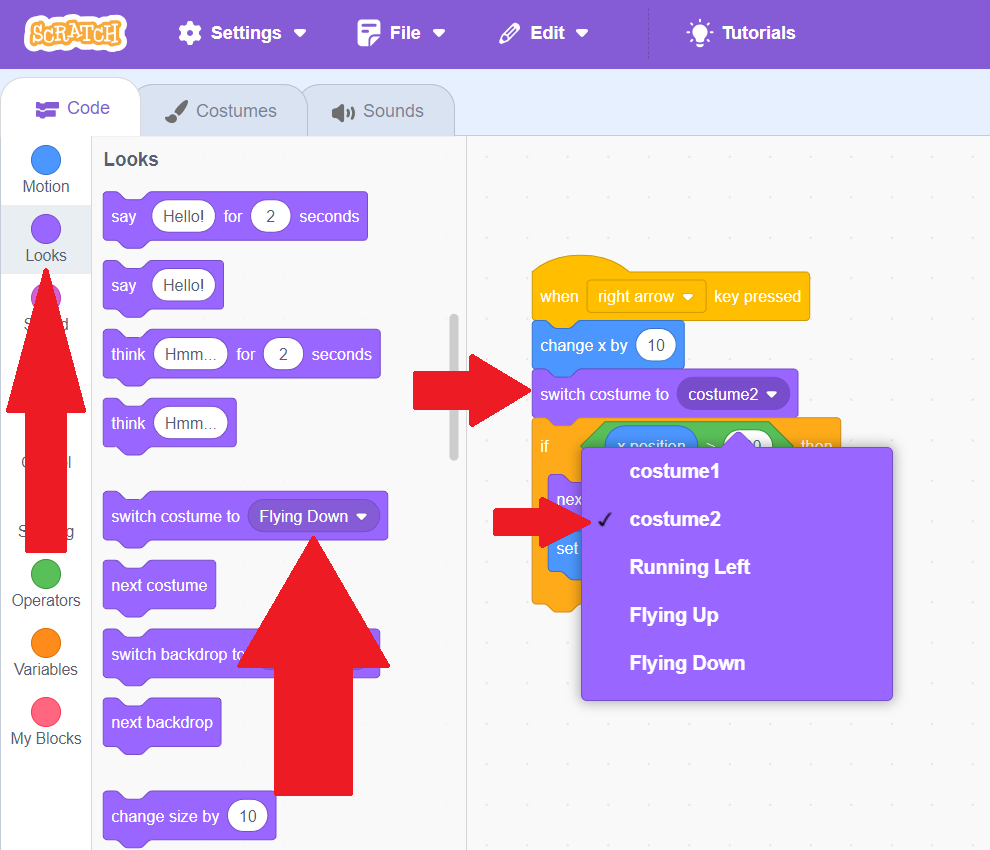
Now, we want to add costume changes to our key bindings. We can find this under "Looks", and it's called "Switch Costume To". Let's drag it to our move right block. We want it outside of our if block because it always happens, no matter where the sprite is. Then, choose costume2 from the dropdown.
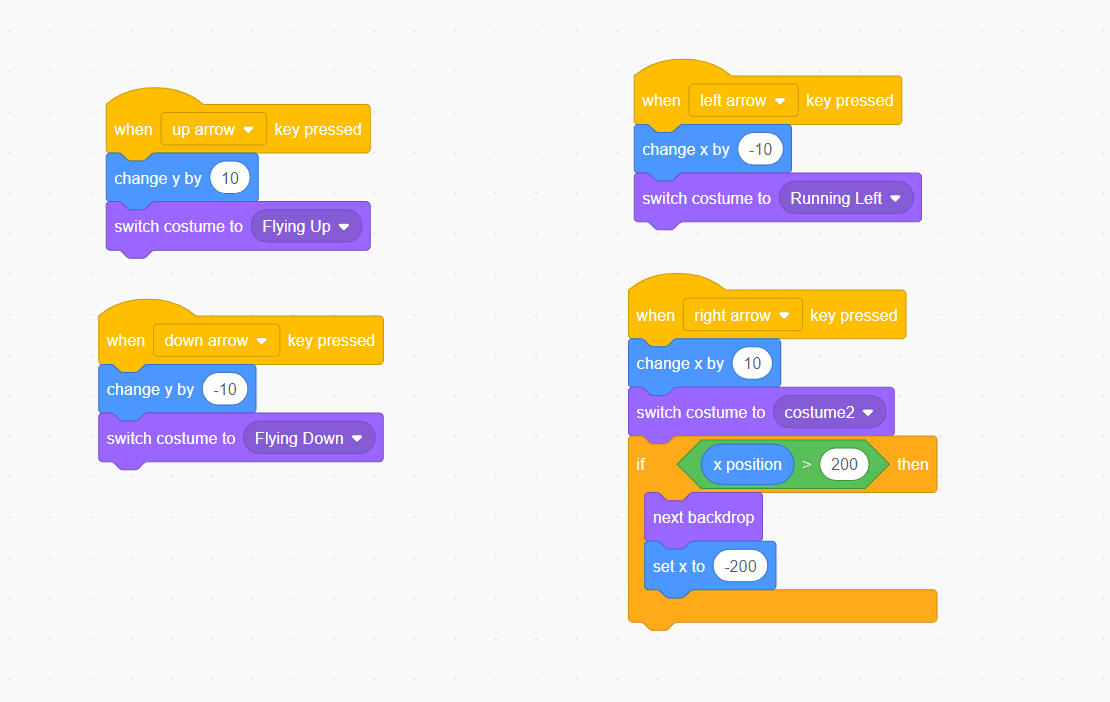
Now, let's add costumes to all of our key bindings, choosing "Flying Down" for our downward motion, "Flying Up" for our upward motion, and "Running Left" for our left motion. Then try moving around using your keys. The costume will change with each direction!
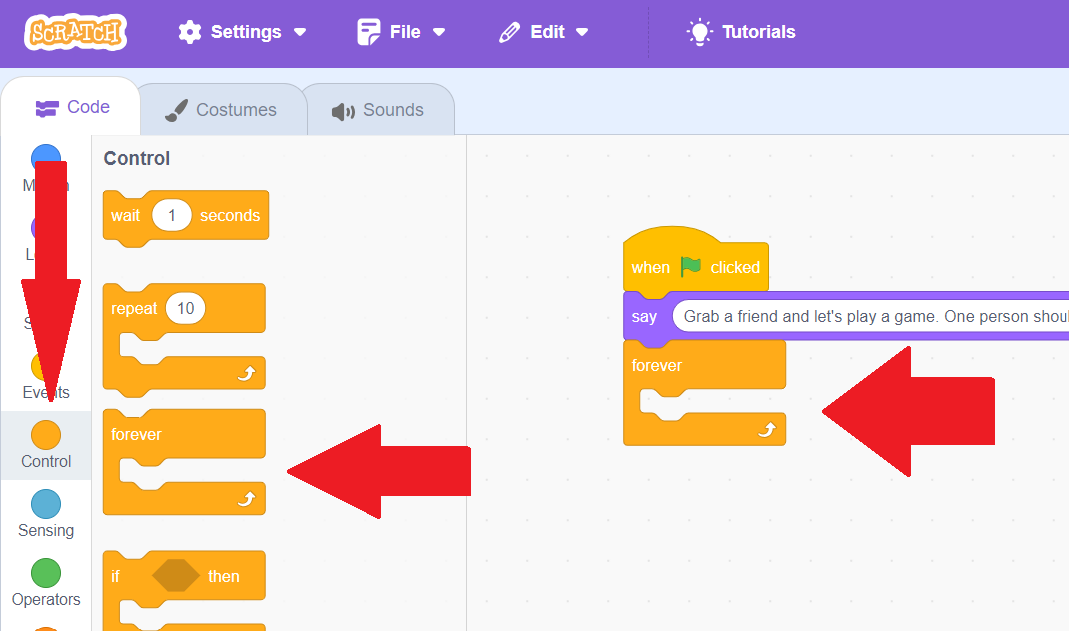
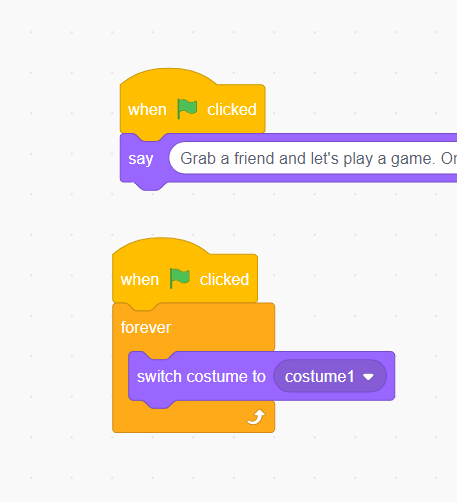
Now our sprite changes how he looks when moving in different directions, but how do we get him to go back to the default costume? To do this, we want to add code that always runs unless we are doing something to change it otherwise. For this to happen, we want to use a "Forever" block. Blocks within these blocks will run over and over again the whole time! Grab the Forever block from the "Control" section and add it to our green flag code.
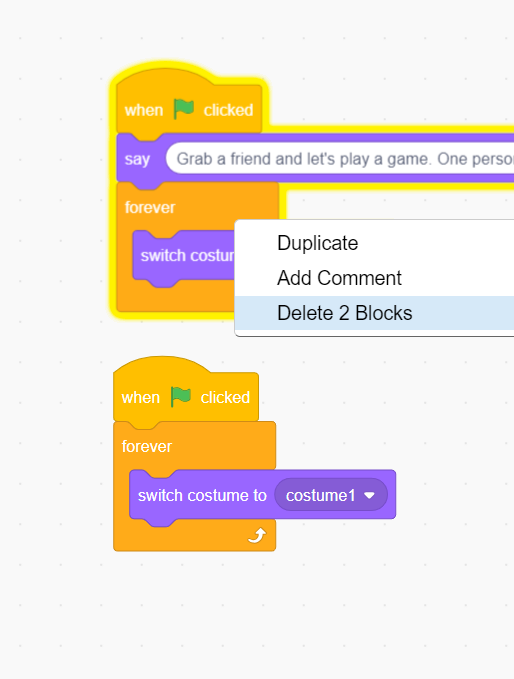
Right now, hitting the green flag doesn't put us in our default stance until after the dialogue finishes! But we want it to happen right away. But you'll see that you can't put blocks after the forever block. This is because this code keeps repeating forever! So let's instead make two versions of our event block. Right click it to duplicate it, and then right click and delete the dialogue box in one, and the forever block in the other
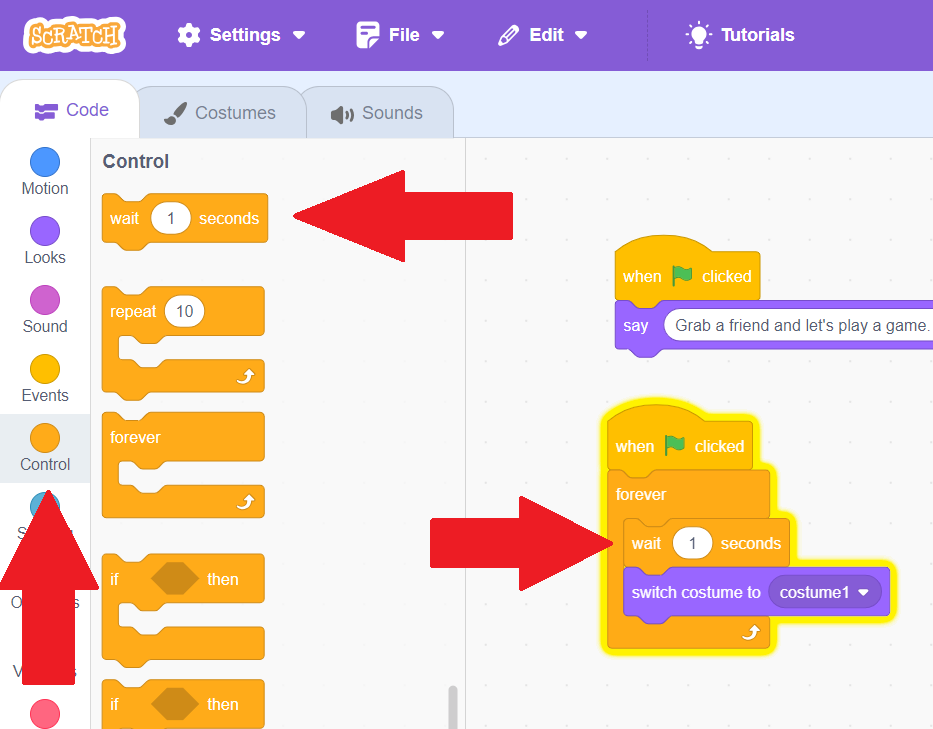
Once you've deleted it, hit the green flag. You'll switch to the default costume right away, and whenever you're not pressing a key! But it happen so fast you can barely see our other costumes. Let's add a delay before it switches back. To do this, we use a wait block.
Find the wait block in our "Control" section, and put it in our forever block before we switch back to the default costume. This will add a 1 second delay!
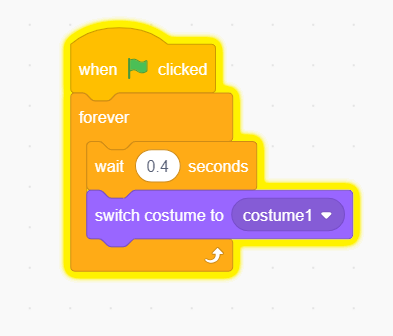
The delay is a little long now! Let's change the number in the wait to be less than a second. Try different values, such as 0.5, or 0.25, until you find the delay that you think looks the best!
You now know how to switch costumes! But what if you want to add more characters or objects? To do that, we'll have to add more sprites. Read on to find out how!
Adding and Removing Sprites
To add more characters and objects to our game or story, we need to add more sprites in our sprite pane. You'll see a purple add button that looks like a cat. You can hover over this to see all your options for uploading a sprite (upload, surprise me, paint, and choose), or you can just click it to choose a sprite. Try clicking it now!
On this page, you can choose other characters to add! If you hover your mouse over any of them, it will filter through all of the costumes that come with that sprite by default. For example, if you hover over Andie, you will see he can be holding the ball with one hand or both hands, or not holding the ball and either shooting or celebrating. To add a sprite to your code, simply click on it. Click on any one you want!
After you click one, you'll see the new sprite in your sprite pane, and your code area will automatically switch to be coding for the new sprite. We don't yet have any code for our new sprite. We can add any code we want, just like we did before! Even though we can only see the code for this sprite, the code for our other sprites will still run. Try pressing your movement keys and you will see that your cat still moves!
You can tie actions for both sprites to the same keys, and the action will occur for both of them. Try adding a movement key to your new sprite bound to the same key as a movement key for your cat sprite. You'll see that pressing that key makes them both move!
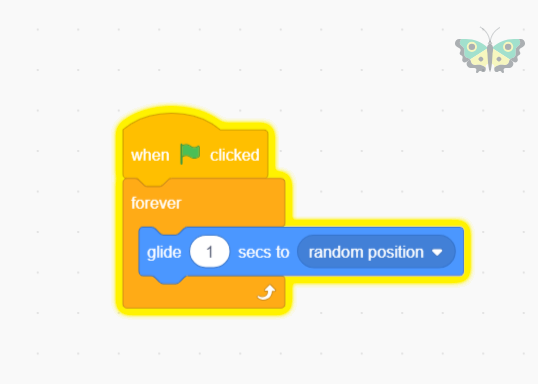
We can use the forever blocks here as well to make our other sprite move around without us having to control it. Let's use our "Event" category green flag block, our "Control" category forever block, and a "Motion" category block that makes it glide to a random position to make the sprite move on its own. Once you've put that code together, hit the green flag to see your sprite start to move!
Now that we can make a sprite move on its own, we can make this a one-player game! But we don't want to re-write the code that we already made on our old sprite. Luckily, we can copy code from one sprite to another! First, we want to return to the code for our cat. Click the cat in the sprite pane to return to the cat's code. Once you click it, it will turn purple, and you'll see your old code back in the code area.
Let's click and drag our "when this sprite clicked" code over to the sprite pane. When you hover over your new sprite, it will turn blue with a purple outline. Let go, and your code will be copied over!
We don't need our cat sprite anymore, so we can click the purple trash-can in the sprite pane to remove him.
It will automatically take you to the code for your next sprite. You'll see the code we copied is in the top-left corner. Hit the green flag and try to click your sprite. It mostly works, but our sprite is going right back to its gliding in the same position after jumping to the new one. That makes the game too easy! To fix this, we'll have to stop the gliding code when the sprite is clicked.
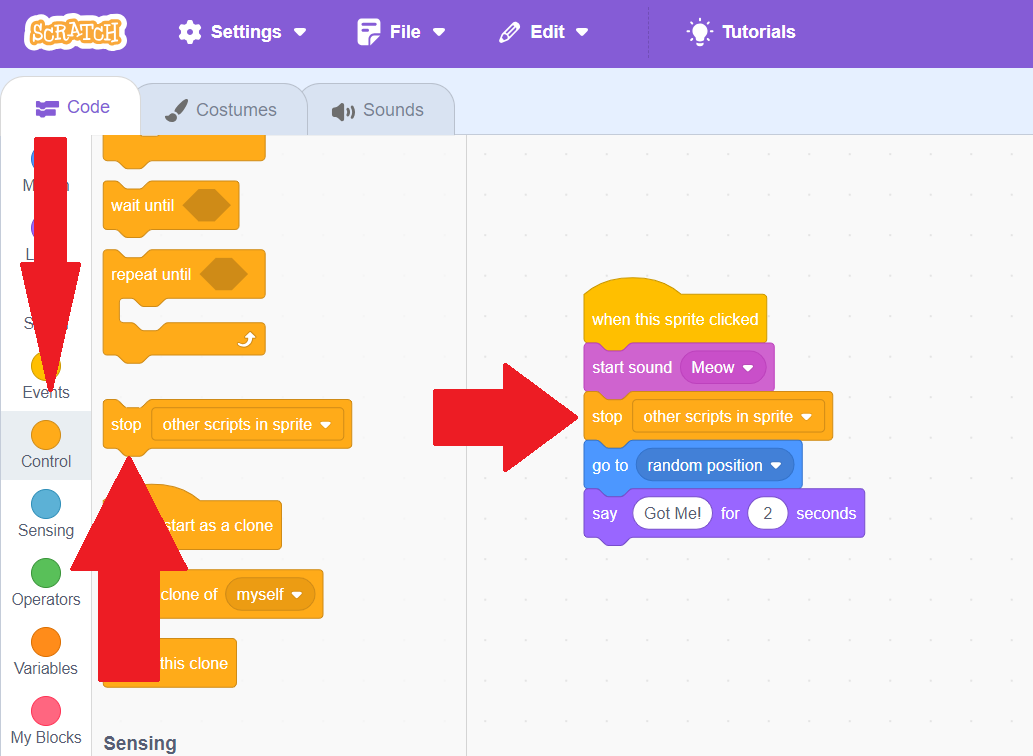
To stop the gliding code, we want to go to the "Control" category in our block palette. You'll see "Stop All". Change the select dropdown to say "Stop Other Scripts in this Sprite", and then put it right before our "Go To Random Position". This will stop the gliding before the sprite moves to a new location! Note that it won't let you put it in the middle of the code unless you change it to stopping other scripts, instead of stopping all. That's beacuse a stopping all code block must be at the end of a code, since it stops everything!
Now if we play our game, we have to start everything over again whenever we click our sprite! That's a lot of work, so let's make it so that our forever code starts up again after our sprite finishes saying "Got Me!". Right click on our forever block and then hit "duplicate", and put that code back at the end of our "When Sprite Clicked" code.
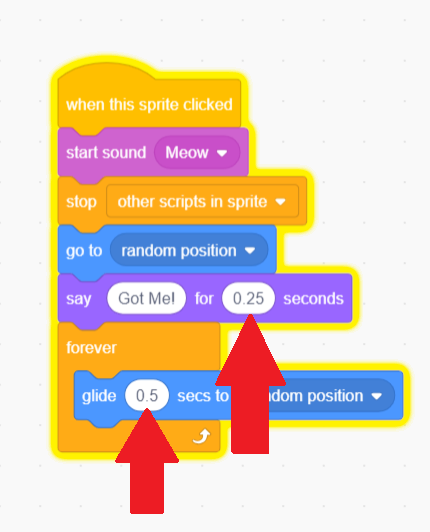
Our movement is now working again! Feel free to adjust the difficulty by making the glide time shorter, and make the wait time shorter between rounds by decreasing the time that the sprite says "Got Me!". Play around with the times, making them longer or shorter, until you are happy with your game.
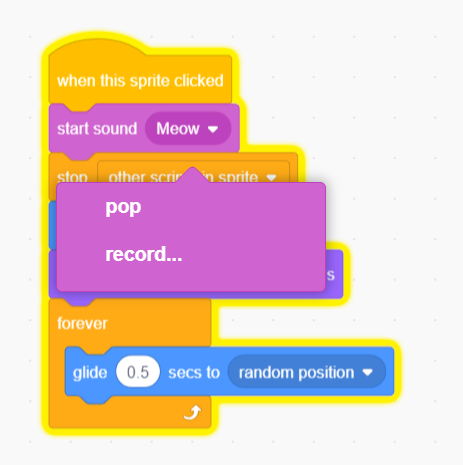
Finally, you'll notice the sound is gone! That's because different sprites can sometimes come with different sounds. Just select a new sound from the dropdown to get our sound working again.
We now have our game working, but the game isn't much fun without a way to keep score! We'll learn how to make our game keep score next.
Custom Variables & Keeping Score
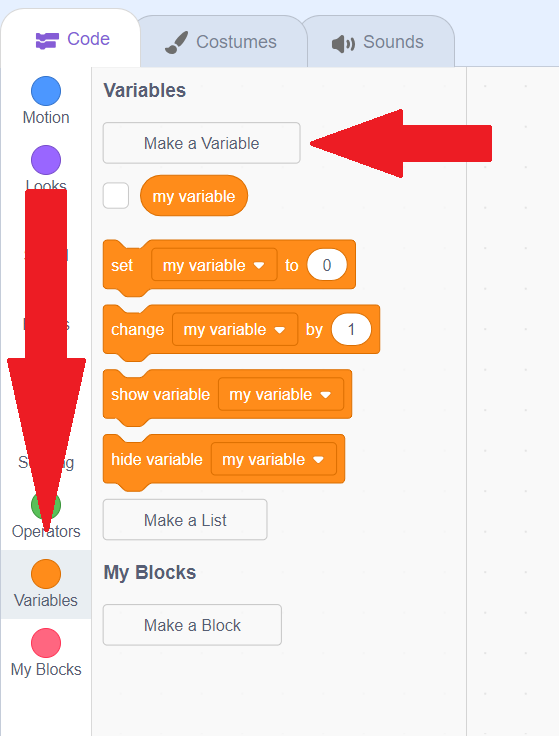
To track the score of our game, we will have to make our own variable that tracks what the score is! We can make our own variables in the dark orange "Variables" section of the code palette. Once you're there, hit the "Make a Variable" button.
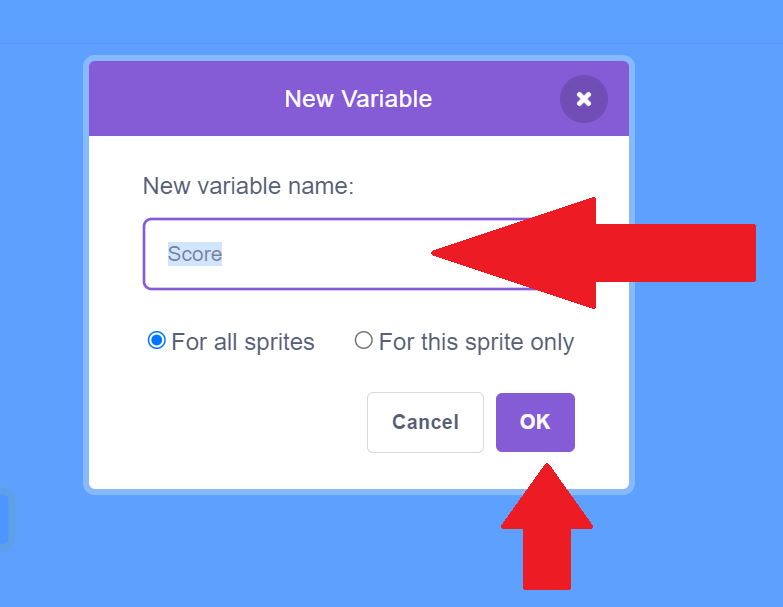
Once you hit the button, you will see a pop-up where you can make a name for our variable. You can call it whatever you want, such as "Score" or "Times Clicked". You can also choose whether your variable will be tracked for just one of the sprites, or for all of the sprites. When you're done, hit "OK".
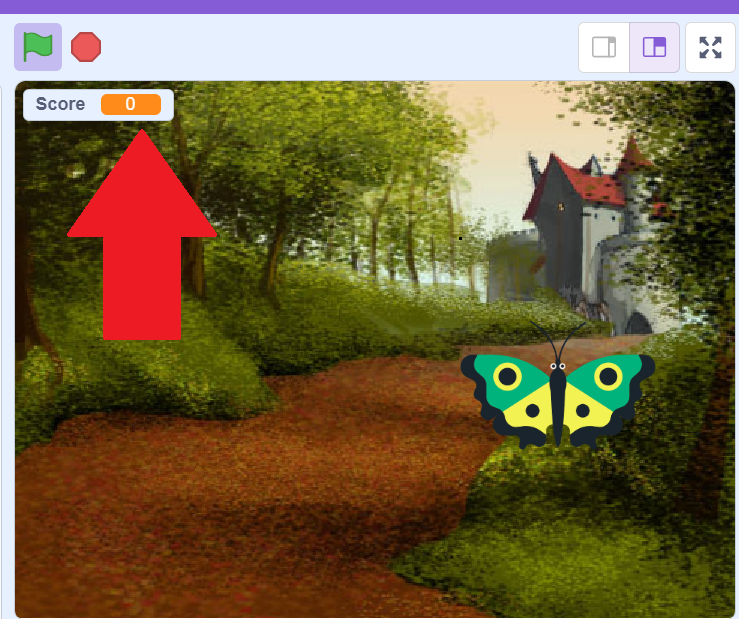
You will now see your variable on the stage, with a default of 0!
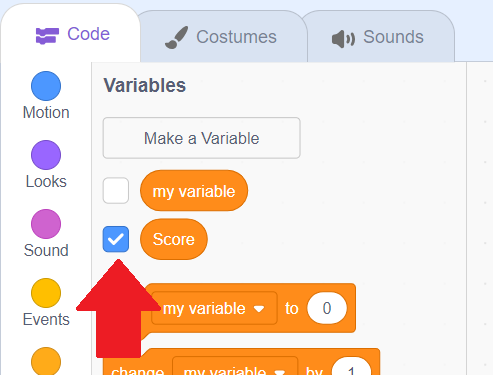
You will also see your variable show up in the list of variables in the block palette. There's a big blue checkmark next to it. You can click that checkmark to change whether the variable is shown or hidden. We want it to be shown, but you can try clicking it and then clicking it again to see it go away!
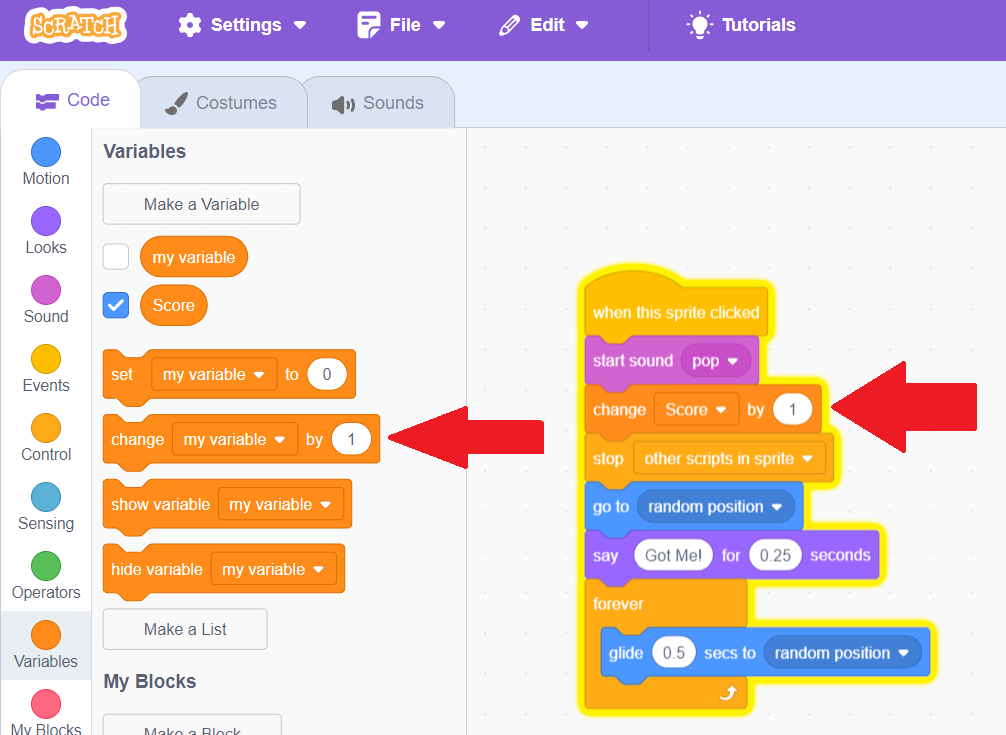
Now, we want to make our variable change when we click on the sprite! Let's drag the "Change my Variable by 1" block to our clicking sprite code, and then use the select dropdown to choose our "Score" variable. Then, try clicking your sprite. Each time you click it, the score will go up by 1!
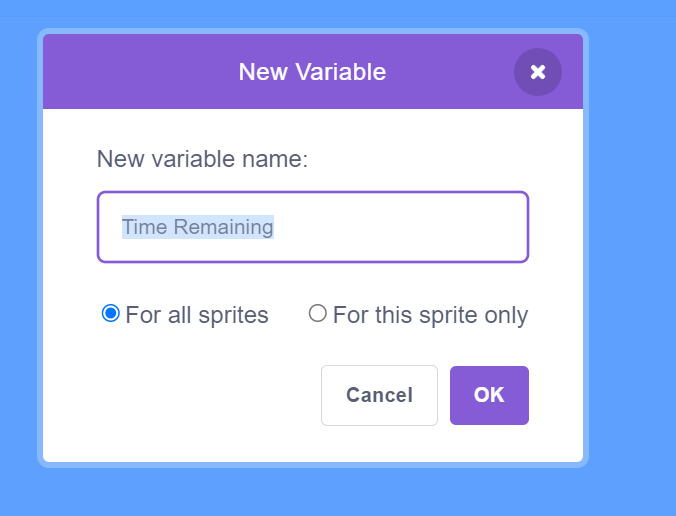
The score doesn't matter too much if you can play forever, so let's add a time limit. Hit "Make a Variable" again, and create a new variable called "Time Remaining"
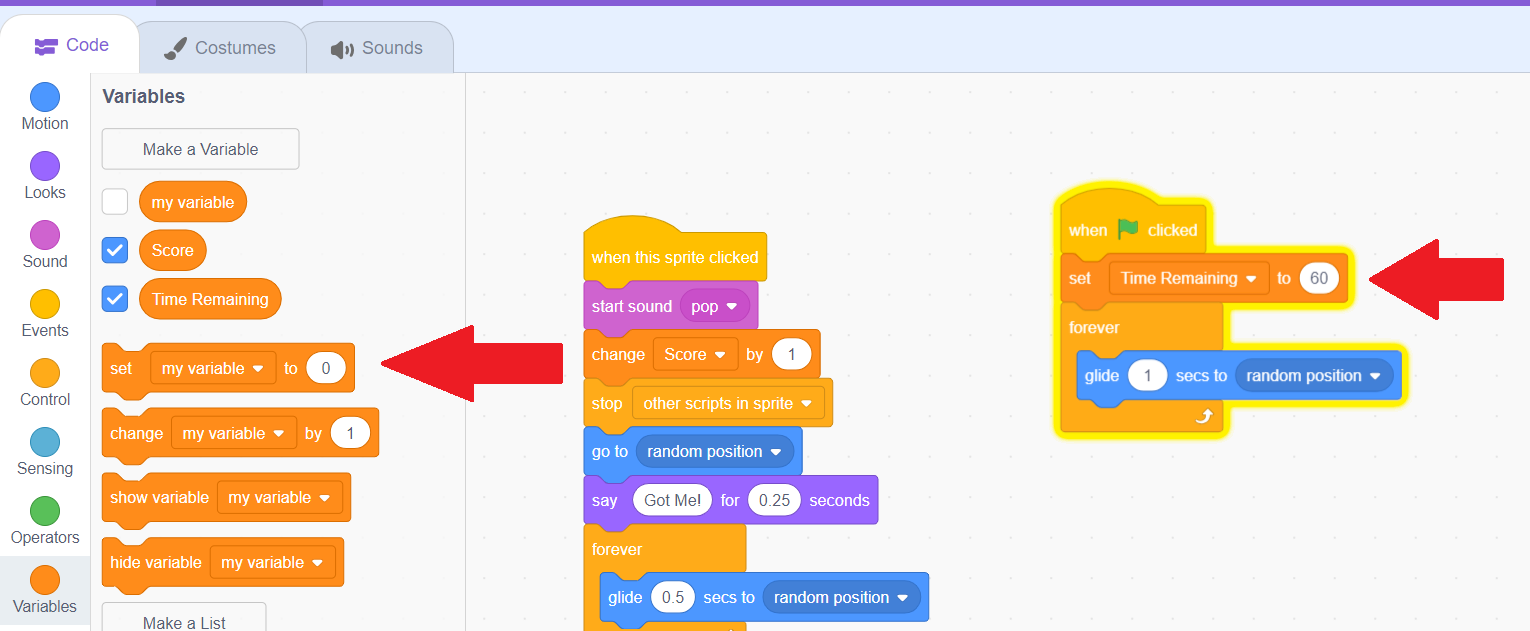
We don't want our time remaining to start at 0! To make our time start not at 0, we need to use our green flag event code to set our time when the game starts. Drag the block "Set My Variable to", and then drag it over to our green flag block. Choose how much time you want to give for your game. I chose 60, since there are 60 seconds in a minute. Then, try hitting the green flag, and you'll see your time remaining variable change!
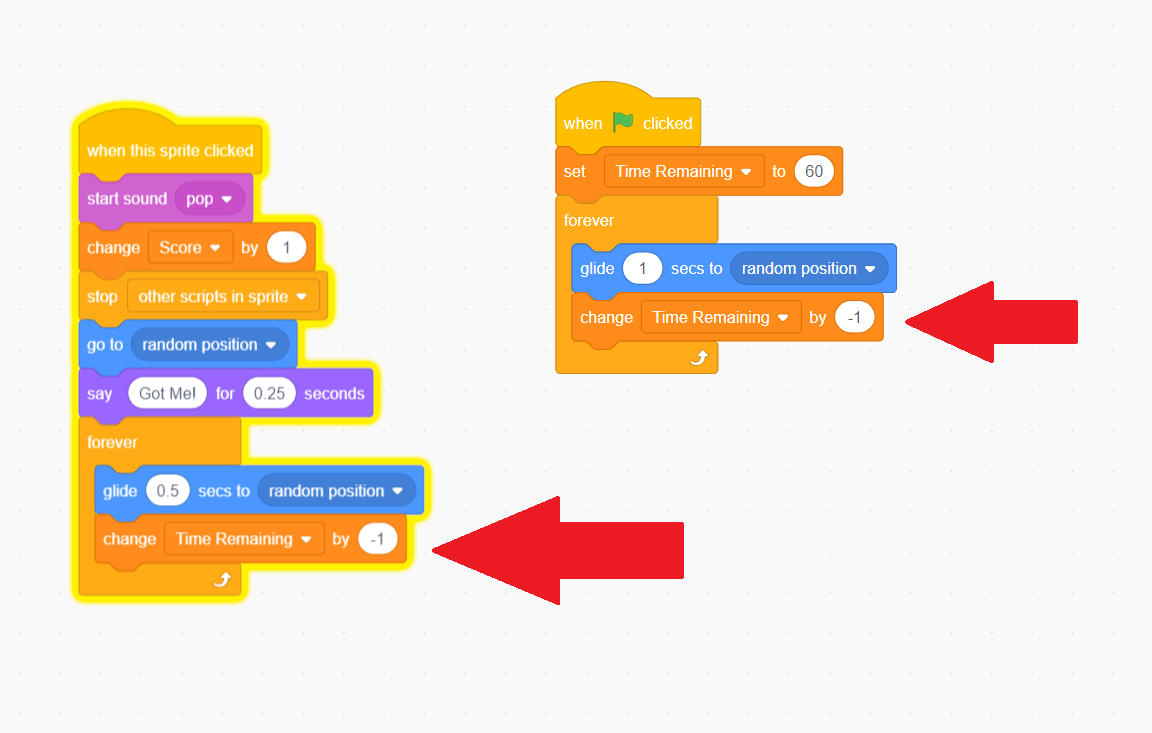
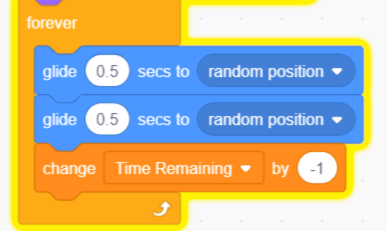
Now our time starts high, but it doesn't go down! We have to code the time going down ourselves. Let's add a change our time remaining variable by -1 to both of our forever blocks. So that it counts down!
This will work if our gliding is set to 1 second, like the game starts at. But once we click it, our gliding speeds up, and our time is now counting down every 0.5 seconds instead of every 1! Let's make sure we have enough glide blocks to last the full second, if our glide block is less than 1 second!
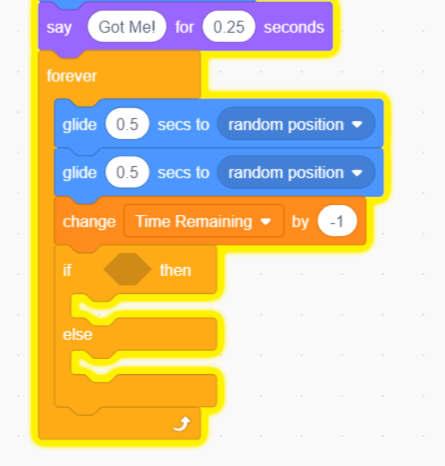
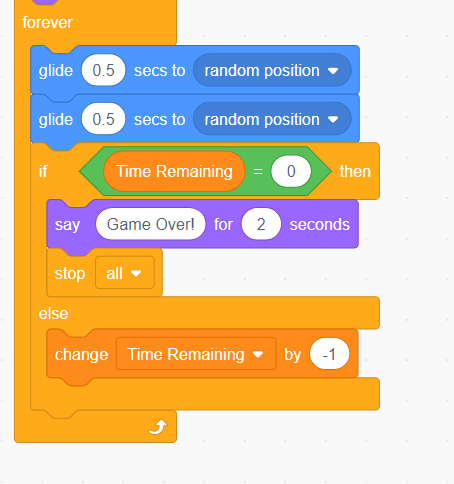
Our time is now counting down correctly, but once it hits 0, it keeps going to the negative numbers! We can use our if statements to make our game stop when the time hits 0. We'l use an if else statement. These are similar to if statements, but with this code, if the statement is true, one thing happens, and if the statement is false, another thing happens. Let's add one to our forever block. You can find them under "Control", which is light orange!
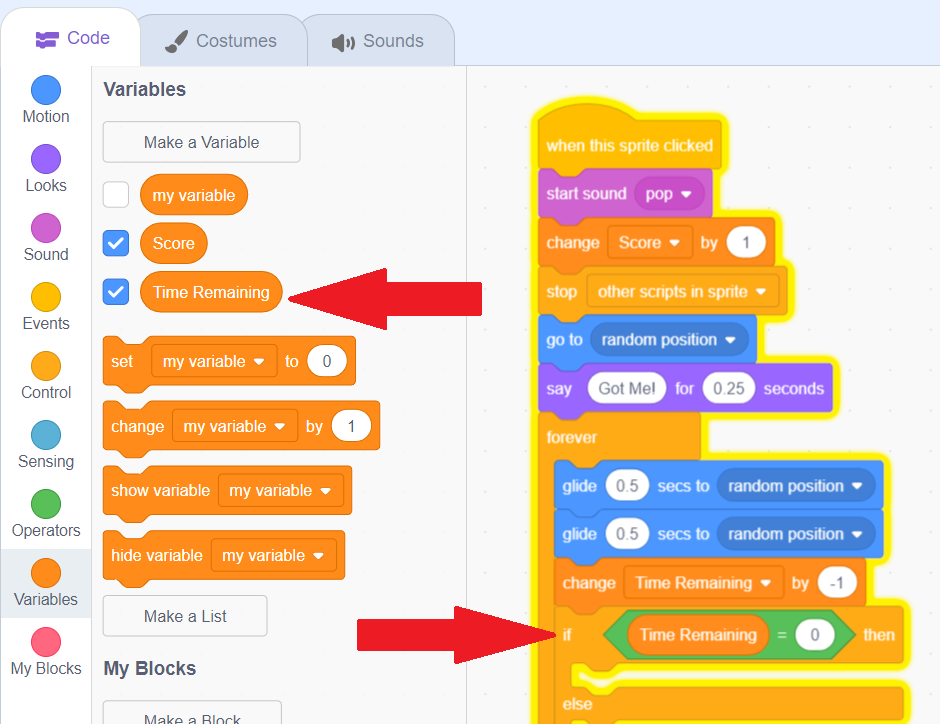
Go to the green operators, and choose a = operator to put in our diamond. Then, let's go back to the dark orange variables, and drag our "Time Remaining" variable into the block. For the second part of our operator, let's choose 0, to check if time is equal to 0.
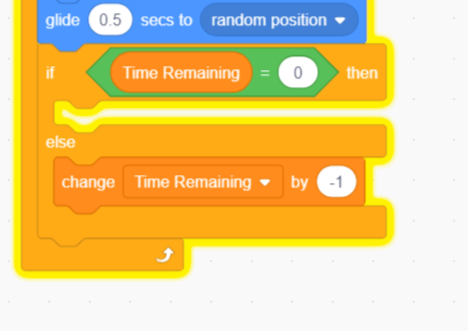
We only want our time to go down if our time is NOT less than 0. So let's put our time reduction code within the "else" portion.
Then, let's decide what we want to happen when time is at 0 at the game is over! I chose that my sprite says "Game Over", which can be found in the purple "Looks" section. Then, I use "stop All", so that my forever block stops repeating!
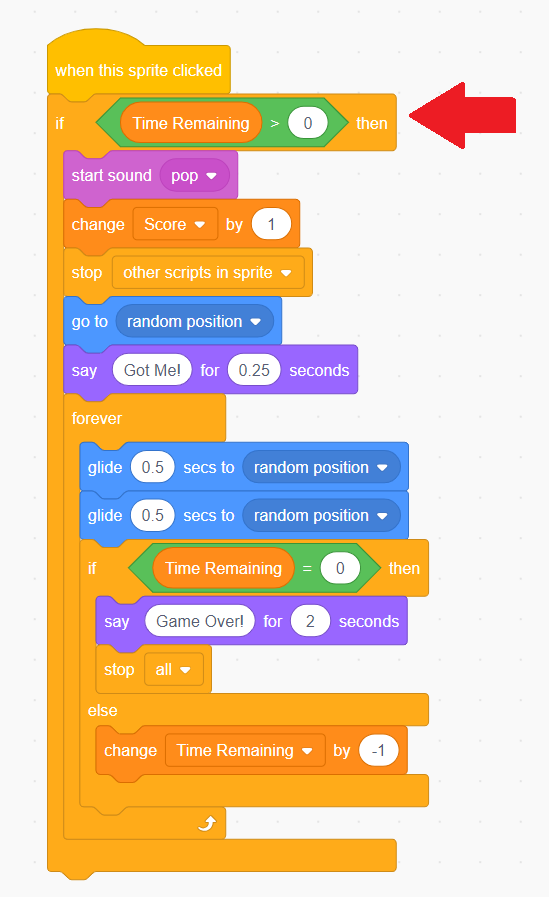
The player can still keep going if they just click the sprite again! We don't want that to happen, so I'm going to put all of my Sprite Clicked code in a big if block, so the code only runs if time is more than 0. That way, nothing will happen unless we have more time!
Now the player can only start over if they hit the green flag to play again, but their score stays the same! Let's add a set Score to 0 with our green flag, so they truly start over.

We now have a game with an end! But we need to add back our instructions to the start. Now that we know more about variables, let's make our instructions fancier by adding some user input!
User Input & Join Statements
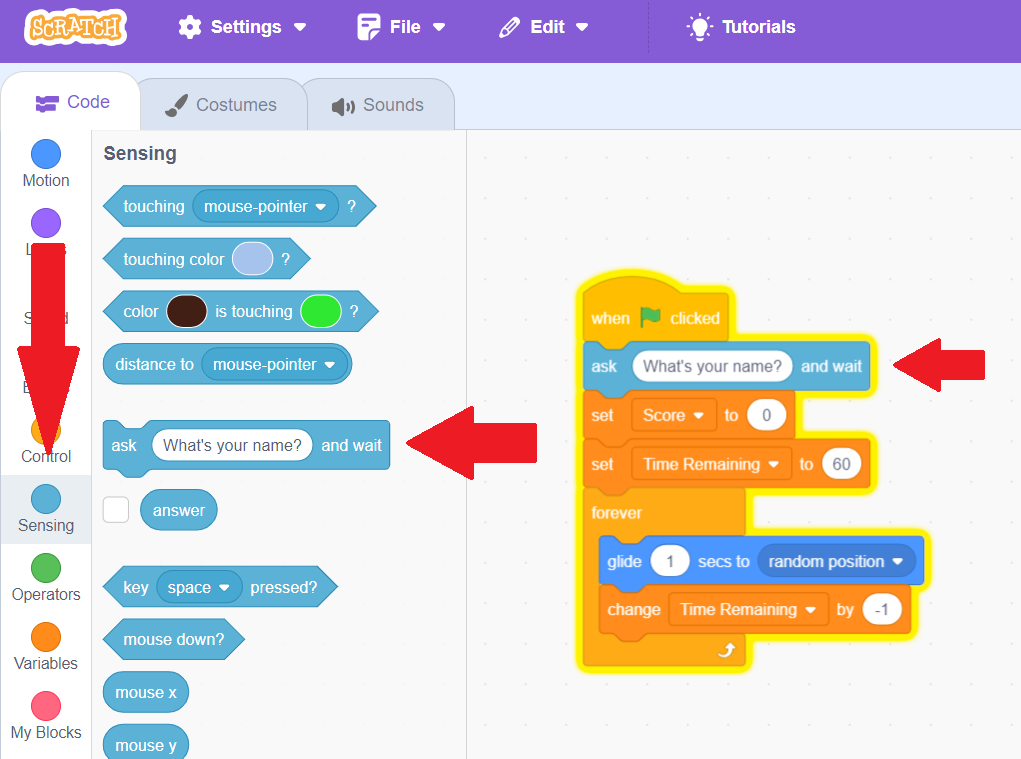
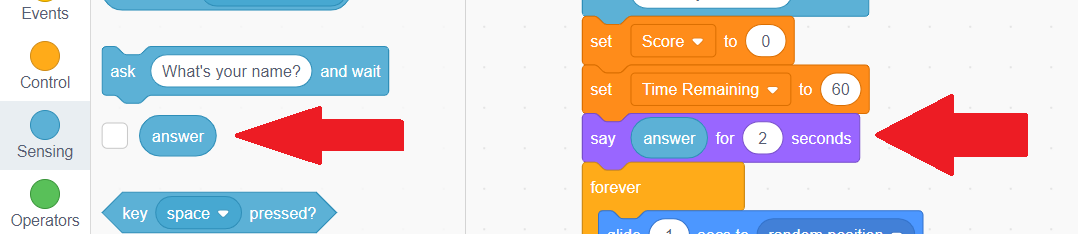
Sometimes, we want to customize games by having the user be able to put in information such as their name. This is called "User Input". In Scratch, we can add this with the "ask" block, which is found under the light blue "Sensing" category. Let's drag this to our green flag code at the top, and then try hitting the green flag.
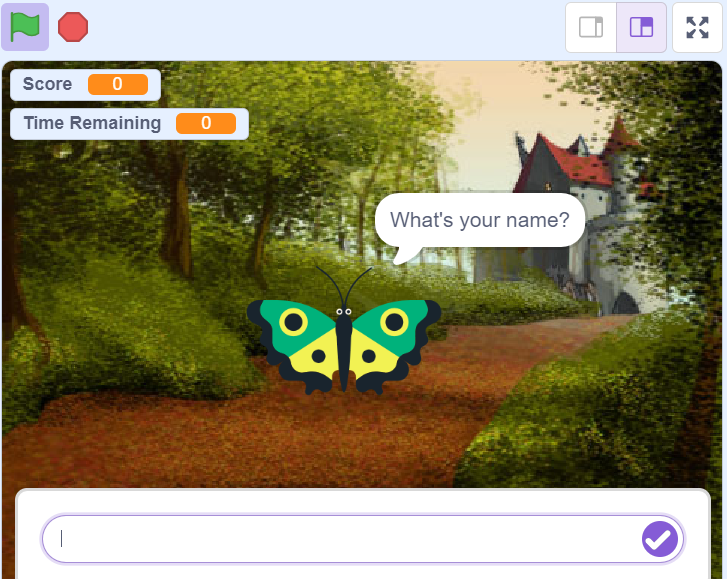
Now, when you click the green flag, there will be a text box at the bottom of the stage. The game won't start until you type it in and click the purple checkmark.
But we aren't doing anything with the name! This is what the "answer" variable underneath the ask is for. Go to the purple "Looks" area and add a "Say" block, and then put the light blue sensing answer variable in the place of the text.
What if we want to say more than just the name? Once we put the answer variable in the say block, we can't add text! If we want to combine variables and text, we have to use join statements. These are under the green "Operators". Let's put the join statement in our say block instead.

In one part of our join statement, we can put text, and in the other, we can put our answer, and the join statement will combine them together! Note that you may want to put a space after your text, so that there's a space before the name!

You now know how to gather user input and put it in your code. Now let's save what we've done!
Saving and Sharing Your Project
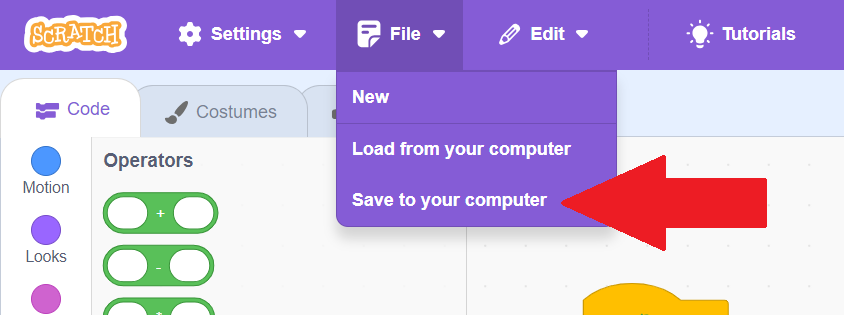
After all the hard work we've put into our project, we'll want to save it! The easiest way is to hit "File" in the top left, and then choose "Save to your computer". This will save it to your downloads folder! Then, if you want to work on it later, you can hit the "File" button and choose "Load from your Computer" to continue working on it.
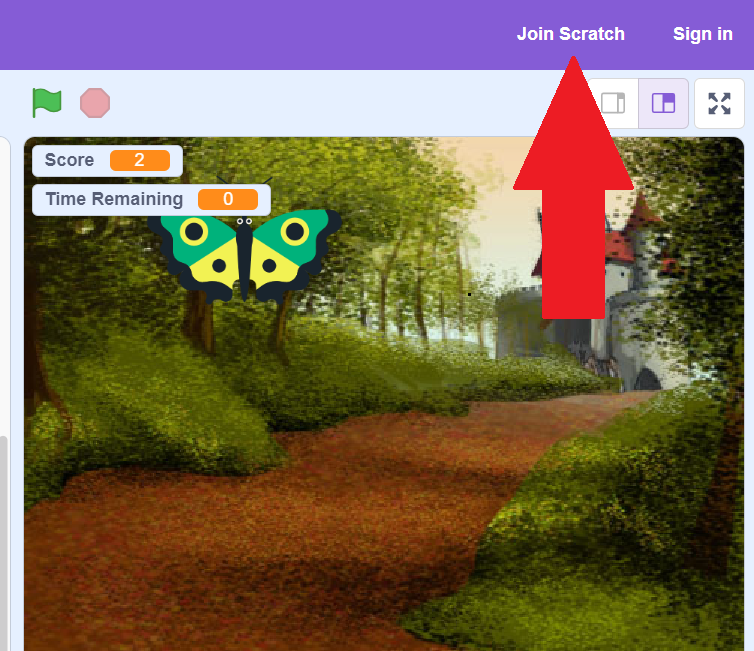
What if you want to work on your project from multiple computers, or you don't own the computer that you coded the project on? Never fear, Scratch will save your projects for you if you make an account, although this is completely optional. Just click "Join Scratch" in the upper right corner. Don't worry, clicking this won't make you lose your progress.
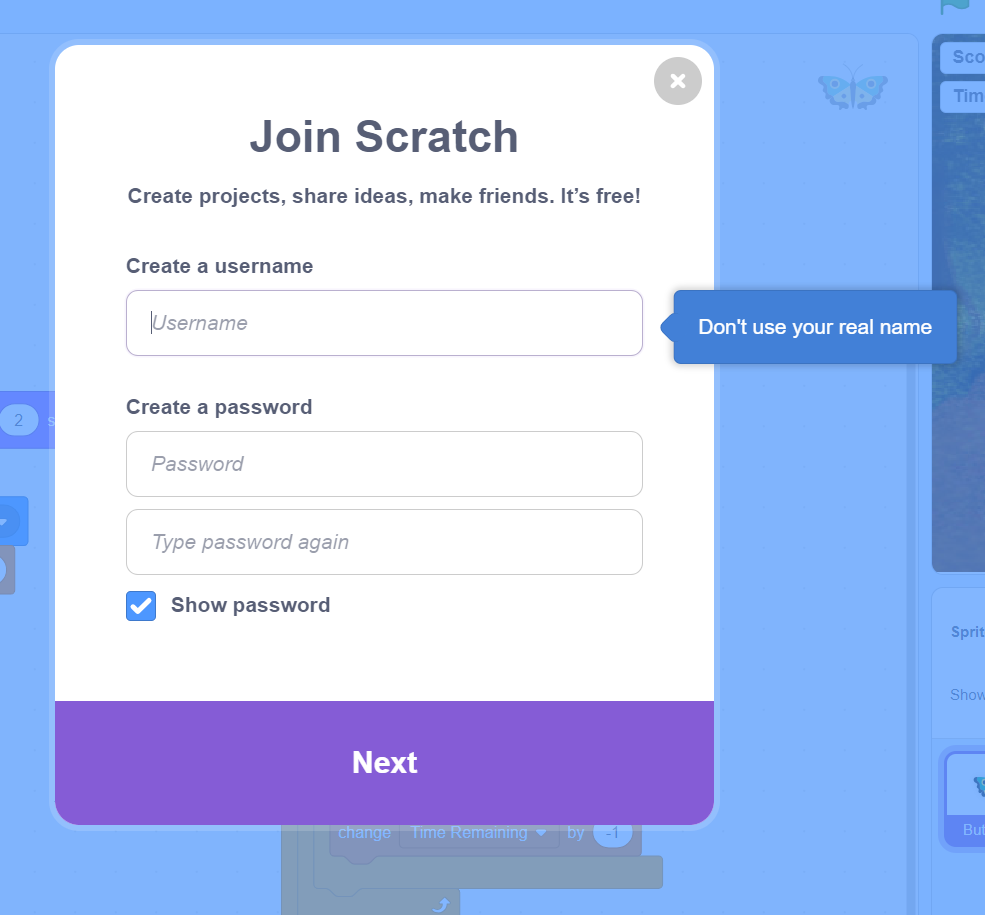
Then, just fill out the fields to create an account! If you already have one, you should hit "Sign In" instead and log in.
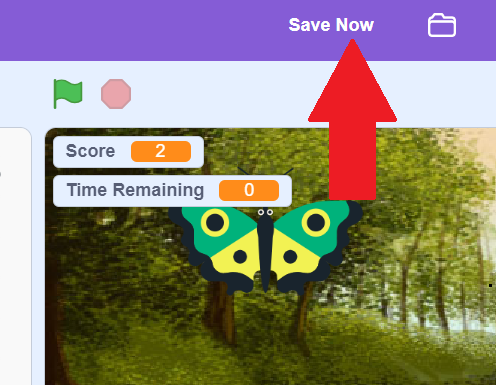
Once your account is made, you'll instead see "Save Now" and your account in the top right. Hit "Save Now" to save!
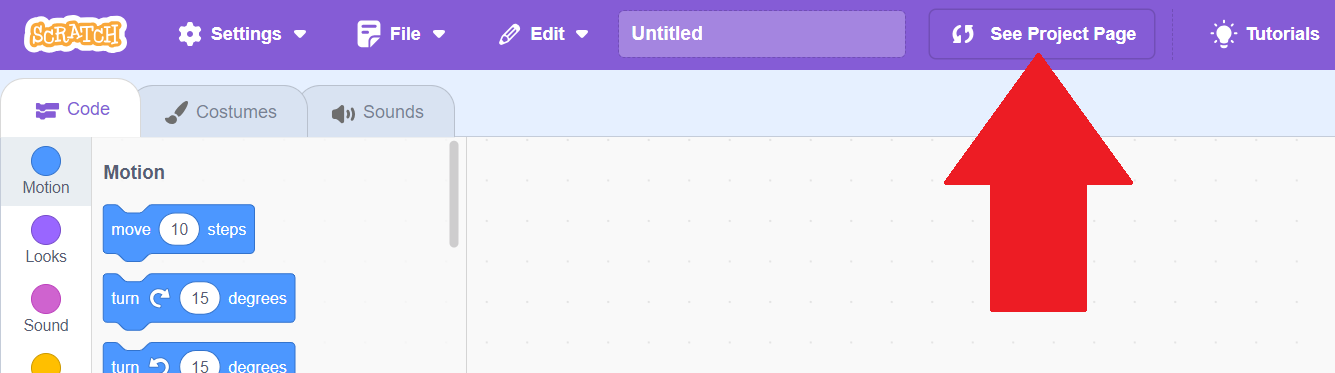
If you make an account, you can also publish your project once it's complete! To do so, first go to your project page.
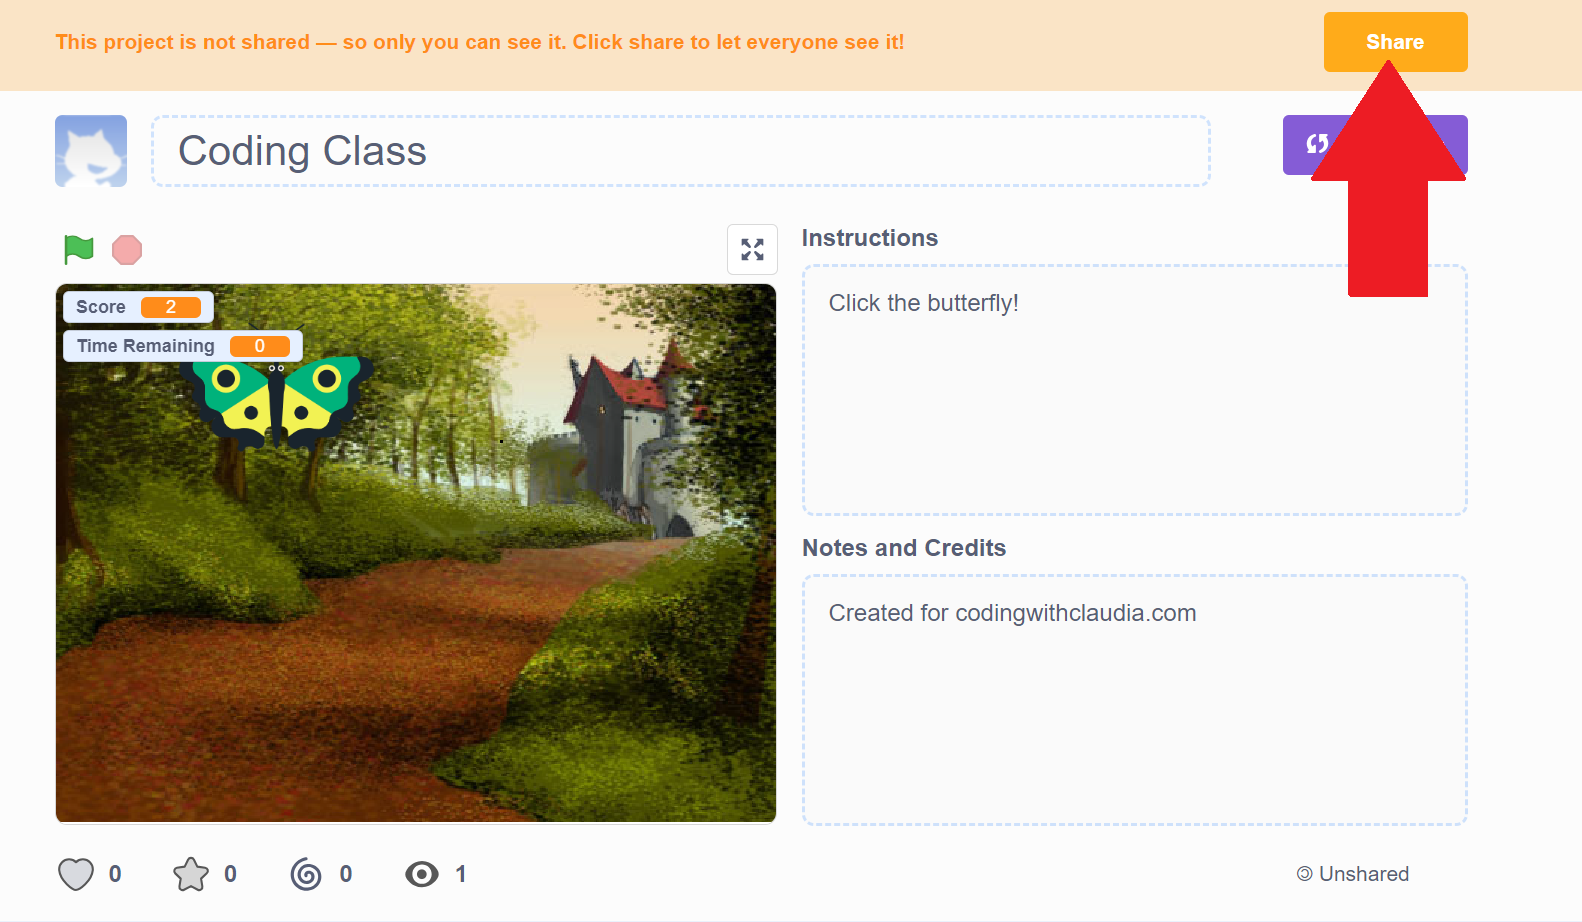
On your project page, you can name your project, add instructions, and add other notes. Hit the orange "share" button to share it.
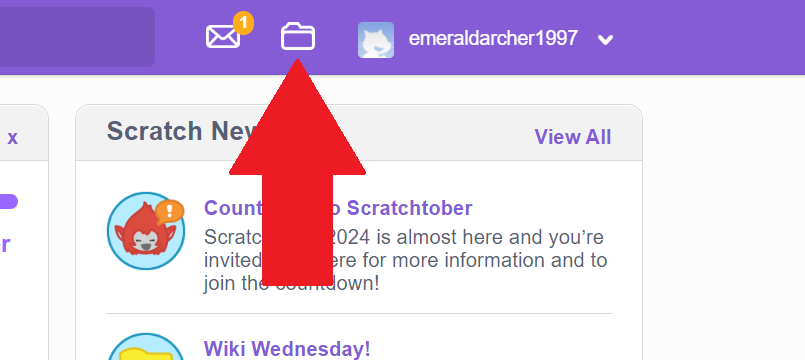
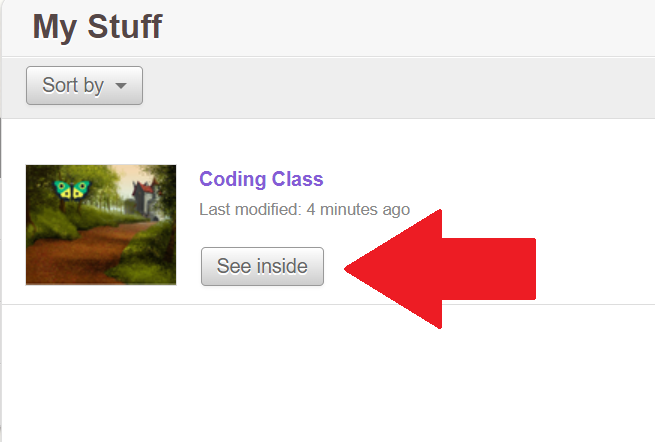
To get back to your project later, simply go back to the scratch website and login! You'll see a folder icon in the top right. Click that to see your projects.
From that page, just find your project on the list and then click "See Inside" to get back to coding!
Your project is now all saved! You can go and make a new game by clicking "Create" in the top left, or keep playing this game and fixing errors, which in coding terms, we call "bugs". Can you find any in this program? (Hint: What happens if time runs out when the user has never clicked the butterfly?)
Keep coding and have fun!